在 Pandas 中使用 groupby 后绘制多个时间序列

8
假设我对 valgdata DataFrame 进行了以下分组操作:
grouped_valgdata = valgdata.groupby(['news_site','dato_uden_tid']).mean()

现在我理解了:

                                  sentiment
news_site          dato_uden_tid           
dr.dk              2015-06-15     54.777183
                   2015-06-16     54.703167
                   2015-06-17     54.948775
                   2015-06-18     54.424881
                   2015-06-19     53.290554
eb.dk              2015-06-15     53.279251
                   2015-06-16     53.285643
                   2015-06-17     53.558753
                   2015-06-18     52.854750
                   2015-06-19     54.415988
jp.dk              2015-06-15     56.590428
                   2015-06-16     55.313752
                   2015-06-17     53.771377
                   2015-06-18     53.218408
                   2015-06-19     54.392638
pol.dk             2015-06-15     54.759532
                   2015-06-16     55.182641
                   2015-06-17     55.001800
                   2015-06-18     56.004326
                   2015-06-19     54.649052

现在,我想为每个新闻网站创建一个时间序列,在X轴上是“dato_uden_tid”,在Y轴上是情感值。
如何最好、最简单地实现这一目标呢?
谢谢!
2个回答

11

以下是使用Pandas和Matplotlib进行更细粒度控制的解决方案。

首先,我提供了一个生成用于测试的随机数据框的函数。重要的是,它创建了三个可概括为更抽象问题的列:

  • my_timestamp是一个包含时间戳的datetime
  • my_series是您想要应用groupby的字符串标签
  • my_value是在my_timestamp时记录为my_series的数值

将列名称替换为您拥有的任何数据框。

def generate_random_data(N=100):
    '''
    Returns a dataframe with N rows of random data.
    '''
    list_of_lists = []
    labels = ['foo', 'bar', 'baz']
    epoch = 1515617110
    for _ in range(N):
        key = random.choice(labels)
        value = 0
        if key == 'foo':
            value = random.randint(1, 10)
        elif key == 'bar':
            value = random.randint(50, 60)
        else:
            value = random.randint(80, 90)
        epoch += random.randint(5000, 30000)
        row = [key, epoch, value]
        list_of_lists.append(row)
    df = pd.DataFrame(list_of_lists, columns=['my_series', 'epoch', 'my_value'])
    df['my_timestamp'] = pd.to_datetime(df['epoch'], unit='s')
    df = df[['my_timestamp', 'my_series', 'my_value']]
    #df.set_index('ts', inplace=True)
    return df

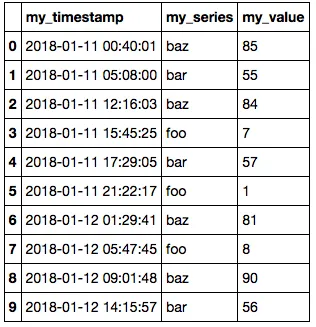
这里是一些生成的示例数据:

enter image description here

下面的代码将运行groupby并绘制漂亮的时间序列图表。

def plot_gb_time_series(df, ts_name, gb_name, value_name, figsize=(20,7), title=None):
    '''
    Runs groupby on Pandas dataframe and produces a time series chart.

    Parameters:
    ----------
    df : Pandas dataframe
    ts_name : string
        The name of the df column that has the datetime timestamp x-axis values.
    gb_name : string
        The name of the df column to perform group-by.
    value_name : string
        The name of the df column for the y-axis.
    figsize : tuple of two integers
        Figure size of the resulting plot, e.g. (20, 7)
    title : string
        Optional title
    '''
    xtick_locator = DayLocator(interval=1)
    xtick_dateformatter = DateFormatter('%m/%d/%Y')
    fig, ax = plt.subplots(figsize=figsize)
    for key, grp in df.groupby([gb_name]):
        ax = grp.plot(ax=ax, kind='line', x=ts_name, y=value_name, label=key, marker='o')
    ax.xaxis.set_major_locator(xtick_locator)
    ax.xaxis.set_major_formatter(xtick_dateformatter)
    ax.autoscale_view()
    ax.legend(loc='upper left')
    _ = plt.xticks(rotation=90, )
    _ = plt.grid()
    _ = plt.xlabel('')
    _ = plt.ylim(0, df[value_name].max() * 1.25)
    _ = plt.ylabel(value_name)
    if title is not None:
        _ = plt.title(title)
    _ = plt.show()

这里是一个例子调用:

df = generate_random_data()

plot_gb_time_series(df, 'my_timestamp', 'my_series', 'my_value',
                    figsize=(10, 5), title="Random data")

这里是生成的时间序列图:

输入图片描述


11

我有点感到有趣,因为这个问题抓住了我正在做同样的事情。

你可以做类似这样的事情

valgdata\
    .groupby([valgdata.dato_uden_tid.name, valgdata.news_site.name])\
    .mean()\
    .unstack()

这将

  • 反转groupby操作

  • 将新的站点列展开

要绘图,只需紧接着之前的片段输入.plot()

valgdata\
    .groupby([valgdata.dato_uden_tid.name, valgdata.news_site.name])\
    .mean()\
    .unstack()\
    .plot()

1
谢谢!正是我想要的! - Henrik Holm

网页内容由stack overflow 提供, 点击上面的
可以查看英文原文,
原文链接