如何使用pydicom访问DICOM文件中的RGB像素数组?

5
我会尝试翻译一下您提供的内容,如下:

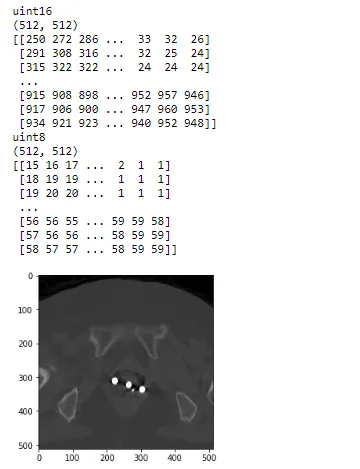
我试图访问一个DICOM文件的RGB像素数组,但不确定是否使用了任何压缩方式。提取灰度像素数组完全没有问题。

然而,在使用...

import dicom
import numpy as np

data_set = dicom.read_file(path)
pixel_array = data_set.pixel_array
size_of_array = pixel_array.shape

if len(size_of_array ) == 3:     
    chanR = pixel_array[0][0:size_of_array[1], 0:size_of_array[2]]
    chanG = pixel_array[1][0:size_of_array[1], 0:size_of_array[2]]
    chanB = pixel_array[2][0:size_of_array[1], 0:size_of_array[2]]
    output_array = (0.299 ** chanR) + (0.587 ** chanG) + (0.114 ** chanB)

目标是将其转换为通用灰度数组。不幸的是,结果数组output_array不包含正确的像素数据。内容不是错误缩放,而是空间上受到干扰。问题出在哪里?


1
也许是BGR而不是RGB? - Divakar
1
不是的,相应的DICOM标签显示为“RGB”,模态是“OT”表示其他,这是患者报告转换为图像格式。结果图像的分辨率和大小都很合适。但是每个通道似乎只包含部分空间信息。 - Andreas
1
pixel_array.shape 是什么? - Warren Weckesser
1
相应的DICOM标签显示为“RGB”。如果您在谈论“光度解释”,那并不意味着顺序。 - Amit Joshi
1
在我的情况下,形状为(3,m,n)。 - Andreas
显示剩余3条评论
3个回答

7

不是RGB像素数组,更好的方法是转换为灰度图像。

获取CT图像的方法是获取CT DICOM文件中pixel_array的属性。 CT DICOM文件中pixel_array元素的类型都是uint16。但是很多Python工具,例如OpenCV和一些AI工具,无法与此类型兼容。

从CT DICOM文件获取pixel_array(CT图像)之后,您总是需要将pixel_array转换为灰度图像,这样您就可以使用许多Python图像处理工具处理此灰度图像

以下代码是将pixel_array转换为灰度图像的工作示例。

import matplotlib.pyplot as plt
import os
import pydicom
import numpy as np 
# Abvoe code is to import dependent libraries of this code

# Read some CT dicom file here by pydicom library
ct_filepath = r"<YOUR_CT_DICOM_FILEPATH>"
ct_dicom = pydicom.read_file(ct_filepath)
img = ct_dicom.pixel_array

# Now, img is pixel_array. it is input of our demo code

# Convert pixel_array (img) to -> gray image (img_2d_scaled)
## Step 1. Convert to float to avoid overflow or underflow losses.
img_2d = img.astype(float)

## Step 2. Rescaling grey scale between 0-255
img_2d_scaled = (np.maximum(img_2d,0) / img_2d.max()) * 255.0

## Step 3. Convert to uint
img_2d_scaled = np.uint8(img_2d_scaled)


# Show information of input and output in above code
## (1) Show information of original CT image 
print(img.dtype)
print(img.shape)
print(img)

## (2) Show information of gray image of it 
print(img_2d_scaled.dtype)
print(img_2d_scaled.shape)
print(img_2d_scaled)

## (3) Show the scaled gray image by matplotlib
plt.imshow(img_2d_scaled, cmap='gray', vmin=0, vmax=255)
plt.show()

以下是我打印出来的结果。

输入图像描述这里


3

您可能已经解决了这个问题,但我认为pydicom无法正确解释平面配置

您需要先执行以下操作:

img = data_set.pixel_array
img = img.reshape([img.shape[1], img.shape[2], 3])

从这里开始,您的图像将具有形状[行数 列数 3],并分离通道。


1
非常感谢!我很快会试一下。实际上我的解决方案是编写一个ITK方法。 - Andreas

1

根据@Daniel的说法,既然您有一个PlanarConfiguration== 1,您需要通过np.reshape在列中重新排列颜色,然后转换为灰度,例如使用OpenCV

import pydicom as dicom
import numpy as np
import cv2 as cv

data_set = dicom.read_file(path)
pixel_array = data_set.pixel_array
## converting to shape (m,n,3)
pixel_array_rgb = pixel_array.reshape((pixel_array.shape[1], pixel_array.shape[2], 3))
## converting to grayscale
pixel_array_gs = cv.cvtColor(pixel_array_rgb, cv.COLOR_RGB2GRAY)

网页内容由stack overflow 提供, 点击上面的
可以查看英文原文,
原文链接