绘制一条看起来像pyplot.arrow的曲线箭头。

19
我使用pyplot.arrow来绘制一些直线箭头,例如,
import matplotlib.pyplot as plt
import numpy as np

v={}
for i in range (1,4):
    v[i]=np.array([np.cos(-2*np.pi/3*i),np.sin(-2*np.pi/3*i)])

plt.arrow(.85*(.05*v[2]+.95*v[1])[0],.85*(.05*v[2]+.95*v[1])[1],.85*.9*(v[2]-v[1])[0],.85*.9*(v[2]-v[1])[1],width=0,head_width=.03,head_length=.045,length_includes_head=True,color="black")
plt.arrow(.85*(.05*v[3]+.95*v[2])[0],.85*(.05*v[3]+.95*v[2])[1],.85*.9*(v[3]-v[2])[0],.85*.9*(v[3]-v[2])[1],width=0,head_width=.03,head_length=.045,length_includes_head=True,color="black")
plt.arrow(.85*(.05*v[1]+.95*v[3])[0],.85*(.05*v[1]+.95*v[3])[1],.85*.9*(v[1]-v[3])[0],.85*.9*(v[1]-v[3])[1],width=0,head_width=.03,head_length=.045,length_includes_head=True,color="black")

plt.axes().set_xlim(-.5,1)
plt.axes().set_ylim(-np.sqrt(3)/2,np.sqrt(3)/2)
plt.axes().set_aspect(1)
plt.show()

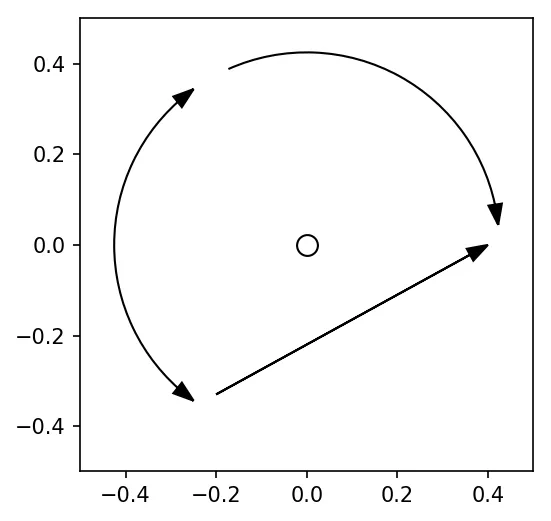
现在我想画一些具有圆形曲率而不是直线的箭头。我发现可以使用pyplot.annotate()patches.FancyArrowPatch来实现这一点,其中connectionstyle="arc3,rad=.5"或类似的方式。
但是这些箭头看起来与pyplot.arrow完全不同,并且与我的其他图形不搭配。而且我不知道如何将connectionstyle之类的东西传递给pyplot.arrow。有没有办法画出与pyplot.arrow得到的曲线箭头完全相同的箭头?
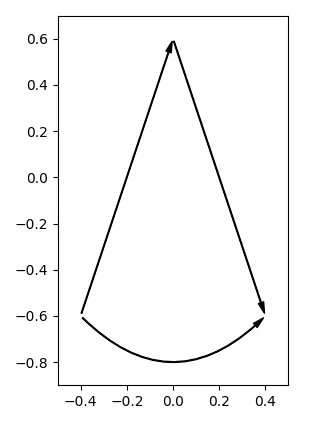
2个回答

42

使用pyplot.arrow无法绘制曲线箭头。然而,patches.FancyArrowPatch 应该提供了所有选项,使您可以获得任何箭头样式,因此想法是对于直箭头也使用 FancyArrowPatch,以便您可以为所有箭头使用相同的样式。

import matplotlib.pyplot as plt
import matplotlib.patches as patches

plt.axes().set_xlim(-.5,0.5)
plt.axes().set_ylim(-0.9,0.7)
plt.axes().set_aspect(1)

style = "Simple, tail_width=0.5, head_width=4, head_length=8"
kw = dict(arrowstyle=style, color="k")

a1 = patches.FancyArrowPatch((-0.4, -0.6), (0, 0.6), **kw)
a2 = patches.FancyArrowPatch((0, 0.6), (0.4, -0.6), **kw)
a3 = patches.FancyArrowPatch((-0.4, -0.6), (0.4, -0.6),
                             connectionstyle="arc3,rad=.5", **kw)

for a in [a1, a2, a3]:
    plt.gca().add_patch(a)
plt.show()

enter image description here


11

这是我最终使用的代码;它有点取巧,只是在一个Arc的末端绘制了直线 箭头

import numpy as np
import matplotlib.pyplot as plt
from matplotlib.patches import Arc
def circarrow(self,diameter,centX,centY,startangle,angle,**kwargs):
    startarrow=kwargs.pop("startarrow",False)
    endarrow=kwargs.pop("endarrow",False)

    arc = Arc([centX,centY],diameter,diameter,angle=startangle,
          theta1=np.rad2deg(kwargs.get("head_length",1.5*3*.001)) if startarrow else 0,theta2=angle-(np.rad2deg(kwargs.get("head_length",1.5*3*.001)) if endarrow else 0),linestyle="-",color=kwargs.get("color","black"))
    self.axes().add_patch(arc)

    if startarrow:
        startX=diameter/2*np.cos(np.radians(startangle))
        startY=diameter/2*np.sin(np.radians(startangle))
        startDX=+.000001*diameter/2*np.sin(np.radians(startangle)+kwargs.get("head_length",1.5*3*.001))
        startDY=-.000001*diameter/2*np.cos(np.radians(startangle)+kwargs.get("head_length",1.5*3*.001))
        self.arrow(startX-startDX,startY-startDY,startDX,startDY,**kwargs)

    if endarrow:
        endX=diameter/2*np.cos(np.radians(startangle+angle))
        endY=diameter/2*np.sin(np.radians(startangle+angle))
        endDX=-.000001*diameter/2*np.sin(np.radians(startangle+angle)-kwargs.get("head_length",1.5*3*.001))
        endDY=+.000001*diameter/2*np.cos(np.radians(startangle+angle)-kwargs.get("head_length",1.5*3*.001))
        self.arrow(endX-endDX,endY-endDY,endDX,endDY,**kwargs)

import types
plt.circarrow = types.MethodType(circarrow,plt)

这个函数被称为circarrow,你需要传入直径、圆心的两个坐标、弧开始的角度和弧应该经过的总角度,以及传递给pyplot arrow的任何参数作为参数。如果要在弧的开头绘制箭头,则需要指定startarrow=True,而endarrow=True将启用弧末端的箭头。

这是一个示例图像,您还可以看到箭头样式与直线箭头一致:

plt.plot(0,0,"o",markersize=10,color="black",mfc="none")

plt.circarrow(.85,0,0,0.05*120,.9*120,startarrow=True,width=0,head_width=.03,head_length=.045,length_includes_head=True,color="black")
plt.circarrow(.85,0,0,1.05*120,.9*120,startarrow=True,endarrow=True,width=0,head_width=.03,head_length=.045,length_includes_head=True,color="black")
plt.arrow(-.2,-.33,.6,+.33,width=0,head_width=.03,head_length=.045,length_includes_head=True,color="black")

plt.axes().set_xlim(-.5,.5)
plt.axes().set_ylim(-.5,.5)
plt.axes().set_aspect(1)
plt.show()

示例图片


网页内容由stack overflow 提供, 点击上面的
可以查看英文原文,
原文链接