有没有办法在XML文件中指定一个三角形的形状?
<shape xmlns:android="http://schemas.android.com/apk/res/android" android:shape="triangle">
  <stroke android:width="1dip" android:color="#FFF" />
  <solid android:color="#FFF" />
</shape>
我们能用路径形状或其他什么方式来实现吗?我只需要一个等边三角形。
谢谢
有没有办法在XML文件中指定一个三角形的形状?
<shape xmlns:android="http://schemas.android.com/apk/res/android" android:shape="triangle">
<stroke android:width="1dip" android:color="#FFF" />
<solid android:color="#FFF" />
</shape>
我们能用路径形状或其他什么方式来实现吗?我只需要一个等边三角形。
谢谢
在这篇文章中,我描述了如何实现它。以下是定义三角形的XML代码:
<?xml version="1.0" encoding="utf-8"?>
<layer-list xmlns:android="http://schemas.android.com/apk/res/android" >
    <item>
        <rotate
            android:fromDegrees="45"
            android:toDegrees="45"
            android:pivotX="-40%"
            android:pivotY="87%" >
            <shape
                android:shape="rectangle" >
                <stroke android:color="@color/transparent" android:width="10dp"/>
                <solid
                    android:color="@color/your_color_here" />
            </shape>
        </rotate>
    </item>
</layer-list>
如果有什么不清楚的地方,或者需要解释如何构建,请参考我的帖子。它是一个旋转并切出矩形的智能且有效的解决方案。
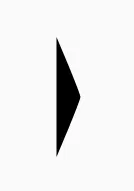
编辑:要创建一个指向 --> 的箭头,请使用:
...
android:fromDegrees="45"
android:toDegrees="45"
android:pivotX="13%"
android:pivotY="-40%" >
...
要创建一个指向左侧的箭头,可以使用以下代码:
<--android:fromDegrees="45"
android:toDegrees="45"
android:pivotX="87%"
android:pivotY="140%" >
<TextView
        android:layout_width="wrap_content"
        android:layout_height="wrap_content"
        android:text="▼"/>
你可以在这里获得更多的选项。
vector来制作如下所示的三角形。
ic_triangle_right.xml<vector xmlns:android="http://schemas.android.com/apk/res/android"
android:width="24dp"
android:height="24dp"
android:viewportWidth="24.0"
android:viewportHeight="24.0">
<path
android:pathData="M0,12l0,12 11.5,-5.7c6.3,-3.2 11.5,-6 11.5,-6.3 0,-0.3 -5.2,-3.1 -11.5,-6.3l-11.5,-5.7 0,12z"
android:strokeColor="#00000000"
android:fillColor="#000000"/>
</vector>
然后像这样使用它
<ImageView
    android:layout_width="wrap_content"
    android:layout_height="wrap_content"
    app:srcCompat="@drawable/ic_triangle_right"
    />
要更改颜色和方向,请使用android:tint和android:rotation
<ImageView
    android:layout_width="wrap_content"
    android:layout_height="wrap_content"
    app:srcCompat="@drawable/ic_triangle_right"
    android:rotation="180" // change direction
    android:tint="#00f" // change color
    />
结果

要改变向量的形状,您可以更改向量的宽度/高度。例如将宽度更改为10dp。
<vector
        android:width="10dp"
        android:height="24dp"
        >
       ...
</vector>
您可以使用矢量可绘制图形。
如果您的最低API低于21,Android Studio会在构建时自动为这些较低版本创建PNG位图(请参见矢量资源工作室)。如果您使用支持库,Android甚至可以将“真正的矢量”管理到API 7(有关此内容的更新,请参见本文底部的更新)。
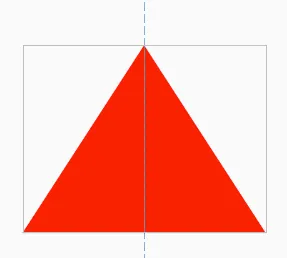
一个红色向上指的三角形是:
<?xml version="1.0" encoding="utf-8"?>
<vector xmlns:android="http://schemas.android.com/apk/res/android"
    android:height="100dp"
    android:width="100dp"
    android:viewportHeight="100"
    android:viewportWidth="100" >
    <group
        android:name="triableGroup">
        <path
            android:name="triangle"
            android:fillColor="#FF0000"
            android:pathData="m 50,0 l 50,100 -100,0 z" />
    </group>
</vector>
将其添加到您的布局中,并记得在旋转三角形时设置clipChildren="false"。
<?xml version="1.0" encoding="utf-8"?>
<RelativeLayout xmlns:android="http://schemas.android.com/apk/res/android"
    android:layout_width="match_parent"
    android:layout_height="match_parent"
    android:clipChildren="false">

    <ImageView
        android:layout_width="130dp"
        android:layout_height="100dp"
        android:rotation="0"
        android:layout_centerInParent="true"
        android:background="@drawable/triangle"/>

</RelativeLayout>
vectorDrawables.useSupportLibrary = true
defaultConfig,然后像这样设置(vector xml) drawable:<ImageView
android:layout_height="wrap_content"
android:layout_width="wrap_content"
app:srcCompat="@drawable/triangle" />
这个矢量资产工作室页面记录得非常详细。
自从采用了这个功能,我在图标方面完全不使用位图。 这也大大减小了APK文件的大小。
vectorDrawables.useSupportLibrary = true的额外好处是,由于位图在构建期间创建(当定义的颜色不可用时),因此可以使用在colors.xml中定义的颜色。 - RobJacek Milewski的解决方案对我有效,并且基于他的解决方案,如果需要一个倒置的三角形,可以使用以下代码:
<?xml version="1.0" encoding="utf-8"?>
<layer-list xmlns:android="http://schemas.android.com/apk/res/android" >
    <item>
        <rotate
            android:fromDegrees="45"
            android:toDegrees="45"
            android:pivotX="135%"
            android:pivotY="15%">
            <shape android:shape="rectangle">
                <solid android:color="@color/aquamarine" />
            </shape>
        </rotate>
    </item>
</layer-list>
在这种情况下,我肯定会选择实现一个 View:
import android.content.Context;
import android.graphics.Canvas;
import android.graphics.Color;
import android.graphics.Paint;
import android.graphics.Path;
import android.util.AttributeSet;
import android.view.View;

public class TriangleShapeView extends View {

    public TriangleShapeView(Context context) {
        super(context);
    }

    public TriangleShapeView(Context context, AttributeSet attrs, int defStyle) {
        super(context, attrs, defStyle);
    }

    public TriangleShapeView(Context context, AttributeSet attrs) {
        super(context, attrs);
    }

    protected void onDraw(Canvas canvas) {
        super.onDraw(canvas);

        int w = getWidth() / 2;

        Path path = new Path();
        path.moveTo( w, 0);
        path.lineTo( 2 * w , 0);
        path.lineTo( 2 * w , w);
        path.lineTo( w , 0);
        path.close();

        Paint p = new Paint();
        p.setColor( Color.RED );

        canvas.drawPath(path, p);
    }
}
按照以下方式在您的布局中使用它:
<TriangleShapeView
    android:layout_width="match_parent"
    android:layout_height="match_parent"
    android:background="#ff487fff">
</TriangleShapeView>
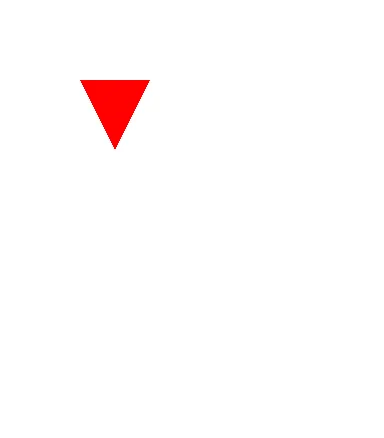
使用此实现将得到以下结果:

使用矢量图:
<vector xmlns:android="http://schemas.android.com/apk/res/android"
   android:width="24dp"
   android:height="24dp"
   android:viewportWidth="24.0"
   android:viewportHeight="24.0">
   <path
        android:pathData="M0,0 L24,0 L0,24 z"
        android:strokeColor="@color/color"
        android:fillColor="@color/color"/>
</vector>

L 和 z 在结尾解决了我的问题,谢谢! - oxied在这里查看答案: 自定义箭头而无需使用图像:Android
<?xml version="1.0" encoding="utf-8"?>
<vector xmlns:android="http://schemas.android.com/apk/res/android"
        android:width="32dp"
        android:height="24dp"
        android:viewportWidth="32.0"
        android:viewportHeight="24.0">
    <path android:fillColor="#e4e4e8"
          android:pathData="M0 0 h32 l-16 24 Z"/>
</vector>

不使用XML,我能帮你吗?
简单地说,
自定义布局(切片):
import android.content.Context;
import android.graphics.Canvas;
import android.graphics.Color;
import android.graphics.Paint;
import android.graphics.Paint.Style;
import android.graphics.Path;
import android.graphics.Point;
import android.util.AttributeSet;
import android.view.View;

public class Slice extends View {

    Paint mPaint;

    Path mPath;

    public enum Direction {
        NORTH, SOUTH, EAST, WEST
    }

    public Slice(Context context) {
        super(context);
        create();
    }

    public Slice(Context context, AttributeSet attrs) {
        super(context, attrs);
        create();
    }

    public void setColor(int color) {
        mPaint.setColor(color);
        invalidate();
    }

    private void create() {
        mPaint = new Paint();
        mPaint.setStyle(Style.FILL);
        mPaint.setColor(Color.RED);
    }

    @Override
    protected void onDraw(Canvas canvas) {
        mPath = calculate(Direction.SOUTH);
        canvas.drawPath(mPath, mPaint);
    }

    private Path calculate(Direction direction) {
        Point p1 = new Point();
        p1.x = 0;
        p1.y = 0;

        Point p2 = null, p3 = null;

        int width = getWidth();

        if (direction == Direction.NORTH) {
            p2 = new Point(p1.x + width, p1.y);
            p3 = new Point(p1.x + (width / 2), p1.y - width);
        } else if (direction == Direction.SOUTH) {
            p2 = new Point(p1.x + width, p1.y);
            p3 = new Point(p1.x + (width / 2), p1.y + width);
        } else if (direction == Direction.EAST) {
            p2 = new Point(p1.x, p1.y + width);
            p3 = new Point(p1.x - width, p1.y + (width / 2));
        } else if (direction == Direction.WEST) {
            p2 = new Point(p1.x, p1.y + width);
            p3 = new Point(p1.x + width, p1.y + (width / 2));
        }

        Path path = new Path();
        path.moveTo(p1.x, p1.y);
        path.lineTo(p2.x, p2.y);
        path.lineTo(p3.x, p3.y);

        return path;
    }
}
你的活动(示例):
import android.app.Activity;
import android.graphics.Color;
import android.os.Bundle;
import android.view.ViewGroup.LayoutParams;
import android.widget.LinearLayout;

public class Layout extends Activity {
    @Override
    protected void onCreate(Bundle savedInstanceState) {
        super.onCreate(savedInstanceState);

        Slice mySlice = new Slice(getApplicationContext());
        mySlice.setBackgroundColor(Color.WHITE);
        setContentView(mySlice, new LinearLayout.LayoutParams(
                LayoutParams.FILL_PARENT, LayoutParams.FILL_PARENT));
    }
}
工作示例:
另一个您可能感兴趣的绝对简单的Calculate函数..
private Path Calculate(Point A, Point B, Point C) {
    Path Pencil = new Path();
    Pencil.moveTo(A.x, A.y);
    Pencil.lineTo(B.x, B.y);
    Pencil.lineTo(C.x, C.y);
    return Pencil;
}
你可以使用下面的xml在背景中添加以下三角形

<?xml version="1.0" encoding="utf-8"?>
<vector xmlns:android="http://schemas.android.com/apk/res/android"
    android:height="100dp"
    android:width="100dp"
    android:viewportHeight="100"
    android:viewportWidth="100" >
    <group
        android:name="triableGroup">
        <path
            android:name="triangle"
            android:fillColor="#848af8"
            android:pathData="M 0,20 L 0,0 L 100,0 L 100,20 L 54,55  l -1,0.6  l -1,0.4  l -1,0.2  l -1,0   l -1,-0  l -1,-0.2  l -1,-0.4  l -1,-0.6    L 46,55   L 0,20 -100,-100 Z" />
    </group>
</vector>
自定义 xml 设计的整个逻辑都在 pathData 中。将左上角视为 (0,0),根据您的要求设计布局。
请查看此答案。