我们如何创建以下的气球形状,其中我们可以动态地更改其颜色。请参考下面的html标签内容。
```
```
如何创建以下的气球形状,其中我们可以动态地更改其颜色。
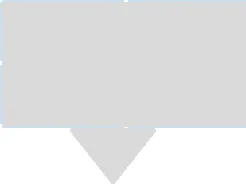
如何创建以下的气球形状,其中我们可以动态地更改其颜色。
这是用于三角形和矩形的XML代码,将其保存在可绘制文件夹中。
triangle.xml
<?xml version="1.0" encoding="utf-8"?>
<layer-list xmlns:android="http://schemas.android.com/apk/res/android" >
    <item >
        <rotate
            android:fromDegrees="45"
            android:toDegrees="45"
            android:pivotX="-40%"
            android:pivotY="87%" >
            <shape
                android:shape="rectangle"  >
                <stroke android:color="@android:color/transparent" android:width="10dp"/>
                <solid
                    android:color="#000000"  />
            </shape>
        </rotate>
    </item>
</layer-list>
矩形.xml
<?xml version="1.0" encoding="utf-8"?>
<layer-list xmlns:android="http://schemas.android.com/apk/res/android" >
    <item>
    <shape android:shape="rectangle">
      <solid android:color="#B2E3FA" />
    </shape>
  </item>
</layer-list>
您需要的形状和布局
<RelativeLayout
        android:id="@+id/rlv1"
        android:layout_width="150dp"
        android:layout_height="50dp"
        android:background="@drawable/rectangle" />

    <RelativeLayout
        android:id="@+id/rlv2"
        android:layout_width="50dp"
        android:layout_height="50dp"
        android:layout_below="@+id/rlv1"
        android:background="@drawable/triangle"
        android:rotation="180" />
根据需要设置边距。
<?xml version="1.0" encoding="utf-8"?>
<LinearLayout xmlns:android="http://schemas.android.com/apk/res/android"
android:id="@+id/linear_root"
android:layout_width="wrap_content"
android:layout_height="wrap_content"
android:orientation="vertical"
>
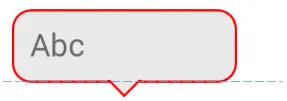
<TextView
android:id="@+id/text_message"
android:layout_width="100dp"
android:layout_height="wrap_content"
android:background="@drawable/bg_rectangle"
android:layout_marginLeft="20dp"
android:layout_marginRight="20dp"
android:layout_marginTop="20dp"
android:padding="8dp"
android:text="Abc"
/>
<ImageView
android:id="@+id/image_arrow"
android:layout_marginTop="-1.5dp"
android:layout_width="16dp"
android:layout_height="16dp"
android:layout_gravity="center_horizontal"
android:background="@drawable/icon_arrow_down"
/>
</LinearLayout>
bg_rectangle
<?xml version="1.0" encoding="utf-8"?>
<shape xmlns:android="http://schemas.android.com/apk/res/android"
    android:shape="rectangle">
    <solid android:color="#eaeaea" />
    <stroke
        android:width="1dp"
        android:color="#f00" />
    <corners android:radius="8dp" />

</shape>
icon_arrow_down,或者你可以像这里一样,通过向量创建三角形。
<?xml version="1.0" encoding="utf-8"?>
<layer-list xmlns:android="http://schemas.android.com/apk/res/android">

    <item>
        <rotate
            android:fromDegrees="45"
            android:pivotX="135%"
            android:pivotY="15%"
            android:toDegrees="45"
            >
            <shape android:shape="rectangle">
                <solid android:color="#eaeaea"/>
                <stroke
                    android:width="1dp"
                    android:color="#f00" />
            </shape>
        </rotate>
    </item>
</layer-list>
保持动态性的清晰正确方法是扩展View类。
然后在onDraw中,您可以这样做:
@Override
protected void onDraw(Canvas canvas) {
    super.onDraw(canvas);

    drawBackground(canvas);
}

private void drawBackground(Canvas canvas) {
    int width = (int) mWidth;
    int height = (int) mHeight;

    Point a = new Point(0, 0);
    Point b = new Point(width, 0);
    Point c = new Point(width, height - mPointHeight);//mPointedHeight is the length of the triangle... in this case we have it dynamic and can be changed.
    Point d = new Point((width/2)+(mPointedHeight/2), height - mPointHeight);
    Point e = new Point((width/2), height);// this is the sharp point of the triangle
    Point f = new Point((width/2)-(mPointedHeight/2), height - mPointHeight);
    Point g = new Point(0, height - mPointHeight);

    Path path = new Path();
    path.moveTo(a.x, a.y);
    path.lineTo(b.x, b.y);
    path.lineTo(c.x, c.y);
    path.lineTo(d.x, d.y);
    path.lineTo(e.x, e.y);
    path.lineTo(f.x, f.y);
    path.lineTo(g.x, g.y);

    canvas.drawPath(path, mPointedBackgroundPaint);// mPointedBackgroundPaint is whatever color you want as the fill.
}
这里没有不必要的层次结构或不具有动态性或清晰度的代码。您还可以在框中添加文本。
onDraw中不要创建任何对象。 - tir38package com.example.dickbutt;
import android.content.Context;
import android.graphics.Canvas;
import android.graphics.Color;
import android.graphics.Paint;
import android.graphics.Path;
import android.util.AttributeSet;
import android.view.View;
public class TriangleShapeView extends View {
public int colorCode = Color.MAGENTA;
public int getColorCode() {
return colorCode;
}
public void setColorCode(int colorCode) {
this.colorCode = colorCode;
}
public TriangleShapeView(Context context) {
super(context);
}
public TriangleShapeView(Context context, AttributeSet attrs, int defStyle) {
super(context, attrs, defStyle);
}
public TriangleShapeView(Context context, AttributeSet attrs) {
super(context, attrs);
}
protected void onDraw(Canvas canvas) {
super.onDraw(canvas);
int w = getWidth() / 2;
int h = getHeight() / 2;
Path path = new Path();
path.moveTo(0, 0);
path.lineTo(w, 2 * h);
path.lineTo(2 * w, 0);
path.lineTo(0, 0);
path.close();
Paint p = new Paint();
p.setColor(colorCode);
p.setAntiAlias(true);
canvas.drawPath(path, p);
}
}
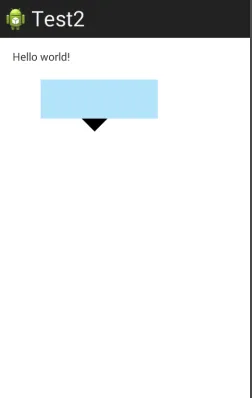
Result
使用方法
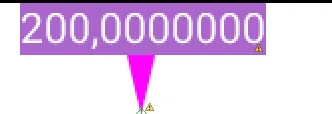
<TextView
    android:id="@+id/progress_value"
    android:layout_width="wrap_content"
    android:layout_height="wrap_content"
    android:layout_alignParentTop="true"
    android:layout_centerHorizontal="true"
    android:background="@android:color/holo_purple"
    android:gravity="center_horizontal"
    android:text="200,0000000"
    android:textColor="#fff" />

<com.example.dickbutt.TriangleShapeView
    android:id="@+id/textView1"
    android:layout_width="10dp"
    android:layout_height="20dp"
    android:layout_below="@+id/progress_value"
    android:layout_centerHorizontal="true"
    android:background="@drawable/rectangle"
    android:gravity="center_horizontal"
    android:textSize="10sp" />
优点
setColorFilter()来将图像更改为新的颜色。我是对的吗? - Dorydrawable文件夹中创建一个xml。xml将负责矩形形状的边框颜色。<?xml version="1.0" encoding="utf-8"?>
<layer-list xmlns:android="http://schemas.android.com/apk/res/android">
<item>
<shape android:shape="rectangle">
<solid android:color="#B2E3FA" />
</shape>
</item>
<item android:left="5dp" android:bottom="5dp" android:top="5dp" >
<shape android:shape="rectangle">
<solid android:color="#D8D8D8" />
</shape>
</item>
</layer-list>
好的,这将为矩形形状创建一个必需的边框,您需要像这样将该矩形形状的背景分配给此可绘制对象
android:background="@drawable/bg"
bg 是一个 XML 文件名,已保存在 drawable 文件夹中。
之后,您需要将该三角形放置在矩形对象的正下方。
希望您能理解我的逻辑。