我能够使用path.addCircle()在画布上绘制一个圆形,并使用path.addRect()绘制一个矩形。
现在,我想知道如何绘制三角形、星形、正方形或爱心?
对于未来的直接答案寻求者,我已经使用画布绘制了一个几乎对称的星形,如下图所示:

主要工具是使用路径。
假设你已经设置好:
Paint paint = new Paint();
paint.setColor(Color.WHITE);
paint.setAntiAlias(true);
paint.setStyle(Paint.Style.STROKE);

Path path = new Path();
那么在你的onDraw方法中,你可以像我下面所示的那样使用该路径。它将按比例缩放到任何尺寸的画布。
@Override
protected void onDraw(Canvas canvas) {

    float mid = getWidth() / 2;
    float min = Math.min(getWidth(), getHeight());
    float fat = min / 17;
    float half = min / 2;
    float rad = half - fat;
    mid = mid - half;

    paint.setStrokeWidth(fat);
    paint.setStyle(Paint.Style.STROKE);

    canvas.drawCircle(mid + half, half, rad, paint);

    path.reset();

    paint.setStyle(Paint.Style.FILL);


        // top left
        path.moveTo(mid + half * 0.5f, half * 0.84f);
        // top right
        path.lineTo(mid + half * 1.5f, half * 0.84f);
        // bottom left
        path.lineTo(mid + half * 0.68f, half * 1.45f);
        // top tip
        path.lineTo(mid + half * 1.0f, half * 0.5f);
        // bottom right
        path.lineTo(mid + half * 1.32f, half * 1.45f);
        // top left
        path.lineTo(mid + half * 0.5f, half * 0.84f);

        path.close();
        canvas.drawPath(path, paint);

    super.onDraw(canvas);

}
如果有人需要心形图案:
    import android.content.Context;
    import android.graphics.Canvas;
    import android.graphics.Color;
    import android.graphics.Paint;
    import android.graphics.Paint.Style;
    import android.graphics.Path;
    import android.view.View;

    public class Heart extends View {

        private Path path;

        private Paint paint;

        public Heart(Context context) {
            super(context);

            path = new Path();
            paint = new Paint(Paint.ANTI_ALIAS_FLAG);
        }

            @Override
            protected void onDraw(Canvas canvas) {
                super.onDraw(canvas);

                // Fill the canvas with background color
                canvas.drawColor(Color.WHITE);
                paint.setShader(null);

                float width = getContext().getResources().getDimension(R.dimen.heart_width);
                float height = getContext().getResources().getDimension(R.dimen.heart_height);

                // Starting point
                path.moveTo(width / 2, height / 5);

                // Upper left path
                path.cubicTo(5 * width / 14, 0,
                        0, height / 15,
                        width / 28, 2 * height / 5);

                // Lower left path
                path.cubicTo(width / 14, 2 * height / 3,
                        3 * width / 7, 5 * height / 6,
                        width / 2, height);

                // Lower right path
                path.cubicTo(4 * width / 7, 5 * height / 6,
                        13 * width / 14, 2 * height / 3,
                        27 * width / 28, 2 * height / 5);

                // Upper right path
                path.cubicTo(width, height / 15,
                        9 * width / 14, 0,
                        width / 2, height / 5);

                paint.setColor(Color.RED);
                paint.setStyle(Style.FILL);
                canvas.drawPath(path, paint);

            }
    }
抱歉有很多数字,但这些对我来说效果最好 :) 结果看起来像这样:

这种方法将返回一个路径,其中给定宽度的正方形内包含指定数量的拐角。添加更多参数以处理小半径等问题。
    private Path createStarBySize(float width, int steps) {
    float halfWidth = width / 2.0F;
    float bigRadius = halfWidth;
    float radius = halfWidth / 2.0F;
    float degreesPerStep = (float) Math.toRadians(360.0F / (float) steps);
    float halfDegreesPerStep = degreesPerStep / 2.0F;
    Path ret = new Path();
    ret.setFillType(FillType.EVEN_ODD);
    float max = (float) (2.0F* Math.PI);
    ret.moveTo(width, halfWidth);
    for (double step = 0; step < max; step += degreesPerStep) {
        ret.lineTo((float)(halfWidth + bigRadius * Math.cos(step)), (float)(halfWidth + bigRadius * Math.sin(step)));
        ret.lineTo((float)(halfWidth + radius * Math.cos(step + halfDegreesPerStep)), (float)(halfWidth + radius * Math.sin(step + halfDegreesPerStep)));
    }
    ret.close();
    return ret;
}
posX 和 posY 是包围星星尖端的正方形左上角的坐标(实际上并没有绘制这个正方形)。
size 是正方形的宽度和高度。
a 是星星的顶部尖端。路径是顺时针创建的。 public void drawStar(float posX, float posY, int size, Canvas canvas){
int hMargin = size/9;
int vMargin = size/4;
Point a = new Point((int) (posX + size/2), (int) posY);
Point b = new Point((int) (posX + size/2 + hMargin), (int) (posY + vMargin));
Point c = new Point((int) (posX + size), (int) (posY + vMargin));
Point d = new Point((int) (posX + size/2 + 2*hMargin), (int) (posY + size/2 + vMargin/2));
Point e = new Point((int) (posX + size/2 + 3*hMargin), (int) (posY + size));
Point f = new Point((int) (posX + size/2), (int) (posY + size - vMargin));
Point g = new Point((int) (posX + size/2 - 3*hMargin), (int) (posY + size));
Point h = new Point((int) (posX + size/2 - 2*hMargin), (int) (posY + size/2 + vMargin/2));
Point i = new Point((int) posX, (int) (posY + vMargin));
Point j = new Point((int) (posX + size/2 - hMargin), (int) (posY + vMargin));
Path path = new Path();
path.moveTo(a.x, a.y);
path.lineTo(b.x, b.y);
path.lineTo(c.x, c.y);
path.lineTo(d.x, d.y);
path.lineTo(e.x, e.y);
path.lineTo(f.x, f.y);
path.lineTo(f.x, f.y);
path.lineTo(g.x, g.y);
path.lineTo(h.x, h.y);
path.lineTo(i.x, i.y);
path.lineTo(j.x, j.y);
path.lineTo(a.x, a.y);
path.close();
canvas.drawPath(path, paint);
}
使用 Shape 类的实例非常好 ))
 @Override
    public void onCreate(Bundle savedInstanceState) {
    super.onCreate(savedInstanceState);

    HeartShape shape = new HeartShape();
    ShapeDrawable shapeDrawable = new ShapeDrawable(shape);
    shapeDrawable.setColorFilter(new LightingColorFilter(0, Color.BLUE));

    LinearLayout linearLayout = new LinearLayout(this);
    linearLayout.setLayoutParams(new LinearLayout.LayoutParams(350 * 3, 350 * 3));
    linearLayout.setBackground(shapeDrawable);

    setContentView(linearLayout);
  }
 public class HeartShape extends Shape {

  private final int INVALID_SIZE = -1;

  private Path mPath = new Path();
  private RectF mRectF = new RectF();

  private float mOldWidth = INVALID_SIZE;
  private float mOldHeight = INVALID_SIZE;

  private float mScaleX, mScaleY;

  public HeartShape() {

  }

  @Override
  public void draw(Canvas canvas, Paint paint) {
    canvas.save();
    canvas.scale(mScaleX, mScaleY);

    float width = mRectF.width();
    float height = mRectF.height();

    float halfWidth = width/2;
    float halfHeight = height/2;

    float stdDestX = 5 * width / 14;
    float stdDestY = 2 * height / 3;

    PointF point1 = new PointF(stdDestX, 0);
    PointF point2 = new PointF(0, height / 15);
    PointF point3 = new PointF(stdDestX / 5, stdDestY);
    PointF point4 = new PointF(stdDestX, stdDestY);

    // Starting point
    mPath.moveTo(halfWidth, height / 5);

    mPath.cubicTo(point1.x, point1.y, point2.x, point2.y, width / 28, 2 * height / 5);
    mPath.cubicTo(point3.x, point3.y, point4.x, point4.y, halfWidth, height);

    canvas.drawPath(mPath, paint);

    canvas.scale(-mScaleX, mScaleY, halfWidth, halfHeight);
    canvas.drawPath(mPath, paint);

    canvas.restore();
  }

  @Override
  protected void onResize(float width, float height) {
    mOldWidth = mOldWidth == INVALID_SIZE ? width : Math.max(1, mOldWidth);
    mOldHeight = mOldHeight == INVALID_SIZE ? height : Math.max(1, mOldHeight);

    width = Math.max(1, width);
    height = Math.max(1, height);

    mScaleX = width / mOldWidth;
    mScaleY = height / mOldHeight;

    mOldWidth = width;
    mOldHeight = height;


    mRectF.set(0, 0, width, height);
  }

  @Override
  public void getOutline(@NonNull Outline outline) {
    // HeartShape not supported outlines
  }

  @Override
  public HeartShape clone() throws CloneNotSupportedException {
    HeartShape shape = (HeartShape) super.clone();
    shape.mPath = new Path(mPath);
    return shape;
  }

}

如果你想仅绘制指定的形状,我建议首先为每个形状创建一个类,并使每个形状实现draw()方法,在该方法中你可以传递Canvas和Paint对象。
class Star(
var cx: Float = 0f,
var cy: Float = 0f,
var radius: Float = 0f,
var angle: Float = 0f,
var color: Int = Color.WHITE,
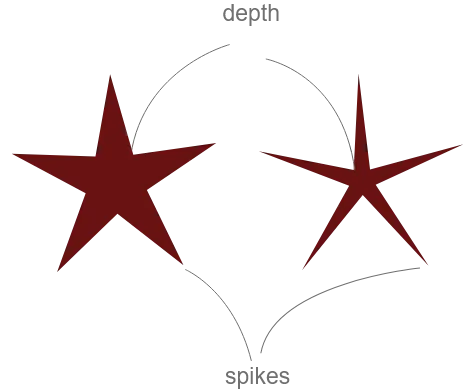
var numberOfSpikes: Int = 5,
var depth: Float = 0.4f
) {
val path: Path = Path()
val point: PointF = PointF()
fun init() {
path.rewind()
var totalAngle = 0f
for (i in 0 until numberOfSpikes * 2) {
val x = cx
var y = cy
y -= if (i % 2 != 0) (radius * depth)
else (radius * 1f)
StaticMethods.rotate(cx, cy, x, y, totalAngle, false, point)
totalAngle += 360f / (numberOfSpikes * 2)
if (i == 0) {
path.moveTo(point.x, point.y)
} else {
path.lineTo(point.x, point.y)
}
}
}
fun draw(canvas: Canvas, paint: Paint) {
paint.apply {
style = Paint.Style.FILL
color = this@Star.color
}
canvas.drawPath(path, paint)
}
}
object StaticMethods {
/**
* Rotate a point around a center with given angle
* @param cx rotary center point x coordinate
* @param cy rotary center point y coordinate
* @param x x coordinate of the point that will be rotated
* @param y y coordinate of the point that will be rotated
* @param angle angle of rotation in degrees
* @param anticlockWise rotate clockwise or anti-clockwise
* @param resultPoint object where the result rotational point will be stored
*/
fun rotate(cx: Float, cy: Float, x: Float, y: Float, angle: Float, anticlockWise: Boolean = false, resultPoint: PointF = PointF()): PointF {
if (angle == 0f) {
resultPoint.x = x
resultPoint.y = y
return resultPoint
}
val radians = if (anticlockWise) {
(Math.PI / 180) * angle
} else {
(Math.PI / -180) * angle
}
val cos = Math.cos(radians)
val sin = Math.sin(radians)
val nx = (cos * (x - cx)) + (sin * (y - cy)) + cx
val ny = (cos * (y - cy)) - (sin * (x - cx)) + cy
resultPoint.x = nx.toFloat()
resultPoint.y = ny.toFloat()
return resultPoint
}
/**
* Inline function that is called, when the final measurement is made and
* the view is about to be draw.
*/
inline fun View.afterMeasured(crossinline function: View.() -> Unit) {
viewTreeObserver.addOnGlobalLayoutListener(object :
ViewTreeObserver.OnGlobalLayoutListener {
override fun onGlobalLayout() {
if (measuredWidth > 0 && measuredHeight > 0) {
viewTreeObserver.removeOnGlobalLayoutListener(this)
function()
}
}
})
}
}
接下来创建一个自定义视图,您可以在其中绘制形状。下面是创建100个随机星星并将它们绘制在画布上的代码。
class StarView : View {
    constructor(context: Context) : super(context)
    constructor(context: Context, attrs: AttributeSet?) : super(context, attrs)
    constructor(context: Context, attrs: AttributeSet?, defStyleAttr: Int) : super(context, attrs, defStyleAttr)

    val stars: ArrayList<Helper.Star> = arrayListOf()

    val paint: Paint = Paint().apply {
        isAntiAlias = true
    }

    init {

        // after the view is measured and we have the width and height
        afterMeasured {

            // create 100 stars
            for (i in 0 until 100) {

                val star = Helper.Star(
                    cx = width * Math.random().toFloat(),
                    cy = height * Math.random().toFloat(),
                    radius = width * 0.1f * Math.random().toFloat(),
                )
                star.init()
                stars.add(star)
            }
        }

    }


    override fun onDraw(canvas: Canvas) {
        stars.forEach {
            it.draw(canvas, paint)
        }
    }
}
这是结果:

如果您想创建许多不同的复杂形状,可以使用这个库。您可以通过将SVG形状作为字符串传递路径数据来实现。首先,使用任何SVG向量编辑器(如
path.lineTo(mid + half * 0.5f, half * 0.84f);不是必需的,因为path.close()会自动处理它! - beginner