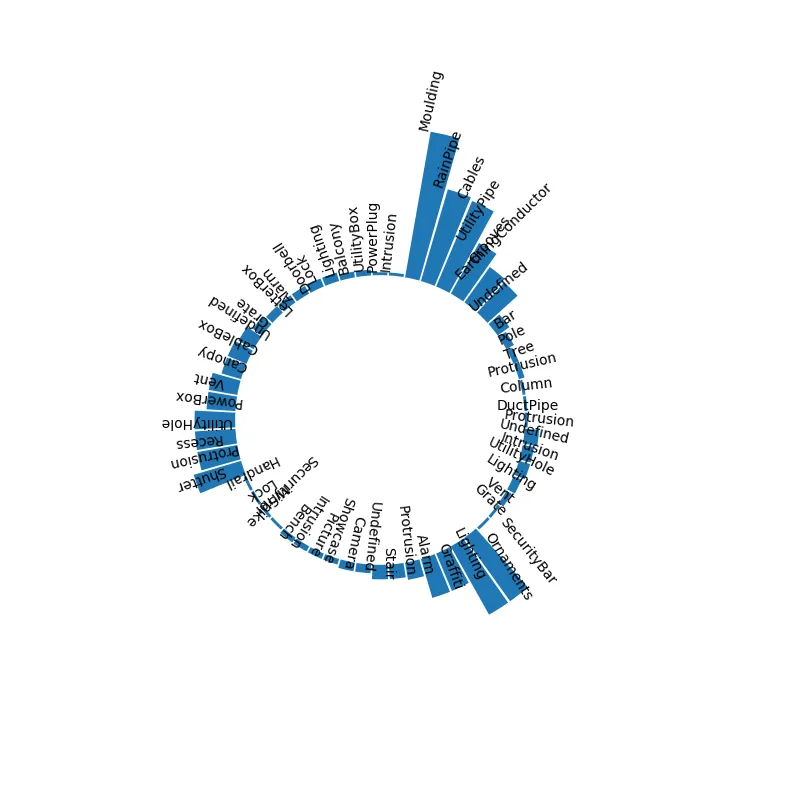
你会遇到的问题是,文本边界框被扩展以容纳完整旋转的文本,但该框本身仍在笛卡尔坐标系中定义。下面的图片显示了两个水平对齐为“左”,垂直对齐为“底部”的文本;问题在于旋转的文本其边界框边缘离文本更远。

你想要的是让文本围绕其自身周围的边缘点旋转,如下所示。
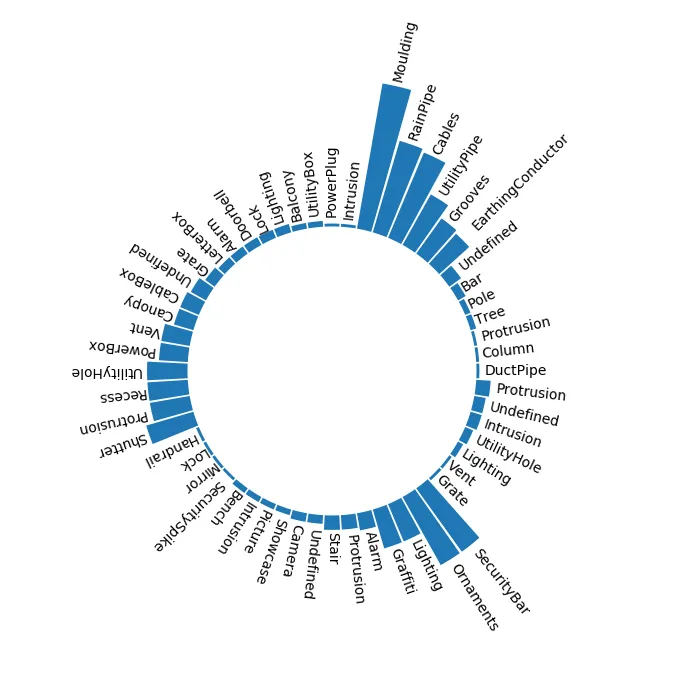
这可以通过将
rotation_mode="anchor"参数应用于
matplotlib.text.Text来实现,该参数恰好控制上述功能。
ax.text(..., rotation_mode="anchor")
在这个例子中:
from matplotlib import pyplot as plt
import numpy as np
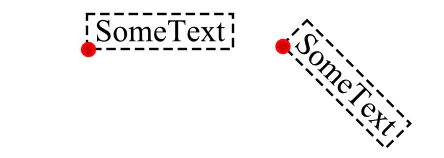
lObjectsALLcnts = [1, 1, 1, 2, 2, 3, 5, 14, 15, 20, 32, 33, 51, 1, 1, 2, 2, 3, 3, 3, 3,
3, 4, 6, 7, 7, 10, 10, 14, 14, 14, 17, 1, 1, 1, 1, 2, 2, 2, 2, 3, 3,
5, 5, 6, 14, 14, 27, 27, 1, 1, 2, 3, 4, 4, 5]
lObjectsALLlbls = ['DuctPipe', 'Column', 'Protrusion', 'Tree', 'Pole', 'Bar', 'Undefined',
'EarthingConductor', 'Grooves', 'UtilityPipe', 'Cables', 'RainPipe', 'Moulding',
'Intrusion', 'PowerPlug', 'UtilityBox', 'Balcony', 'Lighting', 'Lock', 'Doorbell',
'Alarm', 'LetterBox', 'Grate', 'Undefined', 'CableBox', 'Canopy', 'Vent', 'PowerBox',
'UtilityHole', 'Recess', 'Protrusion', 'Shutter', 'Handrail', 'Lock', 'Mirror',
'SecuritySpike', 'Bench', 'Intrusion', 'Picture', 'Showcase', 'Camera',
'Undefined', 'Stair', 'Protrusion', 'Alarm', 'Graffiti', 'Lighting', 'Ornaments',
'SecurityBar',
'Grate', 'Vent', 'Lighting', 'UtilityHole', 'Intrusion', 'Undefined', 'Protrusion']
iN = len(lObjectsALLcnts)
arrCnts = np.array(lObjectsALLcnts)
theta=np.arange(0,2*np.pi,2*np.pi/iN)
width = (2*np.pi)/iN *0.9
bottom = 50
fig = plt.figure(figsize=(8,8))
ax = fig.add_axes([0.1, 0.1, 0.75, 0.75], polar=True)
bars = ax.bar(theta, arrCnts, width=width, bottom=bottom)
plt.axis('off')
rotations = np.rad2deg(theta)
for x, bar, rotation, label in zip(theta, bars, rotations, lObjectsALLlbls):
lab = ax.text(x,bottom+bar.get_height() , label,
ha='left', va='center', rotation=rotation, rotation_mode="anchor",)
plt.show()
请注意,这使用了给定的50个单位的底部间距。您可以稍微增加这个数字以在条形和文本之间获得更多间距。
以下答案的初始版本已经过时。我会保留它作为参考。
你遇到的问题是,文本边界框被扩展以容纳完整旋转的文本,但该框本身仍然以笛卡尔坐标系定义。下面的图片显示了两个水平对齐方式为“left”,垂直对齐方式为“bottom”的文本;问题在于旋转文本的边界框离文本远得多。
一个简单的解决方案可能是将水平和垂直对齐定义为“中心”,这样文本的中心点就不会因旋转而改变。
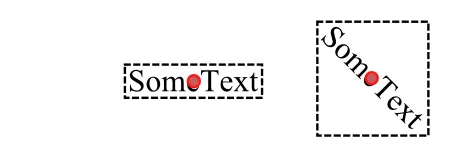
问题则在于如何得到文本中心和进度条顶部之间的距离估计。可以将文字字数除以二,再乘以某个因子来得到一个较好的估计值。需要通过试错法找到这个因子。
bottom = 50
rotations = np.rad2deg(theta)
y0,y1 = ax.get_ylim()

for x, bar, rotation, label in zip(theta, bars, rotations, lObjectsALLlbls):
     offset = (bottom+bar.get_height())/(y1-y0)
     h =offset + len(label)/2.*0.032
     lab = ax.text(x, h, label, transform=ax.get_xaxis_transform(),
             ha='center', va='center')
     lab.set_rotation(rotation)
您也可以尝试找出渲染文本的实际大小,并使用此信息找到坐标。
bottom = 50
rotations = np.rad2deg(theta)
y0,y1 = ax.get_ylim()

for x, bar, rotation, label in zip(theta, bars, rotations, lObjectsALLlbls):
     offset = (bottom+bar.get_height())/(y1-y0)
     lab = ax.text(0, 0, label, transform=None,
             ha='center', va='center')
     renderer = ax.figure.canvas.get_renderer()
     bbox = lab.get_window_extent(renderer=renderer)
     invb = ax.transData.inverted().transform([[0,0],[bbox.width,0] ])
     lab.set_position((x,offset+(invb[1][0]-invb[0][0])/2.*2.7 ) )
     lab.set_transform(ax.get_xaxis_transform())
     lab.set_rotation(rotation)
Complete code for reproduction:
import numpy as np
import matplotlib.pyplot as plt

lObjectsALLcnts = [1, 1, 1, 2, 2, 3, 5, 14, 15, 20, 32, 33, 51, 1, 1, 2, 2, 3, 3, 3, 3,                3, 4, 6, 7, 7, 10, 10, 14, 14, 14, 17, 1, 1, 1, 1, 2, 2, 2, 2, 3, 3,                5, 5, 6, 14, 14, 27, 27, 1, 1, 2, 3, 4, 4, 5]

lObjectsALLlbls = ['DuctPipe', 'Column', 'Protrusion', 'Tree', 'Pole', 'Bar', 'Undefined',                'EarthingConductor', 'Grooves', 'UtilityPipe', 'Cables', 'RainPipe', 'Moulding',                'Intrusion', 'PowerPlug', 'UtilityBox', 'Balcony', 'Lighting', 'Lock', 'Doorbell',                'Alarm', 'LetterBox', 'Grate', 'Undefined', 'CableBox', 'Canopy', 'Vent', 'PowerBox',                'UtilityHole', 'Recess', 'Protrusion', 'Shutter', 'Handrail', 'Lock', 'Mirror',                'SecuritySpike', 'Bench', 'Intrusion', 'Picture', 'Showcase', 'Camera',                'Undefined', 'Stair', 'Protrusion', 'Alarm', 'Graffiti', 'Lighting', 'Ornaments',                'SecurityBar',                'Grate', 'Vent', 'Lighting', 'UtilityHole', 'Intrusion', 'Undefined', 'Protrusion']

iN = len(lObjectsALLcnts)
arrCnts = np.array(lObjectsALLcnts)

theta=np.arange(0,2*np.pi,2*np.pi/iN)
width = (2*np.pi)/iN *0.9
bottom = 50

fig = plt.figure(figsize=(8,8))
ax = fig.add_axes([0.1, 0.1, 0.75, 0.75], polar=True)
bars = ax.bar(theta, arrCnts, width=width, bottom=bottom)

plt.axis('off')

rotations = np.rad2deg(theta)
y0,y1 = ax.get_ylim()

for x, bar, rotation, label in zip(theta, bars, rotations, lObjectsALLlbls):
 offset = (bottom+bar.get_height())/(y1-y0)
 lab = ax.text(0, 0, label, transform=None,
         ha='center', va='center')
 renderer = ax.figure.canvas.get_renderer()
 bbox = lab.get_window_extent(renderer=renderer)
 invb = ax.transData.inverted().transform([[0,0],[bbox.width,0] ])
 lab.set_position((x,offset+(invb[1][0]-invb[0][0])/2.*2.7 ) )
 lab.set_transform(ax.get_xaxis_transform())
 lab.set_rotation(rotation)


plt.show()
不幸的是,这里又涉及到一些奇怪的因素2.7。更不幸的是,在这种情况下,我绝对不知道为什么它必须存在。但结果可能仍然足够好以便使用。
你也可以使用这个问题中的解决方案:相对于文本而不是边界框对齐任意旋转的文本注释