在Matplotlib中为子图添加注释会根据最大的轴缩放图形。

3
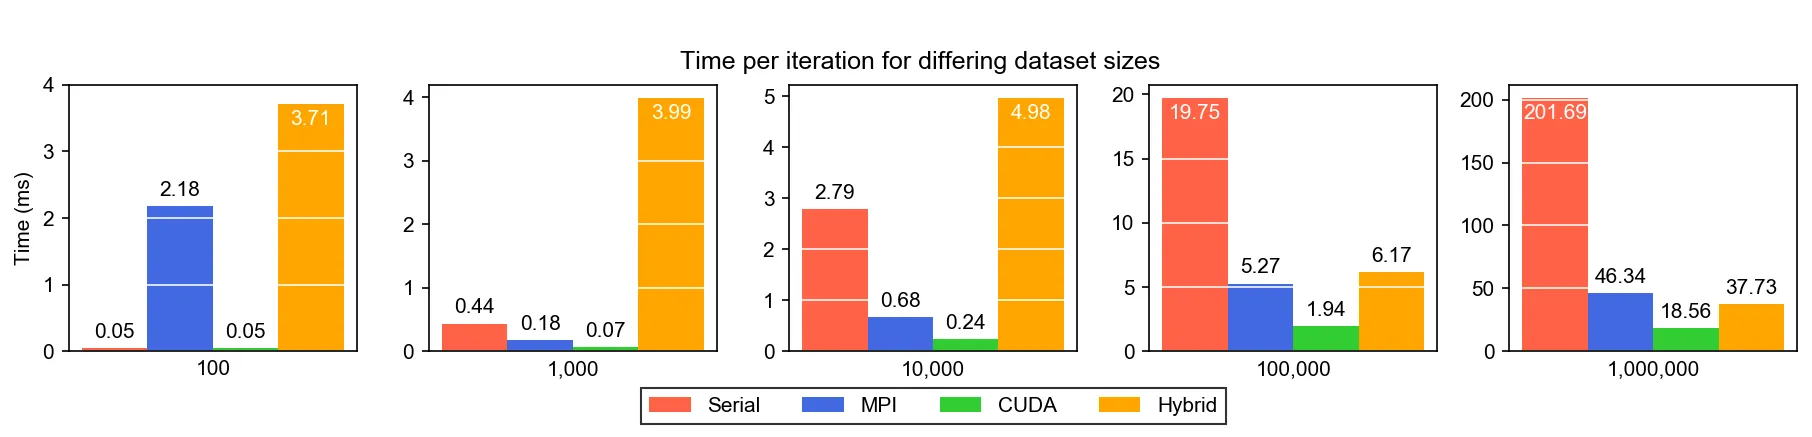
当我用5个子图制作图形并注释每个子图中的条形图时,matplotlib似乎会缩放图形,使得最大y轴的最大值缩放到最小y轴的最小值。
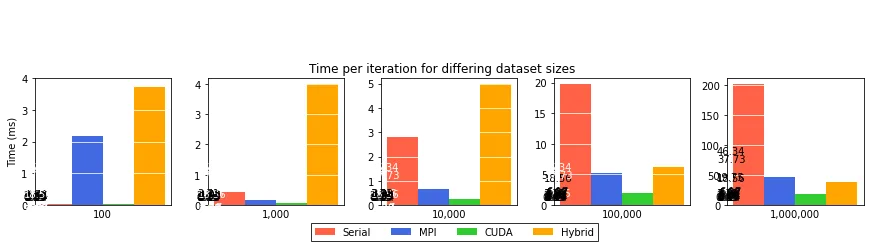
我无法很好地描述这个问题,但请参见这张图片:

在图像应该开始的地方上面有大量空白。

然而,图像理想情况下应该是这样的

this

当我将4个最小的轴的上限设置为与最大轴相同时,图形会正确缩放,但出于可视化目的,我希望不这样做。为什么会这样?有没有办法控制图形,使其不像第一张图片那样自动缩放?或者,有更适合绘制我所希望实现的方式吗?我用来生成图形的代码:
import numpy as np
from matplotlib import pyplot as plt
from matplotlib.patches import Patch
from matplotlib import rcParams
rcParams['font.family'] = 'sans-serif'
rcParams['font.sans-serif'] = ['Arial']
department = ["100", "1,000", "10,000", \
              "100,000", "1,000,000"]
quarter = ["Serial", "MPI", "CUDA", "Hybrid"]
budgets = np.array([[0.049979, 0.43584,  2.787366, 19.75062, 201.6935],\
                    [2.184624, 0.175213, 0.677837, 5.265575, 46.33678],\
                    [0.050294, 0.068537, 0.23739,  1.93778,  18.55734],\
                    [3.714284, 3.9917,   4.977599, 6.174967, 37.732232]])

budgets = np.transpose(budgets)
em = np.zeros((len(department), len(quarter)))

# set up barchart
x = np.arange(len(department)) # label locations
width = 0.8    # width of all the bars

# set up figure
fig, (ax1, ax2, ax3, ax4, ax5) = plt.subplots(1, 5)
axes = [ax1, ax2, ax3, ax4, ax5]

# generate bars
rects = []
color = ["tomato", "royalblue", "limegreen", "orange"]
n = len(quarter)
for i in range(n):
    bar_x = x - width/2.0 + i/float(n)*width + width/(n*2)

    m = len(budgets[:,i])
    for j in range(m):
        bar_x = x[j] - width/2.0 + i/float(n)*width + width/(n*2)
        e = budgets[j,i]
        #bar_x = x - width/2.0 + i/float(n)*width + width/(n*2)
        rects.append(axes[j].bar(bar_x, e, width=width/float(n), \
                label=quarter[i], color=color[i]))

# set figure properties
fig.set_size_inches(12, 2.5)
fig.tight_layout(rect=[0, 0.03, 1, 0.95])
nAx = len(axes)
for i in range(nAx):
    #axes[i].set_aspect("auto")
    axes[i].tick_params(axis='x', which='both', bottom=False, top=False, 
                        labelbottom=False)

ax1.set_ylabel("Time (ms)")
for i in range(nAx):
    axes[i].yaxis.grid(which="major", color="white", lw=0.75)
ax1.set_ylim([0, 4])

fig.suptitle("Time per iteration for differing dataset sizes")   # title

for i in range(nAx):
    axes[i].set_xlabel(department[i])

# annotate bars
for i in range(nAx):
    for rect in rects:
        j = 0;
        for bar in rect:
            y_bottom, y_top = axes[i].get_ylim() # axis limits

            height = bar.get_height() # bar's height

            va = 'bottom'
            offset = 3
            color = 'k'
            fg = 'w'

            # keep label within plot
            if (y_top < 1.1 * height):
                offset = -3
                va = 'top'
                color='w'
                fg = 'k'

            # annotate the bar
            axes[i].annotate('{:.2f}'.format(height),
                              xy=(bar.get_x() + bar.get_width()/2, height),
                              xytext=(0,offset),
                              textcoords="offset points",
                              ha='center', va=va, color=color)


# set custom legend
legend_elements = [Patch(facecolor='tomato', label='Serial'),
                   Patch(facecolor='royalblue', label='MPI'),
                   Patch(facecolor='limegreen', label='CUDA'),
                   Patch(facecolor='orange', label='Hybrid')]
plt.legend(handles=legend_elements, loc="upper center", fancybox=False, 
           edgecolor='k', ncol=4, bbox_to_anchor=(-2, -0.1))

plt.show()

@l_l_l_l_l_l_l_l,我之前使用的是3.1.3版本,但现在已经更新到了3.2.1版本。然而,仍然存在同样的问题。我可以生成图表,但无法去除空白。 - tender
tight_layout 的作用是防止坐标轴重叠。 - tender
plt.show() 更改为 fig.show() 对我来说似乎解决了问题。虽然仍存在一些问题,但比以前更容易通过一些调整来解决。 - tender
你正在使用哪个 matplotlib 后端? - l_l_l_l_l_l_l_l
matplotlib.get_backend() returns Qt5Agg - tender
显示剩余5条评论
2个回答

1
这是部分答案。
这可能是一个错误,因为在我的macOS Jupyter笔记本电脑和从.py脚本中显示的Debian系统中,我无法重现该问题,直到我切换到Debian系统中的Jupyter笔记本电脑(不同的硬件)。您的图形在这些情况下都可以正确绘制。
问题似乎出在您的注释上。如果您在注释之后进行tight_layout调用,则可能会收到如下警告:
<ipython-input-80-f9f592f5efc5>:88: UserWarning: Tight layout not applied. The bottom and top margins cannot be made large enough to accommodate all axes decorations. 
  fig.tight_layout(rect=[0, 0.03, 1, 0.95])

看起来annotate函数计算注释的坐标有些奇怪,但文本最终出现在正确的位置。如果你删除它们,空白处将消失。你可以尝试用不同的方式计算注释的xy坐标。以下代码可能会对你有所帮助:

        axes[i].annotate('{:.2f}'.format(height),
                          xy=(bar.get_x() + bar.get_width()/2, height),
                          xytext=(0,offset),
                          textcoords="offset points",
                          xycoords="axes points", # change
                          ha='center', va=va, color=color)

输出:

enter image description here

为了正确计算点数,您可以尝试使用适当的轴转换,但我无法让它工作,这可能与错误相关。

0
尝试将fig.tight_layout(rect=[0, 0.03, 1, 0.95])放在所有绘图命令之后,如下所示。
import numpy as np
from matplotlib import pyplot as plt
from matplotlib.patches import Patch
from matplotlib import rcParams
rcParams['font.family'] = 'sans-serif'
rcParams['font.sans-serif'] = ['Arial']
department = ["100", "1,000", "10,000", \
              "100,000", "1,000,000"]
quarter = ["Serial", "MPI", "CUDA", "Hybrid"]
budgets = np.array([[0.049979, 0.43584,  2.787366, 19.75062, 201.6935],\
                    [2.184624, 0.175213, 0.677837, 5.265575, 46.33678],\
                    [0.050294, 0.068537, 0.23739,  1.93778,  18.55734],\
                    [3.714284, 3.9917,   4.977599, 6.174967, 37.732232]])

budgets = np.transpose(budgets)
em = np.zeros((len(department), len(quarter)))

# set up barchart
x = np.arange(len(department)) # label locations
width = 0.8    # width of all the bars

# set up figure
fig, (ax1, ax2, ax3, ax4, ax5) = plt.subplots(1, 5)
axes = [ax1, ax2, ax3, ax4, ax5]

# generate bars
rects = []
color = ["tomato", "royalblue", "limegreen", "orange"]
n = len(quarter)
for i in range(n):
    bar_x = x - width/2.0 + i/float(n)*width + width/(n*2)

    m = len(budgets[:,i])
    for j in range(m):
        bar_x = x[j] - width/2.0 + i/float(n)*width + width/(n*2)
        e = budgets[j,i]
        #bar_x = x - width/2.0 + i/float(n)*width + width/(n*2)
        rects.append(axes[j].bar(bar_x, e, width=width/float(n), \
                label=quarter[i], color=color[i]))

# set figure properties
fig.set_size_inches(12, 2.5)
#fig.tight_layout(rect=[0, 0.03, 1, 0.95])
nAx = len(axes)
for i in range(nAx):
    #axes[i].set_aspect("auto")
    axes[i].tick_params(axis='x', which='both', bottom=False, top=False, 
                        labelbottom=False)

ax1.set_ylabel("Time (ms)")
for i in range(nAx):
    axes[i].yaxis.grid(which="major", color="white", lw=0.75)
ax1.set_ylim([0, 4])

fig.suptitle("Time per iteration for differing dataset sizes")   # title

for i in range(nAx):
    axes[i].set_xlabel(department[i])

# annotate bars
for i in range(nAx):
    for rect in rects:
        j = 0;
        for bar in rect:
            y_bottom, y_top = axes[i].get_ylim() # axis limits

            height = bar.get_height() # bar's height

            va = 'bottom'
            offset = 3
            color = 'k'
            fg = 'w'

            # keep label within plot
            if (y_top < 1.1 * height):
                offset = -3
                va = 'top'
                color='w'
                fg = 'k'

            # annotate the bar
            axes[i].annotate('{:.2f}'.format(height),
                              xy=(bar.get_x() + bar.get_width()/2, height),
                              xytext=(0,offset),
                              textcoords="offset points",
                              ha='center', va=va, color=color)


# set custom legend
legend_elements = [Patch(facecolor='tomato', label='Serial'),
                   Patch(facecolor='royalblue', label='MPI'),
                   Patch(facecolor='limegreen', label='CUDA'),
                   Patch(facecolor='orange', label='Hybrid')]
plt.legend(handles=legend_elements, loc="upper center", fancybox=False, 
           edgecolor='k', ncol=4, bbox_to_anchor=(-2, -0.1))

fig.tight_layout(rect=[0, 0.03, 1, 0.95])

plt.show()

尝试这样做,我收到了警告“未应用紧密布局。底部和顶部边距无法足够大以容纳所有轴装饰。” - tender

网页内容由stack overflow 提供, 点击上面的
可以查看英文原文,
原文链接