将视图移出 ConstraintLayout

6

我想要裁剪的图片

我想把我的ImageView移动到父级ConstraintLayout的一半位置。 可以将其想象为在我的LinearLayout中创建负边距。

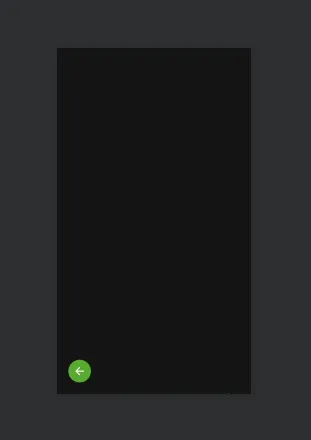
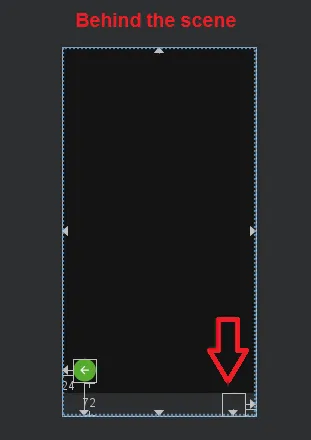
我有一张图片,它应该像照片上那样被裁剪,在实际设备上只显示按钮的一侧。其他部分应该被裁剪掉。

这里是我的布局的一部分。

<android.support.constraint.ConstraintLayout xmlns:android="http://schemas.android.com/apk/res/android"
    xmlns:app="http://schemas.android.com/apk/res-auto"
    android:layout_width="match_parent"
    android:layout_height="wrap_content"
    android:orientation="vertical">

    <ImageView
        android:layout_width="71dp"
        android:layout_height="71dp"
        android:src="@drawable/someImage"
        app:layout_constraintTop_toTopOf="parent"/>

</android.support.constraint.ConstraintLayout>

那么,有没有好的方法可以做到这一点呢?

那有什么用处? - Xenolion
我不确定你想要什么(卡在了ConstraintLayout的中间) - Raghunandan
@Xenolion 我更新了我的回答。 - nutella_eater
这个回答解决了你的问题吗?将视图放置在ConstraintLayout之外 - Mahozad
6个回答

13

所以我找到了解决方案。 基本上,您需要将图像从其容器中进行翻译。

android:translationY="-22dp"

对于背景图像,我也成功地使用了 android:translationY,但我还必须从我的 ImageView 中删除 app:layout_constraintBottom_toBottomOf="parent"。在删除它之前,在不同的设备屏幕尺寸上位置会不一致。 - jbobbins

5

添加一条指导线,并说明你的 ImageView 应该在该指导线之上,例如此代码将使所有内容呈现为您的布局:

<?xml version="1.0" encoding="utf-8"?>
<android.support.constraint.ConstraintLayout xmlns:android="http://schemas.android.com/apk/res/android"
 xmlns:app="http://schemas.android.com/apk/res-auto"
    android:layout_width="match_parent"
    android:layout_height="match_parent"
    android:orientation="vertical">

   <ImageView
        android:layout_width="wrap_content"
        android:layout_height="wrap_content"
        android:adjustViewBounds="true"
        android:src="@drawable/your_image"
        app:layout_constraintEnd_toEndOf="parent"
        app:layout_constraintStart_toStartOf="parent"
        app:layout_constraintBottom_toBottomOf="@id/guideline" />

    <android.support.constraint.Guideline
        android:id="@+id/guideline"
        android:layout_width="wrap_content"
        android:layout_height="wrap_content"
        android:orientation="horizontal"
        app:layout_constraintGuide_begin="163dp" />

</android.support.constraint.ConstraintLayout>

0
我是通过在ConstraintLayout中添加View并给它一些边距来实现这个的。
View为ConstraintLayout提供了背景。
ConstraintLayout必须具有透明背景。
<androidx.constraintlayout.widget.ConstraintLayout
    android:layout_width="match_parent"
    android:layout_height="wrap_content"
    android:background="@drawable/bg_transparent">

    <View
        android:layout_width="match_parent"
        android:layout_height="0dp"
        android:layout_marginTop="38dp"
        android:background="@drawable/bg_white"
        app:layout_constraintBottom_toBottomOf="parent"
        app:layout_constraintEnd_toEndOf="parent"
        app:layout_constraintStart_toStartOf="parent"
        app:layout_constraintTop_toTopOf="parent" />

    <ImageView/>

0
为了将 ImageView 定位在父级的中心位置,需要通过将 layout_height 设置为 0dp 来强制执行垂直约束。为了保持 ImageView 的适当大小,需要将 dimensionRatio 设置为 1:1。代码如下(请注意,父级 ConstraintLayout 现在具有与父级匹配的 layout_height):
<android.support.constraint.ConstraintLayout xmlns:android="http://schemas.android.com/apk/res/android"
    xmlns:app="http://schemas.android.com/apk/res-auto"
    android:layout_width="match_parent"
    android:layout_height="match_parent">

    <ImageView
        android:layout_width="71dp"
        android:layout_height="0dp"
        android:src="@drawable/someImage"
        app:layout_constraintBottom_toTopOf="parent"
        app:layout_constraintEnd_toEndOf="parent"
        app:layout_constraintStart_toStartOf="parent"
        app:layout_constraintTop_toTopOf="parent"
        app:layout_constraintDimensionRatio="1:1"/>
</android.support.constraint.ConstraintLayout>

0
将图像放置在线性布局中。
<LinearLayout....>

    <ImageView..../>

</LinearLayout>

添加名为clipChildren的属性,并将其设置为true


0
一个技巧是在ConstraintLayout本身中为您想要的一侧设置负边距。这需要将其他具有该侧约束的视图偏移。图像中的右侧按钮位于ConstraintLayout下方,并隐藏在底部栏下面:

enter image description here enter image description here

<?xml version="1.0" encoding="utf-8"?>
<androidx.constraintlayout.widget.ConstraintLayout
    ...
    android:layout_marginBottom="-48dp">

    <ImageButton
        android:id="@+id/leftButton"
        android:layout_width="48dp"
        android:layout_height="48dp"
        android:layout_marginEnd="24dp"
        android:layout_marginBottom="72dp"
        android:background="@drawable/shape_next_button"
        app:layout_constraintBottom_toBottomOf="parent"
        app:layout_constraintEnd_toEndOf="parent" />

    <ImageButton
        android:id="@+id/rightButton"
        android:layout_width="48dp"
        android:layout_height="48dp"
        android:layout_marginStart="24dp"
        android:background="@drawable/shape_previous_button"
        app:layout_constraintBottom_toBottomOf="parent"
        app:layout_constraintStart_toStartOf="parent" />

</androidx.constraintlayout.widget.ConstraintLayout>

网页内容由stack overflow 提供, 点击上面的
可以查看英文原文,
原文链接