LinearLayout是一个常用的控件,用于平均分布(权重)视图,例如: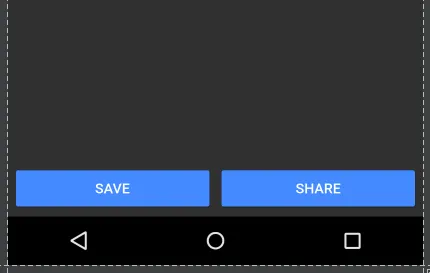
如何使用新的ConstraintLayout实现像这样平均间距的视图?
ConstraintLayout 实现此效果有两种方式: Chain 和 Guideline。使用 Chain 方法需要确保您正在使用 ConstraintLayout Beta 3 或更新版本,如果您想在 Android Studio 的可视化布局编辑器中使用,请确保您正在使用 Android Studio 2.3 Beta 1 或更高版本。
方法1 - 使用 Chain
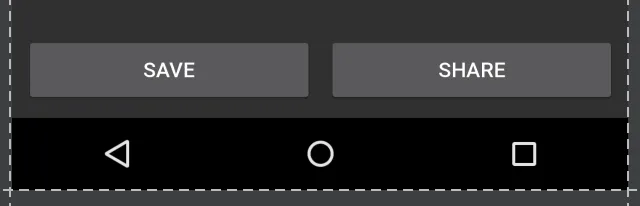
打开布局编辑器并按照需要添加父级约束条件正常添加小部件。 在本例中,我添加了两个带有父级约束的按钮 (Save 按钮位于左侧,Share 按钮位于右侧):
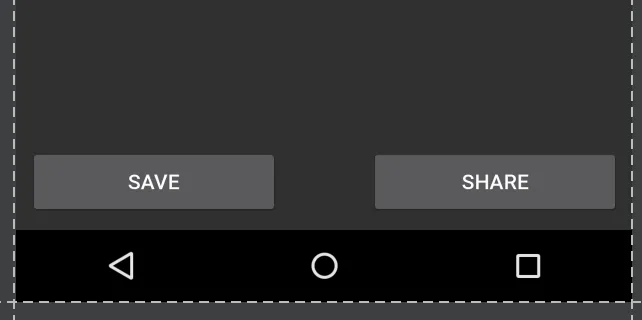 请注意,在这种状态下,如果我切换到横向视图,则视图不会填充父级,而是锚定在角落上:
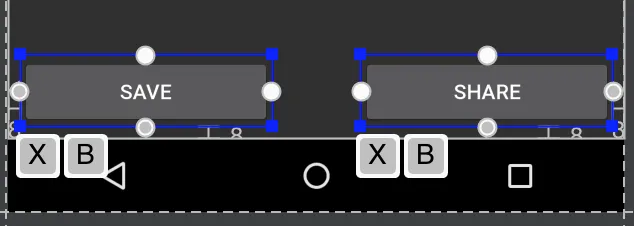
 通过 Ctrl / Cmd 点击或拖动选中两个视图:
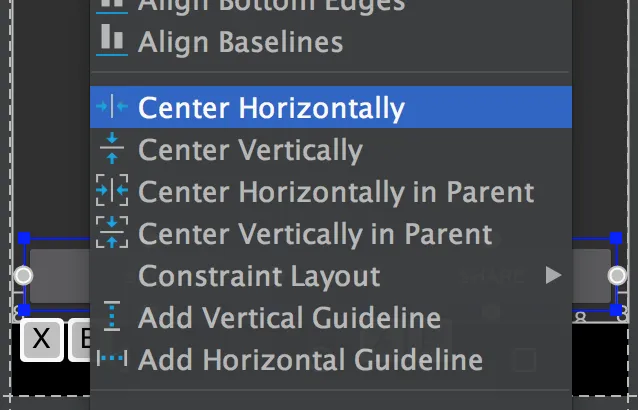
 然后右键单击视图并选择“水平居中”:
 这将在视图之间建立双向连接(Chain 的定义方式)。默认情况下,链式样式为“spread”,即使不包括任何 XML 属性也会应用。保持此链式样式,但将视图的宽度设置为
 0dp,可以让视图填充可用空间,均匀地分布在父级上:
 在横向视图中更加明显:
 如果您喜欢跳过布局编辑器,则生成的 XML 如下所示:
<android.support.constraint.ConstraintLayout
xmlns:android="http://schemas.android.com/apk/res/android"
xmlns:app="http://schemas.android.com/apk/res-auto"
android:layout_width="match_parent"
android:layout_height="match_parent">

<Button
    android:id="@+id/button_save"
    android:layout_width="0dp"
    android:layout_height="wrap_content"
    android:text="@string/button_save_text"
    android:layout_marginStart="8dp"
    android:layout_marginBottom="8dp"
    android:layout_marginEnd="4dp"
    app:layout_constraintLeft_toLeftOf="parent"
    app:layout_constraintBottom_toBottomOf="parent"
    app:layout_constraintRight_toLeftOf="@+id/button_share"
    app:layout_constraintHorizontal_chainStyle="spread" />

<Button
    android:id="@+id/button_share"
    android:layout_width="0dp"
    android:layout_height="wrap_content"
    android:text="@string/button_share_text"
    android:layout_marginStart="4dp"
    android:layout_marginEnd="8dp"
    android:layout_marginBottom="8dp"
    app:layout_constraintLeft_toRightOf="@+id/button_save"
    app:layout_constraintRight_toRightOf="parent"
    app:layout_constraintBottom_toBottomOf="parent" />

</android.support.constraint.ConstraintLayout>
详情:
0dp或MATCH_CONSTRAINT可以让视图填充父容器(可选)layout_constraintHorizontal_chainStyle指定链样式,请参见文档以了解各种链样式,如果省略链样式,则默认为“spread”layout_constraintHorizontal_weight 调整方法2-使用指南线
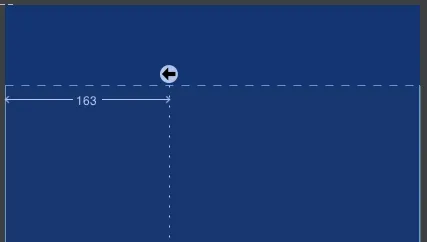
在编辑器中打开布局并单击指南线按钮:

然后选择“添加垂直指南线”:
会出现一个新的指南线,默认情况下,它可能会以相对值锚定到左侧(由朝左的箭头表示):
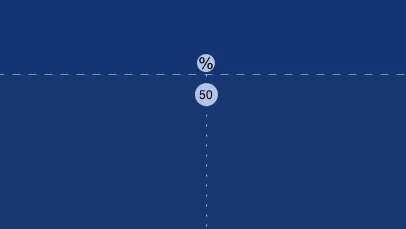
单击朝左的箭头以将其切换为百分比值,然后将指南线拖动到50%标记处:
现在可以将指南线用作其他视图的锚点。在我的示例中,我将保存按钮的右侧和分享按钮的左侧连接到了指南线上:
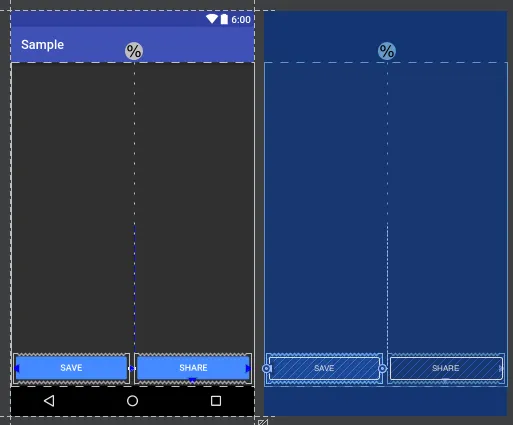
如果要使视图填满可用空间,则应将约束设置为“任意大小”(水平运行的波浪线):
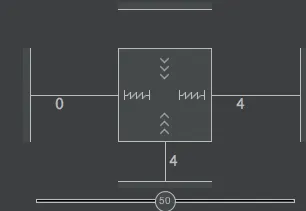
(这与将layout_width设置为0dp相同)。
可以很容易地在XML中创建指南线,而不是使用布局编辑器:
<android.support.constraint.Guideline
    android:layout_width="wrap_content"
    android:layout_height="wrap_content"
    android:id="@+id/guideline"
    android:orientation="vertical"
    app:layout_constraintGuide_percent="0.5" />
要在同一行上创建两个视图,宽度相同,只需定义:
<android.support.constraint.ConstraintLayout
    android:layout_width="match_parent"
    android:layout_height="match_parent"
    >

    <Button
        android:id="@+id/button1"
        android:layout_width="0dp"
        android:layout_height="wrap_content"
        android:text="Button 1"
        app:layout_constraintEnd_toStartOf="@+id/button2"
        app:layout_constraintStart_toStartOf="parent" />

    <Button
        android:id="@+id/button2"
        android:layout_width="0dp"
        android:layout_height="wrap_content"
        android:text="Button 2"
        app:layout_constraintEnd_toEndOf="parent"
        app:layout_constraintStart_toEndOf="@+id/button1" />

</android.support.constraint.ConstraintLayout>
注意
MATCH_CONSTRAINT)button1 和 button2 的约束必须像上面那样结果

更多
如果您想让View1比View2大,可以使用weight或percent。
例如,View1的宽度= 2 * View2的宽度使用weight
<android.support.constraint.ConstraintLayout
    android:layout_width="match_parent"
    android:layout_height="wrap_content"
    >

    <Button
        android:id="@+id/button3"
        android:layout_width="0dp"
        android:layout_height="wrap_content"
        android:text="Button 3"
        app:layout_constraintEnd_toStartOf="@+id/button4"
        app:layout_constraintHorizontal_weight="2"
        app:layout_constraintStart_toStartOf="parent"
        />

    <Button
        android:id="@+id/button4"
        android:layout_width="0dp"
        android:layout_height="wrap_content"
        android:text="Button 4"
        app:layout_constraintEnd_toEndOf="parent"
        app:layout_constraintHorizontal_weight="1"
        app:layout_constraintStart_toEndOf="@+id/button3"
        />

</android.support.constraint.ConstraintLayout>
结果

例如:View1 的宽度为 View2 宽度的百分之二百
<android.support.constraint.ConstraintLayout
    android:layout_width="match_parent"
    android:layout_height="wrap_content"
    >

    <Button
        android:id="@+id/button5"
        android:layout_width="0dp"
        android:layout_height="wrap_content"
        android:text="Button 5"
        app:layout_constraintEnd_toStartOf="@+id/button6"
        app:layout_constraintStart_toStartOf="parent"
        app:layout_constraintWidth_percent="0.667"
        />

    <Button
        android:id="@+id/button6"
        android:layout_width="0dp"
        android:layout_height="wrap_content"
        android:text="Button 6"
        app:layout_constraintEnd_toEndOf="parent"
        app:layout_constraintStart_toEndOf="@+id/button5"
        app:layout_constraintWidth_percent="0.333"
        />

</android.support.constraint.ConstraintLayout>
结果

如果能帮助到某人的话,关键在于这里的app:layout_constraintHorizontal_weight="1",而且 ConstraintLayout 最好的一点就是它支持循环依赖,这正是我用它来实现的。
对于第一个子元素:
app:layout_constraintEnd_toStartOf="@+id/textInputSecondChild"
对于第二个子元素:
app:layout_constraintLeft_toRightOf="@+id/textInputFirstChild"
以下是完整演示:
<android.support.design.widget.TextInputLayout
    android:id="@+id/textInputParent"
    android:layout_width="0dp"
    android:layout_height="wrap_content"
    app:layout_constraintLeft_toLeftOf="parent"
    app:layout_constraintRight_toRightOf="parent">

    <EditText
        android:id="@+id/editTextParent"
        android:layout_width="match_parent"
        android:layout_height="wrap_content"
        android:hint="@string/state" />
</android.support.design.widget.TextInputLayout>

<android.support.design.widget.TextInputLayout
    android:id="@+id/textInputFirstChild"
    android:layout_width="0dp"
    android:layout_height="wrap_content"
    app:layout_constraintEnd_toStartOf="@+id/textInputSecondChild"
    app:layout_constraintHorizontal_weight="1"
    app:layout_constraintLeft_toLeftOf="parent"
    app:layout_constraintTop_toBottomOf="@+id/textInputParent">

    <EditText
        android:id="@+id/editTextChildOne"
        android:layout_width="match_parent"
        android:layout_height="wrap_content"
        android:hint="@string/pin_code" />
</android.support.design.widget.TextInputLayout>

<android.support.design.widget.TextInputLayout
    android:id="@+id/textInputSecondChild"
    android:layout_width="0dp"
    android:layout_height="wrap_content"
    app:layout_constraintHorizontal_weight="1"
    app:layout_constraintLeft_toRightOf="@+id/textInputFirstChild"
    app:layout_constraintRight_toRightOf="parent"
    app:layout_constraintTop_toBottomOf="@+id/textInputParent">

    <EditText
        android:id="@+id/editTextChildSecond"
        android:layout_width="match_parent"
        android:layout_height="wrap_content"
        android:hint="@string/country" />
</android.support.design.widget.TextInputLayout>
你应该了解关于加权链的内容。这里有一份代码示例。
<android.support.constraint.ConstraintLayout xmlns:android="http://schemas.android.com/apk/res/android"
    xmlns:app="http://schemas.android.com/apk/res-auto"
    xmlns:tools="http://schemas.android.com/tools"
    android:layout_width="match_parent"
    android:layout_height="wrap_content"
    >

    <TextView
        android:id="@+id/figure_1"
        android:layout_width="0dp"
        android:layout_height="wrap_content"
        android:layout_marginEnd="8dp"
        android:layout_marginRight="8dp"
        app:layout_constraintEnd_toStartOf="@id/figure_2"
        app:layout_constraintHorizontal_weight="1"
        app:layout_constraintStart_toStartOf="parent"
        tools:text="1"
        />

    <TextView
        android:id="@+id/figure_2"
        android:layout_width="0dp"
        android:layout_height="wrap_content"
        android:layout_marginStart="8dp"
        android:layout_marginLeft="8dp"
        android:layout_marginEnd="8dp"
        android:layout_marginRight="8dp"
        app:layout_constraintEnd_toStartOf="@id/figure_3"
        app:layout_constraintHorizontal_weight="1"
        app:layout_constraintStart_toEndOf="@id/figure_1"
        tools:text="2"
        />

    <TextView
        android:id="@+id/figure_3"
        android:layout_width="0dp"
        android:layout_height="wrap_content"
        android:layout_marginStart="8dp"
        android:layout_marginLeft="8dp"
        android:layout_marginEnd="8dp"
        android:layout_marginRight="8dp"
        app:layout_constraintEnd_toStartOf="@id/figure_4"
        app:layout_constraintHorizontal_weight="1"
        app:layout_constraintStart_toEndOf="@id/figure_2"
        tools:text="3"
        />

    <TextView
        android:id="@+id/figure_4"
        android:layout_width="0dp"
        android:layout_height="wrap_content"
        android:layout_marginStart="8dp"
        android:layout_marginLeft="8dp"
        app:layout_constraintEnd_toEndOf="parent"
        app:layout_constraintHorizontal_weight="1"
        app:layout_constraintStart_toEndOf="@id/figure_3"
        tools:text="4"
        />
</android.support.constraint.ConstraintLayout>
因此,设置android:layout_width="0dp",app:layout_constraintHorizontal_weight="1",并与相邻视图进行链接,例如:
app:layout_constraintStart_toEndOf="@id/figure_2"
app:layout_constraintEnd_toStartOf="@id/figure_4"
ConstraintLayout中权重的工作方式,只有第一个答案是不够的,无法得到完整的图片。 - CoolMind一旦您有了连接的项目,您仍然可以像相对布局一样在它们上面使用权重来保持它们均匀间隔。下面的示例演示了如何在具有不同大小的TextView的情况下保持它们均匀间隔。
<TextView1
     app:layout_constraintHorizontal_weight="1" />
 <TextView2
     app:layout_constraintHorizontal_weight="1" />
 <TextView3
     app:layout_constraintHorizontal_weight="1" />
 <TextView4
     app:layout_constraintHorizontal_weight="1" />
