如果可以避免,我不想使用子视图。我想要一个带有背景图片、文本和图像的UIButton。目前,当我这样做时,图像在文本的左侧。背景图片、文本和图像都有不同的高亮状态。
如何将图片放在UIButton文本的右侧?
380
- jasongregori
1
在这里增加另一个“hack”:您可以将按钮的attributedTitle设置为包含按钮标题+空格+图像(作为NSTextAttachment)的属性字符串。您可能需要调整附件的边界以使其对齐(请参见https://dev59.com/L18e5IYBdhLWcg3wFnPm)。 - Manav
35个回答
3
参考@Piotr的回答并将其转换为Swift扩展。在调用此方法之前,请确保设置图像和标题,以便按钮可以正确地调整大小。
 extension UIButton {

    /// Makes the ``imageView`` appear just to the right of the ``titleLabel``.
    func alignImageRight() {
        if let titleLabel = self.titleLabel, imageView = self.imageView {
            // Force the label and image to resize.
            titleLabel.sizeToFit()
            imageView.sizeToFit()
            imageView.contentMode = .ScaleAspectFit

            // Set the insets so that the title appears to the left and the image appears to the right.
            // Make the image appear slightly off the top/bottom edges of the button.
            self.titleEdgeInsets = UIEdgeInsets(top: 0, left: -1 * imageView.frame.size.width,
                bottom: 0, right: imageView.frame.size.width)
            self.imageEdgeInsets = UIEdgeInsets(top: 4, left: titleLabel.frame.size.width,
                bottom: 4, right: -1 * titleLabel.frame.size.width)
          }
        }
     }
- Nick Yap
2
子类化和覆盖layoutSubviews可能是您最好的选择。
- FeifanZ
1
3可以毫无问题地继承 UIButton。 - nonamelive
2
一个快速选项,可以在不使用任何插入物的情况下完成您想要的操作:
class RightImageButton: UIButton {

    override func layoutSubviews() {
        super.layoutSubviews()

        if let  textSize = titleLabel?.intrinsicContentSize(),
                imageSize = imageView?.intrinsicContentSize() {
            let wholeWidth = textSize.width + K.textImageGap + imageSize.width
            titleLabel?.frame = CGRect(
                x: round(bounds.width/2 - wholeWidth/2),
                y: 0,
                width: ceil(textSize.width),
                height: bounds.height)
            imageView?.frame = CGRect(
                x: round(bounds.width/2 + wholeWidth/2 - imageSize.width),
                y: RoundRetina(bounds.height/2 - imageSize.height/2),
                width: imageSize.width,
                height: imageSize.height)
        }
    }

    struct K {
        static let textImageGap: CGFloat = 5
    }

}
- Chris
1
什么是“RoundRetina”,这段代码已经过时了。 - Pedro Paulo Amorim
1
Swift 3.0迁移方案,由jasongregori提供。
class ButtonIconRight: UIButton {
        override func imageRect(forContentRect contentRect: CGRect) -> CGRect {
            var imageFrame = super.imageRect(forContentRect: contentRect)
           imageFrame.origin.x = super.titleRect(forContentRect: contentRect).maxX - imageFrame.width
        return imageFrame
        }

        override func titleRect(forContentRect contentRect: CGRect) -> CGRect {
            var titleFrame = super.titleRect(forContentRect: contentRect)
            if (self.currentImage != nil) {
                titleFrame.origin.x = super.imageRect(forContentRect: contentRect).minX
            }
            return titleFrame
        }
- Sourabh Sharma
1
这里提到的解决方案在启用了“自动布局”后停止起作用。我不得不自己想出一个解决方案:
子类化UIButton并覆盖
子类化UIButton并覆盖
layoutSubviews方法://
// MIThemeButtonImageAtRight.m
// Created by Lukasz Margielewski on 7/9/13.
//
#import "MIThemeButtonImageAtRight.h"
static CGRect CGRectByApplyingUIEdgeInsets(CGRect frame, UIEdgeInsets insets);
@implementation MIThemeButtonImageAtRight
- (void)layoutSubviews
{
[super layoutSubviews];
CGRect contentFrame = CGRectByApplyingUIEdgeInsets(self.bounds, self.contentEdgeInsets);
CGRect frameIcon = self.imageView.frame;
CGRect frameText = self.titleLabel.frame;
frameText.origin.x = CGRectGetMinX(contentFrame) + self.titleEdgeInsets.left;
frameIcon.origin.x = CGRectGetMaxX(contentFrame) - CGRectGetWidth(frameIcon);
self.imageView.frame = frameIcon;
self.titleLabel.frame = frameText;
}
@end
static CGRect CGRectByApplyingUIEdgeInsets(CGRect frame, UIEdgeInsets insets){
CGRect f = frame;
f.origin.x += insets.left;
f.size.width -= (insets.left + insets.right);
f.origin.y += (insets.top);
f.size.height -= (insets.top + insets.bottom);
return f;
}
Result:
- Lukasz
1
这在Swift 5.2上对我有效
let sizeOfTitle: CGFloat = 80
let sizeOfImage: CGFloat = 20
yourButton.titleEdgeInsets = UIEdgeInsets(top: 0.0, left: -sizeOfImage , bottom: 0.0, right: sizeOfImage)
yourButton.imageEdgeInsets = UIEdgeInsets(top: 0.0, left: sizeOfTitle, bottom: 0.0, right: -sizeOfTitle)
- Noman Haroon
1
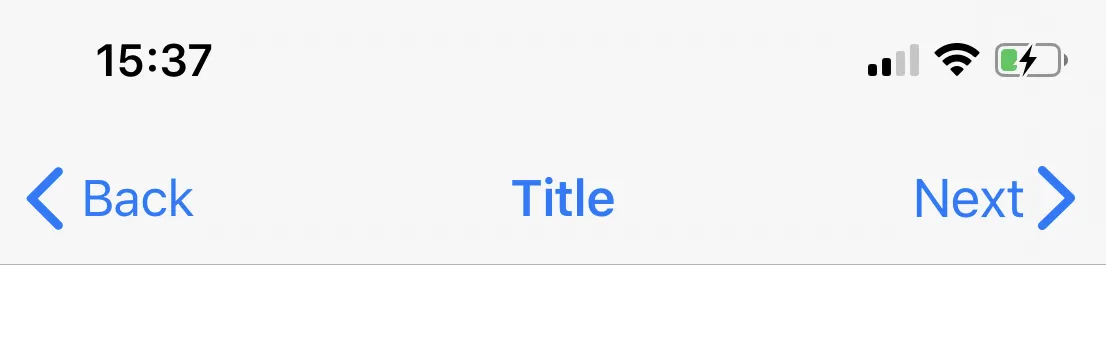
Xcode 11.4 Swift 5.2
如果有人试图像这样使用尖角符号镜像返回按钮的样式:
import UIKit

class NextBarButton: UIBarButtonItem {

    convenience init(target: Any, selector: Selector) {

        // Create UIButton
        let button = UIButton(frame: .zero)

        // Set Title
        button.setTitle("Next", for: .normal)
        button.setTitleColor(.systemBlue, for: .normal)
        button.titleLabel?.font = UIFont.systemFont(ofSize: 17)

        // Configure Symbol
        let config = UIImage.SymbolConfiguration(pointSize: 19.0, weight: .semibold, scale: .large)
        let image = UIImage(systemName: "chevron.right", withConfiguration: config)
        button.setImage(image, for: .normal)

        // Add Target
        button.addTarget(target, action: selector, for: .touchUpInside)

        // Put the Image on the right hand side of the button
        // Credit to liau-jian-jie for this part
        button.transform = CGAffineTransform(scaleX: -1.0, y: 1.0)
        button.titleLabel?.transform = CGAffineTransform(scaleX: -1.0, y: 1.0)
        button.imageView?.transform = CGAffineTransform(scaleX: -1.0, y: 1.0)

        // Customise spacing to match system Back button
        button.imageEdgeInsets = UIEdgeInsets(top: 0.0, left: -18.0, bottom: 0.0, right: 0.0)
        button.titleEdgeInsets = UIEdgeInsets(top: 0.0, left: -12.0, bottom: 0.0, right: 0.0)

        self.init(customView: button)
    }
}
实现:
override func viewDidLoad() {
    super.viewDidLoad()
    let nextButton = NextBarButton(target: self, selector: #selector(nextTapped))
    navigationItem.rightBarButtonItem = nextButton
}

@objc func nextTapped() {
    // your code
}
- rbaldwin
0
Swift 3:
open override func imageRect(forContentRect contentRect: CGRect) -> CGRect {
    var frame = super.imageRect(forContentRect: contentRect)
    let  imageWidth = frame.size.width
    var titleRect = CGRect.zero
    titleRect.size = self.title(for: self.state)!.size(attributes: [NSFontAttributeName: self.titleLabel!.font])
    titleRect.origin.x = (self.frame.size.width - (titleRect.size.width + imageWidth)) / 2.0 + self.titleEdgeInsets.left - self.titleEdgeInsets.right;
    frame.origin.x = titleRect.origin.x + titleRect.size.width - self.imageEdgeInsets.right + self.imageEdgeInsets.left;
    return frame
}

open override func titleRect(forContentRect contentRect: CGRect) -> CGRect {
    var frame = super.titleRect(forContentRect: contentRect)
    if let imageWidth = self.image(for: self.state)?.size.width {
        frame.origin.x = (self.frame.size.width - (frame.size.width + imageWidth)) / 2.0 + self.titleEdgeInsets.left - self.titleEdgeInsets.right;
    }
    return frame
}
- Alexander Volkov
0
Swift 4 & 5
改变UIButton图像的方向(RTL和LTR)
extension UIButton {
    func changeDirection(){
       isArabic ? (self.contentHorizontalAlignment = .right) : (self.contentHorizontalAlignment = .left)
        // left-right margin
        self.imageEdgeInsets = UIEdgeInsets(top: 0, left: 5, bottom: 0, right: 5)
        self.titleEdgeInsets = UIEdgeInsets(top: 0, left: 5, bottom: 0, right: 5)
    }
}
- Rashid Latif
2
什么是“Utility”? - Byron Coetsee
我刚刚删除了Utility,它是我的代码中的一个类,在那里我可以检查所选语言是否为阿拉伯语或英语。 - Rashid Latif
0
在尝试了互联网上的多个解决方案后,我并没有达到精确的要求。所以我最终编写了自定义的实用程序代码。希望能对未来的某人有所帮助。 在Swift 4.2上进行了测试。
// This function should be called in/after viewDidAppear to let view render
    func addArrowImageToButton(button: UIButton, arrowImage:UIImage = #imageLiteral(resourceName: "my_image_name") ) {
        let btnSize:CGFloat = 32
        let imageView = UIImageView(image: arrowImage)
        let btnFrame = button.frame
        imageView.frame = CGRect(x: btnFrame.width-btnSize-8, y: btnFrame.height/2 - btnSize/2, width: btnSize, height: btnSize)
        button.addSubview(imageView)
        //Imageview on Top of View
        button.bringSubviewToFront(imageView)
    }
- jeet.chanchawat
网页内容由stack overflow 提供, 点击上面的可以查看英文原文,
原文链接
原文链接