如果可以避免,我不想使用子视图。我想要一个带有背景图片、文本和图像的UIButton。目前,当我这样做时,图像在文本的左侧。背景图片、文本和图像都有不同的高亮状态。
如何将图片放在UIButton文本的右侧?
380
- jasongregori
1
在这里增加另一个“hack”:您可以将按钮的attributedTitle设置为包含按钮标题+空格+图像(作为NSTextAttachment)的属性字符串。您可能需要调整附件的边界以使其对齐(请参见https://dev59.com/L18e5IYBdhLWcg3wFnPm)。 - Manav
35个回答
642
最简单的解决方案:
iOS 10及更高版本,Swift语言:
button.transform = CGAffineTransform(scaleX: -1.0, y: 1.0)
button.titleLabel?.transform = CGAffineTransform(scaleX: -1.0, y: 1.0)
button.imageView?.transform = CGAffineTransform(scaleX: -1.0, y: 1.0)
iOS 10之前,使用Swift/Obj-C:
button.transform = CGAffineTransformMakeScale(-1.0, 1.0);
button.titleLabel.transform = CGAffineTransformMakeScale(-1.0, 1.0);
button.imageView.transform = CGAffineTransformMakeScale(-1.0, 1.0);
iOS 9及以上版本,Swift:(推荐)
button.semanticContentAttribute = .forceRightToLeft
- Liau Jian Jie
15
12我用这个来作为导航栏标题视图,但出现了故障。当它首次加载时是正常的,但当你推入一个视图控制器并将其弹出时,标题就会翻转。 - funct7
1我发现如果在运行时出现关于自动布局约束冲突的投诉,可以通过在layoutSubviews()中添加以下内容来解决。 - Vlad
1我该如何在文本和图片之间加入更多的空白? - rohinb
2@rohinb @jose920405 尝试设置ImageEdgeInsets和ContentEdgeInsets来进行填充(记得它们是相反的)。例如
button.ImageEdgeInsets = new UIEdgeInsets(0, -leftPadding, 0, leftPadding); button.ContentEdgeInsets = new UIEdgeInsets(0, 0, 0, leftPadding);。这是在Xamarin中,但应该很容易转换到Swift/Obj-C。 - Lee Richardson4设置
semanticContentAttribute 的致命缺陷在于它会破坏语音导航。语音导航使用语义内容属性来确定通过元素的导航方向,改变语义意味着用户到达按钮后,他们的 VO 导航将被翻转并回到他们刚才访问的元素而不是下一个元素。请注意,这句话中的 WILL 表示强调,表示“一定会”,需要保留其强调的意义。 - timzilla显示剩余10条评论
349
尽管有些提出的答案非常有创意和极为聪明,但最简单的解决方案如下:
button.semanticContentAttribute = UIApplication.shared
    .userInterfaceLayoutDirection == .rightToLeft ? .forceLeftToRight : .forceRightToLeft
就是这么简单。作为额外的奖励,在从右到左的语言环境中,该图像将位于左侧。
编辑:由于这个问题已经被问了几次,这是 iOS 9+。
- Benjamin
20
134我无法相信这个答案被接受了。难道没有人为他们的应用做本地化吗? - Zoltán
10@pallzoltan:这回答了问题(即“如何在UIButton中将图像放在文本的右侧?”)。本地化与此有什么关系? - Benjamin
31在使用从右到左(RTL)语言时,很少有不需要布局“翻转”的情况。直接设置
semanticContentAttribute只是一种hack或解决方法,而不是真正的解决方案。 - Zoltán8我的方法是你不知道提问者正在构建什么,因此最好考虑布局的灵活性。 - Zoltán
10为什么这个答案被接受了?它既不是最简单的答案,也不是正确答案中任何一种。
苹果的
UIUserInterfaceLayoutDirection.rightToLeft文档说明:
“从右到左的布局方向。当本地化为阿拉伯语或希伯来语等需要用户界面布局原点在坐标系右边缘的情况时,此值是合适的。”UIButton具有一个imageEdgeInsets属性,可以在代码或IB中设置。它是专门用于重新定位按钮图像的正确方式。 - Alex Chase显示剩余15条评论
341
更新至XCODE 9(通过界面构建)
有一个更简单的方式来自界面构建。
选择UIButton并在视图实用程序 > 语义中选择此选项:
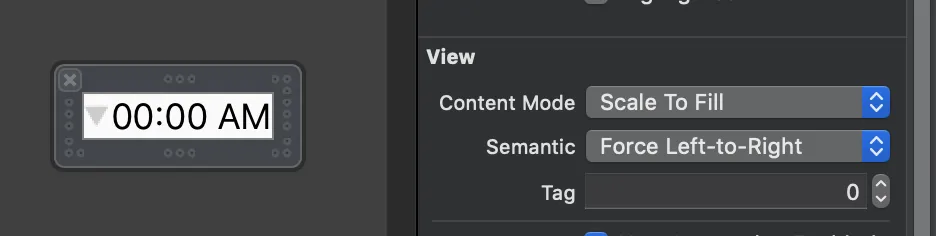
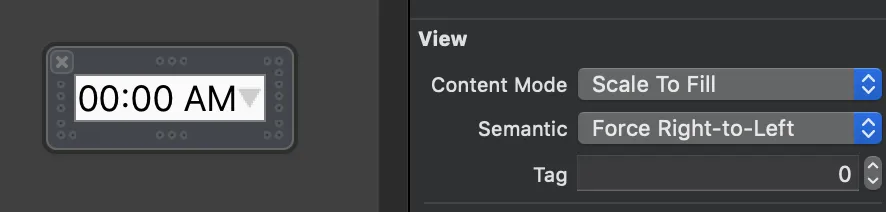 就是这样! 简单易操作!
可选 - 第二步:
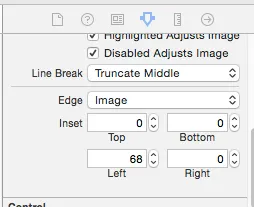
如果您想要调整图像和标题之间的间距,可以在此处更改图像插入:
- Victor Rius
2
2在Xcode 9.0 beta 5 (9M202q)中,不幸的是,您只能在运行时看到结果 - 在故事板中仍然显示图像在左侧。此外,请注意,由于这个原因,设置正确的插入需要一些试错。 - PDK
22请不要这样做 - 这会破坏从右至左语言的本地化。 - jsadler
180
不必要完全地对UIButton进行子类化。相反,您可以为图像插入设置较高的左插入值,并为标题设置较小的右插入值。类似这样:
子类化 UIButton 是完全不必要的。相反,您可以为图像插入设置较高的左插入值,并将标题的右插入设置为较小的值。类似如下:
button.imageEdgeInsets = UIEdgeInsetsMake(0., button.frame.size.width - (image.size.width + 15.), 0., 0.);
button.titleEdgeInsets = UIEdgeInsetsMake(0., 0., 0., image.size.width);
- Ben Baron
1
3它起作用了,但请记住,今天使用自动布局时,您必须在viewDidAppear上执行它,而不是在viewDidLoad上执行。 - Hola Soy Edu Feliz Navidad
95
我要感谢Inspire48 提供的建议。基于他的建议和参考其他问题,我得出了这个解决方案。继承UIButton并覆盖这些方法。
@implementation UIButtonSubclass

- (CGRect)imageRectForContentRect:(CGRect)contentRect
{
    CGRect frame = [super imageRectForContentRect:contentRect];
    frame.origin.x = CGRectGetMaxX(contentRect) - CGRectGetWidth(frame) -  self.imageEdgeInsets.right + self.imageEdgeInsets.left;
    return frame;
}

- (CGRect)titleRectForContentRect:(CGRect)contentRect
{
    CGRect frame = [super titleRectForContentRect:contentRect];
    frame.origin.x = CGRectGetMinX(frame) - CGRectGetWidth([self imageRectForContentRect:contentRect]);
    return frame;
}

@end
- jasongregori
9
3UIButton 是一个类簇,不应该被子类化。 - Scott Berrevoets
52不是这样的,文档明确提到了子类化,并提供了需要覆盖以自定义布局行为的方法。 - Tark
2https://developer.apple.com/library/ios/documentation/uikit/reference/UIButton_Class/UIButton/UIButton.html
buttonWithType 如果您子类化了UIButton,则此方法不会返回您的子类的实例。如果要创建特定子类的实例,则必须直接分配/初始化按钮。backgroundRectForBounds 提供自定义背景装饰的子类可以重写此方法并返回修改后的边界矩形,以防止按钮绘制在任何自定义内容上方。两者都没有提到这些特定方法,但我认为它们不介意子类。 - christophercotton1看起来这个公式更适合镜像图像框架:
frame.origin.x = CGRectGetMaxX(contentRect) - CGRectGetWidth(frame) - self.imageEdgeInsets.right + self.imageEdgeInsets.left - frame.origin.x; 它适用于 UIControlContentHorizontalAlignmentCenter 和其他模式... - k06a@Accatyyc,jasongregori:嗯,我不同意。1. “完全控制布局”根本不在最初的问题中。2. “如果您的按钮更改大小,则除非每次更改大小时手动更改插图,否则布局将会破裂。”->这就是viewDidLayoutSubviews的作用。3. UIButton子类化是一个非常重的答案,当简单的插图操作可以完成工作时。对不起,伙计们,我保留我的反对票,并支持其他更简单的答案。 - Gwendal Roué
显示剩余4条评论
80
当标题更改时,只需更新插图。您需要在另一侧使用相等且相反的插入来补偿插入。
[thebutton setTitle:title forState:UIControlStateNormal];
thebutton.titleEdgeInsets = UIEdgeInsetsMake(0, -thebutton.imageView.frame.size.width, 0, thebutton.imageView.frame.size.width);
thebutton.imageEdgeInsets = UIEdgeInsetsMake(0, thebutton.titleLabel.frame.size.width, 0, -thebutton.titleLabel.frame.size.width);
- Piotr Tomasik
4
4在此之前,你可能需要添加
[thebutton.titleLabel sizeToFit];。如果您尚未触发布局,则宽度可能为零。图像大小也是如此(只需使用UIImage.size而不是imageView大小)。 - scosman@delrox 说得好。可以使用
titleWidth = [self.titleLabel sizeThatFits:CGSizeMake(CGFLOAT_MAX, self.bounds.size.height)].width;(或者如果您担心按钮框架尚未建立,请在高度上也使用 CGFLOAT_MAX)和 imageWidth = self.currentImage.size.width;。 - Dave Goldman1在viewDidLayoutSubviews上完美运行。 - Gwendal Roué
我不得不将这个放在我的
UITableViewCell子类的layoutSubviews中,但它工作得很好。谢谢! - RyanG57
截止到2016年1月,这些回答都已经不再需要。在界面构建器中,将“视图语义”设置为Force Right-to-Left,或者如果您更喜欢编程方式,则为semanticContentAttribute = .forceRightToLeft。这将导致图像出现在文本的右侧。
- barndog
5
5很遗憾,它不支持iOS 9以下的版本。虽然是个不错的答案。 - Eddie
1我很遗憾地报告,将此设置在用于UIBarButtonItem的UIButton上并没有产生任何变化。 - Amelia
正如@Amelia所提到的,如果您调用
UIBarButtonItem(customView: button),那么它将无法工作,但是如果您在某些空视图中包装按钮,则可以正常工作。 - tt.Kilew@tt.Kilew,使用XCode 8.1,你可以让它工作。我设置了uiButton.semanticContentAttribute = .forceRightToLeft,并提供了let nextButton = UIBarButtonItem(customView: uiButton)。 - Eugene Biryukov
2如果您支持辅助功能,请不要使用此功能,因为它会破坏VoiceOver在屏幕上读取元素的顺序。 - Sihad Begovic
54
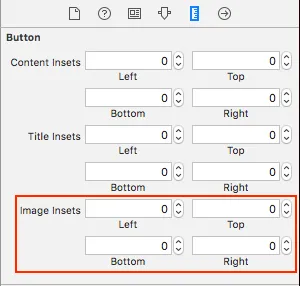
在接口生成器中,您可以为UIButton配置Edge Insets选项,分别针对三个部分:内容、图像和标题。
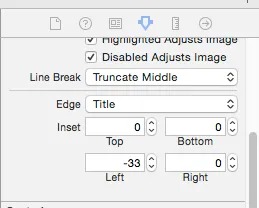
Xcode 8:
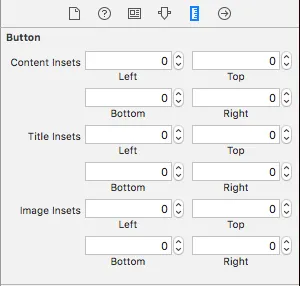
- Henadzi Rabkin
1
6在我看来,实际上最好的答案是这个:https://dev59.com/i2w05IYBdhLWcg3wqzms#39013315。 - Henadzi Rabkin
31
我决定不使用标准的按钮图片视图,因为提出的移动解决方案感觉很粗糙。这让我得到了想要的美学效果,通过更改约束条件重新定位按钮是直观的:
extension UIButton {
    func addRightIcon(image: UIImage) {
        let imageView = UIImageView(image: image)
        imageView.translatesAutoresizingMaskIntoConstraints = false

        addSubview(imageView)

        let length = CGFloat(15)
        titleEdgeInsets.right += length

        NSLayoutConstraint.activate([
            imageView.leadingAnchor.constraint(equalTo: self.titleLabel!.trailingAnchor, constant: 10),
            imageView.centerYAnchor.constraint(equalTo: self.titleLabel!.centerYAnchor, constant: 0),
            imageView.widthAnchor.constraint(equalToConstant: length),
            imageView.heightAnchor.constraint(equalToConstant: length)
        ])
    }
}
- Mark H
3
这不响应点击,文本变暗但图像不变。 - Teddy K
请确保在小型设备上检查您的扩展。 - Zulqarnain Naveed
不错的解决方案,易于定制和使用。 - Ramesh Sanghar
26
更新:Swift 3
class ButtonIconRight: UIButton {
    override func imageRect(forContentRect contentRect:CGRect) -> CGRect {
        var imageFrame = super.imageRect(forContentRect: contentRect)
        imageFrame.origin.x = super.titleRect(forContentRect: contentRect).maxX - imageFrame.width
        return imageFrame
    }

    override func titleRect(forContentRect contentRect:CGRect) -> CGRect {
        var titleFrame = super.titleRect(forContentRect: contentRect)
        if (self.currentImage != nil) {
            titleFrame.origin.x = super.imageRect(forContentRect: contentRect).minX
        }
        return titleFrame
    }
}
Swift 2 的原始回答:
这是一个处理所有水平对齐方式的解决方案,附带 Swift 实现示例。如有需要,请将其翻译为 Objective-C。
class ButtonIconRight: UIButton {
    override func imageRectForContentRect(contentRect:CGRect) -> CGRect {
        var imageFrame = super.imageRectForContentRect(contentRect)
        imageFrame.origin.x = CGRectGetMaxX(super.titleRectForContentRect(contentRect)) - CGRectGetWidth(imageFrame)
        return imageFrame
    }

    override func titleRectForContentRect(contentRect:CGRect) -> CGRect {
        var titleFrame = super.titleRectForContentRect(contentRect)
        if (self.currentImage != nil) {
            titleFrame.origin.x = CGRectGetMinX(super.imageRectForContentRect(contentRect))
        }
        return titleFrame
    }
}
值得注意的是,它可以很好地处理图像和标题插图。受到jasongregori答案的启发;)
- Jean-Baptiste
3
1这个解决方案对我很有效,但是我的图片需要一些空间,所以我添加了以下代码:self.contentEdgeInsets = UIEdgeInsetsMake(10.0, 10.0, 10.0, 10.0) - user1354603
1我喜欢这种方式,因为您可以在设计时间添加
@IBDesignable 到类中并查看它翻转。 - James Toomey我更喜欢这个解决方案,因为即使放在导航栏中,它也能正常工作。 - El Horrible
网页内容由stack overflow 提供, 点击上面的可以查看英文原文,
原文链接
原文链接