我有一个文本为“Explore the app”的UIButton和一个UIImage图像。
在Interface Builder中,它看起来像:
[ (>) Explore the app ]
但我需要把这个UIImage放在文本之后:
[ Explore the app (>) ]
我该如何将 UIImage 向右移动?
我有一个文本为“Explore the app”的UIButton和一个UIImage图像。
在Interface Builder中,它看起来像:
[ (>) Explore the app ]
但我需要把这个UIImage放在文本之后:
[ Explore the app (>) ]
我该如何将 UIImage 向右移动?
我的解决方案非常简单
[button sizeToFit];
button.titleEdgeInsets = UIEdgeInsetsMake(0, -button.imageView.frame.size.width, 0, button.imageView.frame.size.width);
button.imageEdgeInsets = UIEdgeInsetsMake(0, button.titleLabel.frame.size.width, 0, -button.titleLabel.frame.size.width);
在iOS 9及以上版本中,似乎强制视图的语义是实现这一点的简单方法。
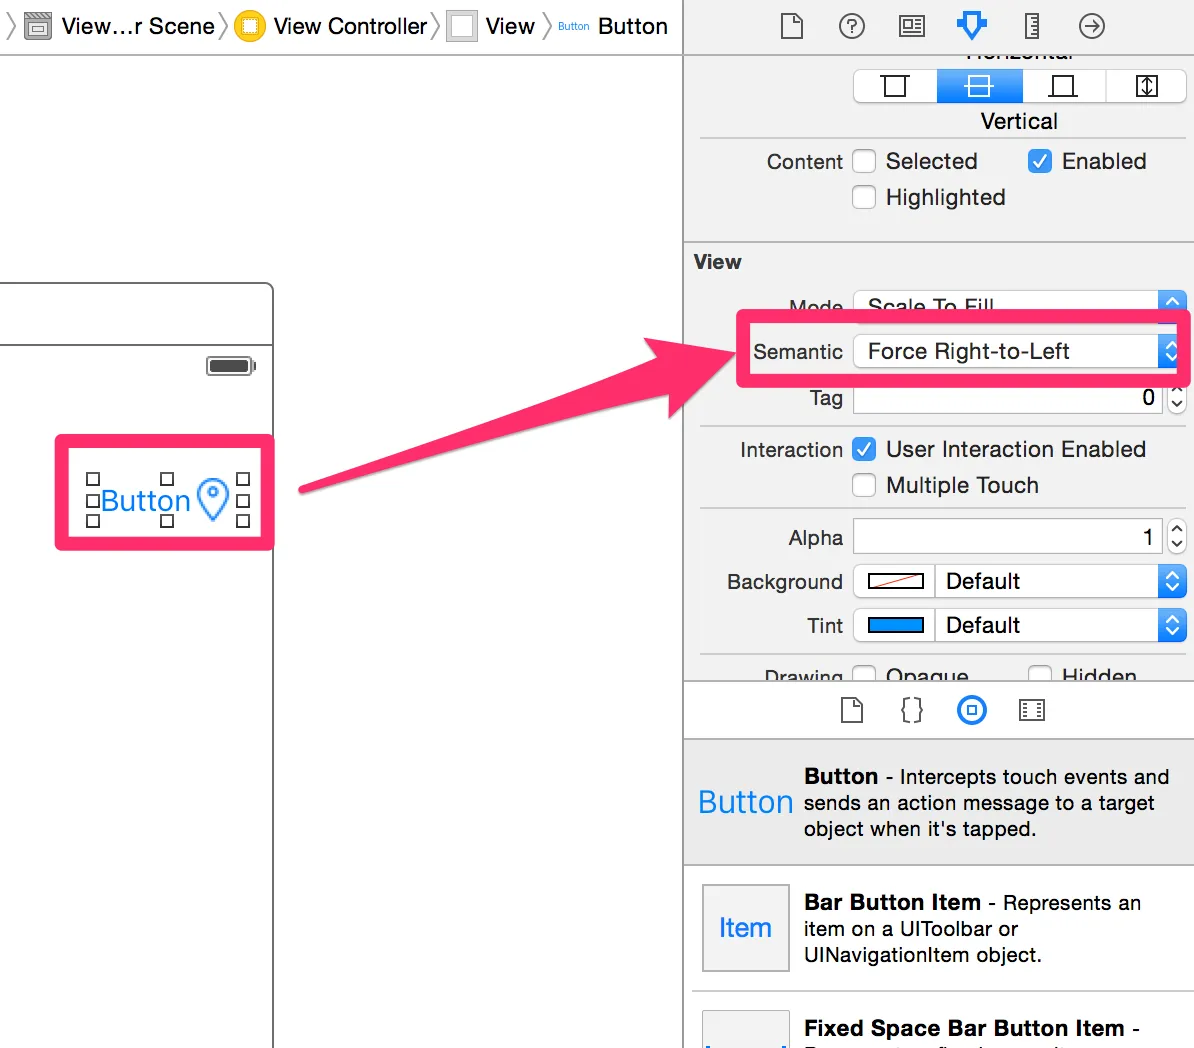
或者可以通过编程来实现:
button.semanticContentAttribute = .ForceRightToLeft
设置imageEdgeInset和titleEdgeInset来移动图像中的组件。您也可以使用这些图形创建一个全尺寸的按钮,并将其用作按钮的背景图像(然后使用titleEdgeInsets来移动标题位置)。
Raymond W的回答最好。使用自定义的layoutSubviews子类化UIButton。这样做非常简单,以下是对我有效的一个layoutSubviews实现:
- (void)layoutSubviews
{
    // Allow default layout, then adjust image and label positions
    [super layoutSubviews];

    UIImageView *imageView = [self imageView];
    UILabel *label = [self titleLabel];

    CGRect imageFrame = imageView.frame;
    CGRect labelFrame = label.frame;

    labelFrame.origin.x = imageFrame.origin.x;
    imageFrame.origin.x = labelFrame.origin.x + CGRectGetWidth(labelFrame);

    imageView.frame = imageFrame;
    label.frame = labelFrame;
}
labelFrame.origin.x = excessiveWidth / 2;
imageFrame.origin.x = CGRectGetMaxX(labelFrame) + 10;'
- i-konov如何通过继承 UIButton 并覆盖 layoutSubviews 方法来实现布局?
接着可以处理 self.imageView 和 self.titleLabel 的位置。
另一个简单的方法(不仅限于iOS 9)是子类化UIButton并重写这两个方法。
override func titleRectForContentRect(contentRect: CGRect) -> CGRect {
    var rect = super.titleRectForContentRect(contentRect)
    rect.origin.x = 0
    return rect
}

override func imageRectForContentRect(contentRect: CGRect) -> CGRect {
    var rect = super.imageRectForContentRect(contentRect)
    rect.origin.x = CGRectGetMaxX(contentRect) - CGRectGetWidth(rect)
    return rect
}
contentEdgeInsets 已经通过使用 super 而被考虑在内。
如果您的应用程序同时支持“从左到右”和“从右到左”,则强制按钮使用“从右到左”并不是一个选项。
对我有效的解决方案是在Storyboard中为按钮添加一个可添加的子类,并与约束很好地配合使用(在iOS 11中进行了测试):
class ButtonWithImageAtEnd: UIButton {

    override func layoutSubviews() {
        super.layoutSubviews()

        if let imageView = imageView, let titleLabel = titleLabel {
            let padding: CGFloat = 15
            imageEdgeInsets = UIEdgeInsets(top: 5, left: titleLabel.frame.size.width+padding, bottom: 5, right: -titleLabel.frame.size.width-padding)
            titleEdgeInsets = UIEdgeInsets(top: 0, left: -imageView.frame.width, bottom: 0, right: imageView.frame.width)
        }

    }

}
“padding”指的是标题和图像之间的空白区域。
.forceRightToLeft 是一个选项!如果 UIApplication.shared.userInterfaceLayoutDirection == .rightToLeft,只需使用相反的值(.forceLeftToRight)即可。 - manmal使用Swift:
override func layoutSubviews(){
    super.layoutSubviews()

    let inset: CGFloat = 5

    if var imageFrame = self.imageView?.frame,
       var labelFrame = self.titleLabel?.frame {

       let cumulativeWidth = imageFrame.width + labelFrame.width + inset
       let excessiveWidth = self.bounds.width - cumulativeWidth
       labelFrame.origin.x = excessiveWidth / 2
       imageFrame.origin.x = labelFrame.origin.x + labelFrame.width + inset

       self.imageView?.frame = imageFrame
       self.titleLabel?.frame = labelFrame
    }
}
在@split的答案基础上进行扩展...
这个答案非常好,但它忽略了一个事实:按钮可能具有预先设置的自定义图像和标题边缘插图(例如,在storyboard中)。
例如,您可能希望图像与容器的顶部和底部有一些填充,但仍将图像移动到按钮的右侧。
我使用以下方法扩展了这个概念:
- (void) moveImageToRightSide {
    [self sizeToFit];

    CGFloat titleWidth = self.titleLabel.frame.size.width;
    CGFloat imageWidth = self.imageView.frame.size.width;
    CGFloat gapWidth = self.frame.size.width - titleWidth - imageWidth;
    self.titleEdgeInsets = UIEdgeInsetsMake(self.titleEdgeInsets.top,
                                            -imageWidth + self.titleEdgeInsets.left,
                                            self.titleEdgeInsets.bottom,
                                            imageWidth - self.titleEdgeInsets.right);

    self.imageEdgeInsets = UIEdgeInsetsMake(self.imageEdgeInsets.top,
                                            titleWidth + self.imageEdgeInsets.left + gapWidth,
                                            self.imageEdgeInsets.bottom,
                                            -titleWidth + self.imageEdgeInsets.right - gapWidth);
}
// Get the size of the text and image
CGSize buttonLabelSize = [[self.button titleForState:UIControlStateNormal] sizeWithFont:self.button.titleLabel.font];
CGSize buttonImageSize = [[self.button imageForState:UIControlStateNormal] size];

// You can do this line in the xib too:
self.button.contentHorizontalAlignment = UIControlContentHorizontalAlignmentRight;

// Adjust Edge Insets according to the above measurement. The +2 adds a little space
self.button.imageEdgeInsets = UIEdgeInsetsMake(0, 0, 0, -(buttonLabelSize.width+2));
self.button.titleEdgeInsets = UIEdgeInsetsMake(0, 0, 0, buttonImageSize.width+2);
这将创建一个向右对齐的按钮,如下所示:
[ button label (>)]