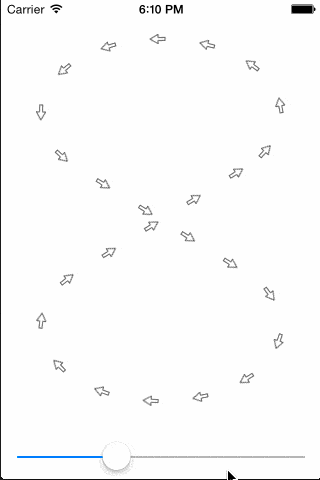
我猜你想要这样的效果:
你可以在这个 Github 仓库中找到完整的演示应用项目。
话虽如此,这是一个有趣的小问题。
你需要生成一系列沿着路径的点,并且我假设你希望它们等距分布。 生成这些点并不容易。
幸运的是,Core Graphics 包含一个可以为你完成此操作的函数,但并不明显。该函数是 CGPathCreateCopyByDashingPath。
首先,让我们创建一个 UIBezierPath 类别来创建一个虚线副本:
UIBezierPath+Rob_dash.h
#import <UIKit/UIKit.h>

@interface UIBezierPath (Rob_dash)

- (instancetype)Rob_dashedPathWithPattern:(NSArray *)pattern phase:(CGFloat)phase;

@end
UIBezierPath+Rob_dash.m
#import "UIBezierPath+Rob_dash.h"

@implementation UIBezierPath (Rob_dash)

- (instancetype)Rob_dashedPathWithPattern:(NSArray *)pattern phase:(CGFloat)phase {
    CGFloat lengths[pattern.count];
    size_t i = 0;
    for (NSNumber *number in pattern) {
        lengths[i++] = number.doubleValue;
    }
    CGPathRef dashedCGPath = CGPathCreateCopyByDashingPath(self.CGPath, NULL, phase, lengths, pattern.count);
    UIBezierPath *dashedPath = [self.class bezierPathWithCGPath:dashedCGPath];
    CGPathRelease(dashedCGPath);
    return dashedPath;
}

@end
一旦我们有了虚线路径,我们需要枚举路径的元素(例如moveToPoint:、addLineToPoint:等单个命令)。唯一的方法是使用另一个Core Graphics函数CGPathApply。让我们编写另一个UIBezierPath类别,使用块使其更容易。这个类别有点长:
UIBezierPath+Rob_forEach.h
#import <UIKit/UIKit.h>

typedef void (^Rob_UIBezierPath_moveBlock)(CGPoint destination);
typedef void (^Rob_UIBezierPath_lineBlock)(CGPoint destination);
typedef void (^Rob_UIBezierPath_quadBlock)(CGPoint control, CGPoint destination);
typedef void (^Rob_UIBezierPath_cubicBlock)(CGPoint control0, CGPoint control1, CGPoint destination);
typedef void (^Rob_UIBezierPath_closeBlock)(void);

@interface UIBezierPath (Rob_forEach)

- (void)Rob_forEachMove:(Rob_UIBezierPath_moveBlock)moveBlock line:(Rob_UIBezierPath_lineBlock)lineBlock quad:(Rob_UIBezierPath_quadBlock)quadBlock cubic:(Rob_UIBezierPath_cubicBlock)cubicBlock close:(Rob_UIBezierPath_closeBlock)closeBlock;

@end
UIBezierPath+Rob_forEach.m
#import "UIBezierPath+Rob_forEach.h"

struct ForEachBlocks {
    __unsafe_unretained Rob_UIBezierPath_moveBlock moveBlock;
    __unsafe_unretained Rob_UIBezierPath_lineBlock lineBlock;
    __unsafe_unretained Rob_UIBezierPath_quadBlock quadBlock;
    __unsafe_unretained Rob_UIBezierPath_cubicBlock cubicBlock;
    __unsafe_unretained Rob_UIBezierPath_closeBlock closeBlock;
};

static void applyBlockToPathElement(void *info, const CGPathElement *element) {
    struct ForEachBlocks *blocks = info;
    switch (element->type) {
        case kCGPathElementMoveToPoint:
            if (blocks->moveBlock != nil) {
                blocks->moveBlock(element->points[0]);
            }
            break;
        case kCGPathElementAddLineToPoint:
            if (blocks->lineBlock != nil) {
                blocks->lineBlock(element->points[0]);
            }
            break;
        case kCGPathElementAddQuadCurveToPoint:
            if (blocks->quadBlock) {
                blocks->quadBlock(element->points[0], element->points[1]);
            }
            break;
        case kCGPathElementAddCurveToPoint:
            if (blocks->cubicBlock) {
                blocks->cubicBlock(element->points[0], element->points[1], element->points[2]);
            }
            break;
        case kCGPathElementCloseSubpath:
            if (blocks->closeBlock) {
                blocks->closeBlock();
            }
            break;
    }
}

@implementation UIBezierPath (Rob_forEach)

- (void)Rob_forEachMove:(Rob_UIBezierPath_moveBlock)moveBlock line:(Rob_UIBezierPath_lineBlock)lineBlock quad:(Rob_UIBezierPath_quadBlock)quadBlock cubic:(Rob_UIBezierPath_cubicBlock)cubicBlock close:(Rob_UIBezierPath_closeBlock)closeBlock {
    struct ForEachBlocks blocks = {
        .moveBlock = moveBlock,
        .lineBlock = lineBlock,
        .quadBlock = quadBlock,
        .cubicBlock = cubicBlock,
        .closeBlock = closeBlock
    };
    CGPathApply(self.CGPath, &blocks, applyBlockToPathElement);
}

@end
现在我们要将这两个类别结合起来,以虚线路径绘制,然后沿着虚线行走并在每个虚线的末尾发出点。请注意,一条虚线可能由多个连续的直线/曲线段组成。我们需要关注移动命令,以了解何时结束虚线。此外,为了在正确的角度绘制每个箭头,我们需要知道每个点处曲线的切向量,因此我们还将计算它作为单位向量。在直线段的情况下,切向量与直线段平行。对于曲线,直接在曲线端点之前的控制点确定端点处的切线。
UIBezierPath+Rob_points.h
#import <UIKit/UIKit.h>

@interface UIBezierPath (Rob_points)

- (void)Rob_forEachPointAtInterval:(CGFloat)interval perform:(void (^)(CGPoint point, CGVector vector))block;

@end
UIBezierPath+Rob_points.m
#import "UIBezierPath+Rob_points.h"
#import "UIBezierPath+Rob_dash.h"
#import "UIBezierPath+Rob_forEach.h"
#import <tgmath.h>

static CGVector vectorFromPointToPoint(CGPoint tail, CGPoint head) {
    CGFloat length = hypot(head.x - tail.x, head.y - tail.y);
    return CGVectorMake((head.x - tail.x) / length, (head.y - tail.y) / length);
}

@implementation UIBezierPath (Rob_points)

- (void)Rob_forEachPointAtInterval:(CGFloat)interval perform:(void (^)(CGPoint, CGVector))block {
    UIBezierPath *dashedPath = [self Rob_dashedPathWithPattern:@[ @(interval * 0.5), @(interval * 0.5) ] phase:0];
    __block BOOL hasPendingSegment = NO;
    __block CGPoint pendingControlPoint;
    __block CGPoint pendingPoint;
    [dashedPath Rob_forEachMove:^(CGPoint destination) {
        if (hasPendingSegment) {
            block(pendingPoint, vectorFromPointToPoint(pendingControlPoint, pendingPoint));
            hasPendingSegment = NO;
        }
        pendingPoint = destination;
    } line:^(CGPoint destination) {
        pendingControlPoint = pendingPoint;
        pendingPoint = destination;
        hasPendingSegment = YES;
    } quad:^(CGPoint control, CGPoint destination) {
        pendingControlPoint = control;
        pendingPoint = destination;
        hasPendingSegment = YES;
    } cubic:^(CGPoint control0, CGPoint control1, CGPoint destination) {
        pendingControlPoint = control1;
        pendingPoint = destination;
        hasPendingSegment = YES;
    } close:nil];
    if (hasPendingSegment) {
        block(pendingPoint, vectorFromPointToPoint(pendingControlPoint, pendingPoint));
    }
}

@end
现在我们可以沿着路径找到点,并在每个点上找到单位切向量。让我们创建一个自定义视图,在 drawRect: 中利用这种能力:
ArrowView.h
#import <UIKit/UIKit.h>

@interface ArrowView : UIView

@property (nonatomic) CGFloat interval;

@end
ArrowView.m
#import "ArrowView.h"
#import "UIBezierPath+Rob_figureEight.h"
#import "UIBezierPath+Rob_points.h"
@implementation ArrowView
- (void)setInterval:(CGFloat)interval {
_interval = interval;
[self setNeedsDisplay];
}
- (void)drawRect:(CGRect)rect {
UIImage *arrow = [UIImage imageNamed:@"right233.png"];
UIBezierPath *path = [UIBezierPath Rob_figureEightInRect:CGRectInset(self.bounds, 40, 40)];
[path Rob_forEachPointAtInterval:self.interval perform:^(CGPoint point, CGVector vector) {
CGContextRef gc = UIGraphicsGetCurrentContext();
CGContextSaveGState(gc); {
CGContextTranslateCTM(gc, point.x, point.y);
CGContextConcatCTM(gc, CGAffineTransformMake(vector.dx, vector.dy, -vector.dy, vector.dx, 0, 0));
CGContextTranslateCTM(gc, -0.5 * arrow.size.width, -0.5 * arrow.size.height);
[arrow drawAtPoint:CGPointZero];
} CGContextRestoreGState(gc);
}];
}
@end
如果您想在路径沿线绘制箭头图像,那就是全部内容了。
在我的演示应用程序存储库中还有一个小奖励。如果您返回到第一个提交,我还实现了另一种解决方案:一个类别,它接受路径并将其“箭头化”,在每个子路径末端放置一个箭头。 如果您将其与虚线组合(就像我在该项目版本中所做的那样),则可以沿路径获得箭头。 但最终效果并不如使用箭头图像好看。
CGPathCreateCopyByDashingPath是个绝妙的发现。 - bgfriend0