我试图理解torchvision如何与matplotlib交互以生成图像网格。生成图像并迭代显示很容易:
import torch
import torchvision
import matplotlib.pyplot as plt

w = torch.randn(10,3,640,640)
for i in range (0,10):
    z = w[i]
    plt.imshow(z.permute(1,2,0))
    plt.show()
然而,将这些图像以网格形式展示似乎并不是那么简单。
Translated text:然而,将这些图像以网格形式展示似乎并不是那么简单。
w = torch.randn(10,3,640,640)
grid = torchvision.utils.make_grid(w, nrow=5)
plt.imshow(grid)
---------------------------------------------------------------------------
TypeError                                 Traceback (most recent call last)
<ipython-input-61-1601915e10f3> in <module>()
      1 w = torch.randn(10,3,640,640)
      2 grid = torchvision.utils.make_grid(w, nrow=5)
----> 3 plt.imshow(grid)

/anaconda3/lib/python3.6/site-packages/matplotlib/pyplot.py in imshow(X, cmap, norm, aspect, interpolation, alpha, vmin, vmax, origin, extent, shape, filternorm, filterrad, imlim, resample, url, hold, data, **kwargs)
   3203                         filternorm=filternorm, filterrad=filterrad,
   3204                         imlim=imlim, resample=resample, url=url, data=data,
-> 3205                         **kwargs)
   3206     finally:
   3207         ax._hold = washold

/anaconda3/lib/python3.6/site-packages/matplotlib/__init__.py in inner(ax, *args, **kwargs)
   1853                         "the Matplotlib list!)" % (label_namer, func.__name__),
   1854                         RuntimeWarning, stacklevel=2)
-> 1855             return func(ax, *args, **kwargs)
   1856
   1857         inner.__doc__ = _add_data_doc(inner.__doc__,

/anaconda3/lib/python3.6/site-packages/matplotlib/axes/_axes.py in imshow(self, X, cmap, norm, aspect, interpolation, alpha, vmin, vmax, origin, extent, shape, filternorm, filterrad, imlim, resample, url, **kwargs)
   5485                               resample=resample, **kwargs)
   5486
-> 5487         im.set_data(X)
   5488         im.set_alpha(alpha)
   5489         if im.get_clip_path() is None:

/anaconda3/lib/python3.6/site-packages/matplotlib/image.py in set_data(self, A)
    651         if not (self._A.ndim == 2
    652                 or self._A.ndim == 3 and self._A.shape[-1] in [3, 4]):
--> 653             raise TypeError("Invalid dimensions for image data")
    654
    655         if self._A.ndim == 3:

TypeError: Invalid dimensions for image data
尽管 PyTorch 的文档表明 w 是正确的形状,但 Python 却说不是。所以我尝试对张量的索引进行排列:
    w = torch.randn(10,3,640,640)
    grid = torchvision.utils.make_grid(w.permute(0,2,3,1), nrow=5)
    plt.imshow(grid)
---------------------------------------------------------------------------
    RuntimeError                              Traceback (most recent call last)
    <ipython-input-62-6f2dc6313e29> in <module>()
          1 w = torch.randn(10,3,640,640)
    ----> 2 grid = torchvision.utils.make_grid(w.permute(0,2,3,1), nrow=5)
          3 plt.imshow(grid)

    /anaconda3/lib/python3.6/site-packages/torchvision-0.2.1-py3.6.egg/torchvision/utils.py in make_grid(tensor, nrow, padding, normalize, range, scale_each, pad_value)
         83             grid.narrow(1, y * height + padding, height - padding)\
         84                 .narrow(2, x * width + padding, width - padding)\
    ---> 85                 .copy_(tensor[k])
         86             k = k + 1
         87     return grid

    RuntimeError: The expanded size of the tensor (3) must match the existing size (640) at non-singleton dimension 0
这里发生了什么?我怎样才能将一堆随机生成的图像放入网格中并展示它们?
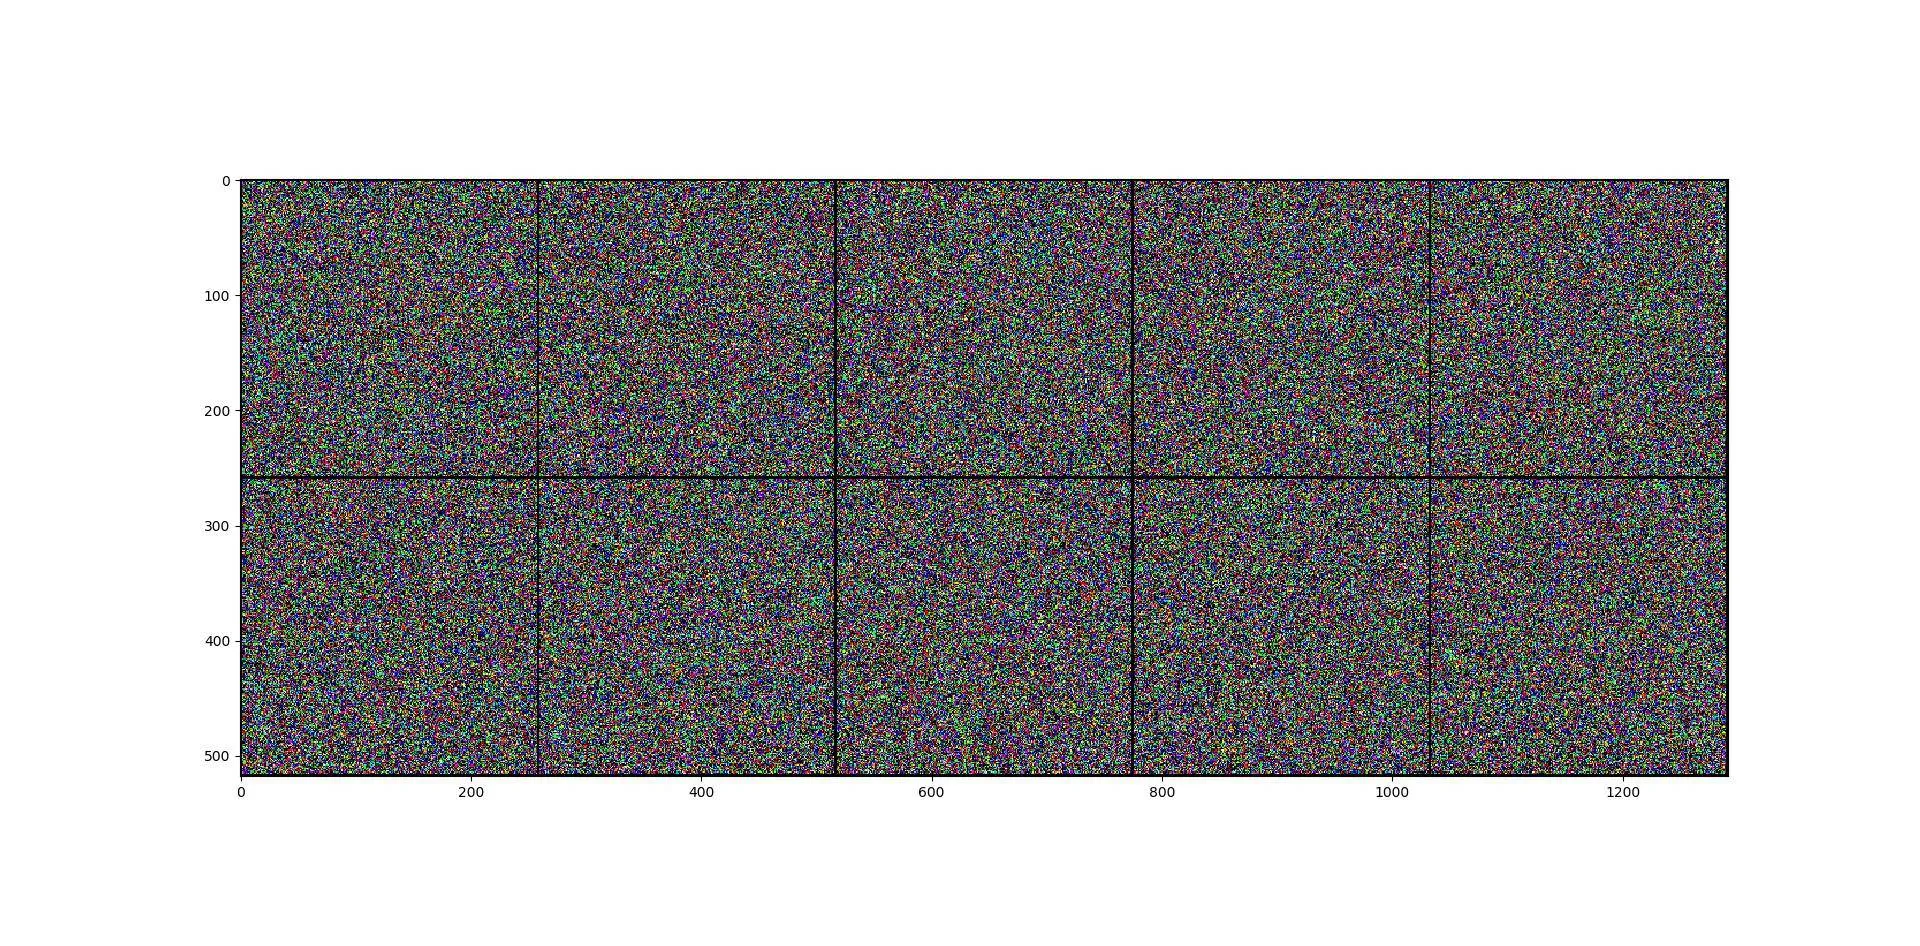
grid_img.permute(1, 2, 0)是做什么的?这里的1、2、0是什么意思?你能解释一下吗? - Md. Musfiqur Rahamanin [110] grid_img.shape所示,grid_img的维度为 [# 颜色通道 x 图像高度 x 图像宽度]。相反,传递给 matplotlib.pyplot.imshow() 的输入 需要 是 [图像高度 x 图像宽度 x # 颜色通道](即,形状需要是[518, 1292, 3])。.permute(1, 2, 0)操作是 Torch 特定的函数,它按照精确的顺序对原始轴进行排列:[轴1 x 轴2 x 轴0] = [图像高度 x 图像宽度 x # 颜色通道]。 - Eriktorchvision.utils.save_image,它可以避免需要排列和安装matplotlib的需要。torchvision.utils.save_image(grid_img, 'filename.png')- kevmo314