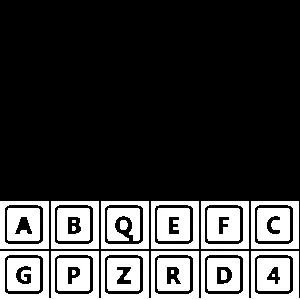
Python OpenCV使用轮廓层次结构进行裁剪

3
我在尝试去掉下面这张图片的边框: enter image description here 到目前为止,我尝试使用OpenCV获取边缘,代码如下:
def autocrop(image, threshold=0):
    """Crops any edges below or equal to threshold

    Crops blank image to 1x1.

    Returns cropped image.

    """
    if len(image.shape) == 3:
        flatImage = np.max(image, 2)
    else:
        flatImage = image
    assert len(flatImage.shape) == 2

    rows = np.where(np.max(flatImage, 0) > threshold)[0]
    if rows.size:
        cols = np.where(np.max(flatImage, 1) > threshold)[0]
        image = image[cols[0]: cols[-1] + 1, rows[0]: rows[-1] + 1]
    else:
        image = image[:1, :1]

    return image

no_border = autocrop(new_image)


cv2.imwrite('no_border.png',no_border)

这句话的英译中文是:“结果就是这张图片,下一步怎样去掉那些框框。”

enter image description here

更新:
我发现这个解决方案适用于白色背景,但是当我改变背景颜色时,边框没有被移除。

enter image description here

已编辑:
我已经尝试了这张图片上的解决方案。

enter image description here

但是结果就像这样。

enter image description here

我如何实现完全删除边界框。

可能重复:https://stackoverflow.com/questions/29465433 - Ywapom
2
我已经编写了一个简洁的代码,使用轮廓层次结构来识别字符。没有必要编写详细的代码来裁剪和切割。请参见下面的答案! - Jeru Luke
2个回答

5
为此,我们使用floodFill函数来实现。
import cv2
import numpy as np

if __name__ == '__main__':
    # read image and convert to gray
    img = cv2.imread('image.png',cv2.IMREAD_UNCHANGED)
    gray = cv2.cvtColor(img, cv2.COLOR_BGR2GRAY)

    # threshold the gray image to binarize, and negate it
    _,binary = cv2.threshold(gray, 150, 255, cv2.THRESH_BINARY)
    binary = cv2.bitwise_not(binary)

    # find external contours of all shapes
    _,contours,_ = cv2.findContours(binary, cv2.RETR_EXTERNAL, cv2.CHAIN_APPROX_NONE)

    # create a mask for floodfill function, see documentation
    h,w,_ = img.shape
    mask = np.zeros((h+2,w+2), np.uint8)

    # determine which contour belongs to a square or rectangle
    for cnt in contours:
        poly = cv2.approxPolyDP(cnt, 0.02*cv2.arcLength(cnt,True),True)
        if len(poly) == 4:
            # if the contour has 4 vertices then floodfill that contour with black color
            cnt = np.vstack(cnt).squeeze()
            _,binary,_,_ = cv2.floodFill(binary, mask, tuple(cnt[0]), 0)
    # convert image back to original color
    binary = cv2.bitwise_not(binary)        

    cv2.imshow('Image', binary)
    cv2.waitKey(0)
    cv2.destroyAllWindows()

result


非常感谢,它可以工作。小修改因为i未定义。 - ahmed osama
@ahmedosama, 你的新图像已经有了白色前景,所以不需要这两行代码:binary = cv2.bitwise_not(binary)。请将这两行注释掉。 - zindarod
我添加了新的图像。代码在上半部分运行良好,但在下半部分出现黑色背景。 当我删除 binary = cv2.bitwise_not(binary) 时,这是输出结果。链接 https://imgur.com/a/20Go16w - ahmed osama
我想从新图像中去掉边框,这个可能吗? - ahmed osama
@ahmedosama 是的,这是可能的。将图像分成两部分。使用 cv2.bitwise_not() 计算上半部分,而下半部分则不需要。 - zindarod
显示剩余4条评论

5

在图像中查找字符的另一种方法是使用轮廓中的层次结构概念。

具体实现是用Python编写的:

path = r'C:\Desktop\Stack'
filename = '2.png'

img = cv2.imread(os.path.join(path, filename), 1)

gray = cv2.cvtColor(img, cv2.COLOR_BGR2GRAY)

_, binary = cv2.threshold(gray, 0, 255, cv2.THRESH_BINARY|cv2.THRESH_OTSU)

_, contours2, hierarchy2 = cv2.findContours(binary, cv2.RETR_CCOMP, cv2.CHAIN_APPROX_NONE)

请注意,在cv2.findContours()函数中,传入了RETR_CCOMP参数,以根据其不同的层次结构存储轮廓。当一个轮廓位于另一个轮廓内部时,层次结构非常有用,从而实现父子关系。RETR_CCOMP有助于识别这种关系。
img2 = img.copy()
l = []
for h in hierarchy2[0]:
    if h[0] > -1 and h[2] > -1:
        l.append(h[2]) 

在上面的代码段中,我将所有具有子轮廓的轮廓传递到列表 l 中。使用 l ,我在下面的代码段中绘制这些轮廓。
for cnt in l:
    if cnt > 0:
        cv2.drawContours(img2, [contours2[cnt]], 0, (0,255,0), 2)

cv2.imshow('img2', img2)          

在此输入图片描述

请查看这里的文档,了解有关轮廓层次结构的更多信息。


1
这是一个很好的回答! - Ishara Madhawa

网页内容由stack overflow 提供, 点击上面的
可以查看英文原文,
原文链接