在Python OpenCV中对已排序轮廓进行相关层次排序

4
我正在使用以下代码从图像(input.png)中提取最内层轮廓(contours)
我正在使用Python 3.6.3opencv-python==3.4.0.12

input.png

enter image description here

import copy
import cv2

BLACK_THRESHOLD = 200
THIN_THRESHOLD = 10
ANNOTATION_COLOUR = (0, 0, 255)

img = cv2.imread('input.png')
orig = copy.copy(img)
gray = cv2.cvtColor(img, 6)
thresh = cv2.threshold(gray, thresh=BLACK_THRESHOLD, maxval=255, type=cv2.THRESH_BINARY_INV)[1]

# Find the contours
_, contours, hierarchy = cv2.findContours(thresh, cv2.RETR_CCOMP, cv2.CHAIN_APPROX_SIMPLE)

hierarchy = hierarchy[0]  # get the actual inner list of hierarchy descriptions
idx = 0
# For each contour, find the bounding rectangle and extract it
for component in zip(contours, hierarchy):
    currentContour = component[0]
    currentHierarchy = component[1]
    x, y, w, h = cv2.boundingRect(currentContour)
    roi = img[y+2:y + h-2, x+2:x + w-2]
    # Skip thin contours (vertical and horizontal lines)
    if h < THIN_THRESHOLD or w < THIN_THRESHOLD:
        continue
    if h > 300 and w > 300:
        continue
    if h < 40 or w < 40:
        continue
    if currentHierarchy[3] > 0:
        # these are the innermost child components
        idx += 1
        cv2.imwrite(str(idx) + '.png', roi)

结果: 在此输入图片描述

从图中可以看出提取的图像没有任何特定的顺序。所以为了解决这个问题,我根据它们的x轴坐标对轮廓进行了排序。以下是代码:

import copy
import cv2

BLACK_THRESHOLD = 200
THIN_THRESHOLD = 10
ANNOTATION_COLOUR = (0, 0, 255)

img = cv2.imread('input.png')
orig = copy.copy(img)
gray = cv2.cvtColor(img, 6)
thresh = cv2.threshold(gray, thresh=BLACK_THRESHOLD, maxval=255, type=cv2.THRESH_BINARY_INV)[1]

# Find the contours
_, contours, hierarchy = cv2.findContours(thresh, cv2.RETR_CCOMP, cv2.CHAIN_APPROX_SIMPLE)

# Sort Contours on the basis of their x-axis coordinates in ascending order
def sort_contours(cnts, method="left-to-right"):
    # initialize the reverse flag and sort index
    reverse = False
    i = 0
    # handle if we need to sort in reverse
    if method == "right-to-left" or method == "bottom-to-top":
        reverse = True
    # handle if we are sorting against the y-coordinate rather than
    # the x-coordinate of the bounding box
    if method == "top-to-bottom" or method == "bottom-to-top":
        i = 1
    # construct the list of bounding boxes and sort them from top to
    # bottom
    boundingBoxes = [cv2.boundingRect(c) for c in cnts]
    (cnts, boundingBoxes) = zip(*sorted(zip(cnts, boundingBoxes),
                                        key=lambda b: b[1][i], reverse=reverse))
    # return the list of sorted contours
    return cnts


sorted_contours = sort_contours(contours)

idx = 0
# For each contour, find the bounding rectangle and extract it
for component in sorted_contours:
    currentContour = component
    x, y, w, h = cv2.boundingRect(currentContour)
    roi = img[y + 2:y + h - 2, x + 2:x + w - 2]
    # Skip thin contours (vertical and horizontal lines)
    if h < THIN_THRESHOLD or w < THIN_THRESHOLD:
        continue
    if h > 300 and w > 300:
        continue
    if h < 40 or w < 40:
        continue
    idx += 1
    print(x, idx)
    cv2.imwrite(str(idx) + '.png', roi)

结果:

enter image description here

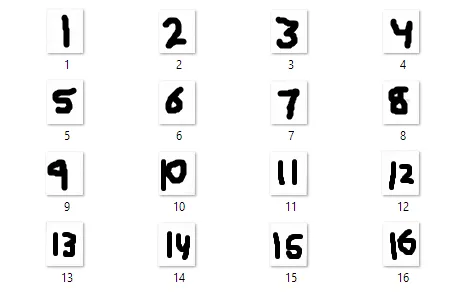
现在轮廓已经排好序了。但是,正如您所看到的,我正在获取所有轮廓(这就是每个数字的两个副本的原因),因为我没有使用层次结构,但当我花费一些时间进行调试时,我意识到仅仅排序了轮廓而未排序其相关的层次结构。那么,请问有谁能告诉我如何同时排序层次结构和轮廓,以便我只能获得已排序轮廓的最内部轮廓呢?谢谢!


+1 和赞扬,因为提出了一个连贯的问题,并附带了[mcve]、示例和所有其他重要细节!我只希望更多的[标签:opencv]问题具有这样的质量。 - Dan Mašek
哈哈,我能理解你的意思,你是指一种并行排序吗?@DanMašek - Aadit
1
顺便提一下,你不需要使用 copy 模块... orig = img.copy() 可以进行深拷贝(图像被表示为 numpy 数组)。 - Dan Mašek
1
不,我并不是指并行排序。间接排序只是意味着你在对元素的一个单独的数字索引数组进行排序(同时使用元素的值来确定顺序),而不是对元素本身进行排序。当移动元素的成本很高或者像这种情况下重新组织会破坏其他关系时,这是非常有用的。 - Dan Mašek
谢谢您注意到复制不是必需的(它是多余的),这加快了事情的进展,现在我明白了您所说的间接排序的含义。向@DanMašek致敬。 - Aadit
显示剩余2条评论
1个回答

4

让我们从你的第一个脚本开始,因为它给了你很好的结果,只是排序不正确。

请注意,基于层级结构(决定是否将特定轮廓视为数字)的唯一决策是currentHierarchy[3] > 0。为什么不先选择仅符合此标准的轮廓,并仅对此子集执行进一步处理(不必再关心层次结构)呢?

# Find the contours
_, contours, hierarchy = cv2.findContours(thresh, cv2.RETR_CCOMP, cv2.CHAIN_APPROX_SIMPLE)

hierarchy = hierarchy[0]  # get the actual inner list of hierarchy descriptions

# Grab only the innermost child components
inner_contours = [c[0] for c in zip(contours, hierarchy) if c[1][3] > 0]

现在我们只剩下了我们感兴趣的轮廓,我们只需要对它们进行排序。我们可以重复使用简化版的原始排序函数:
# Sort Contours on the basis of their x-axis coordinates in ascending order
def sort_contours(contours):
    # construct the list of bounding boxes and sort them from top to bottom
    boundingBoxes = [cv2.boundingRect(c) for c in contours]
    (contours, boundingBoxes) = zip(*sorted(zip(contours, boundingBoxes)
       , key=lambda b: b[1][0], reverse=False))
    # return the list of sorted contours
    return contours

并获取排序的轮廓:

sorted_contours = sort_contours(inner_contours)

最后,我们希望过滤掉垃圾并正确标记好的轮廓输出:

MIN_SIZE = 40
MAX_SIZE = 300
THIN_THRESHOLD = max(10, MIN_SIZE)
PADDING = 2

# ...

idx = 0
# For each contour, find the bounding rectangle and extract it
for contour in sorted_contours:
    x, y, w, h = cv2.boundingRect(contour)
    roi = img[(y + PADDING):(y + h - PADDING), (x + PADDING):(x + w - PADDING)]
    # Skip thin contours (vertical and horizontal lines)
    if (h < THIN_THRESHOLD) or (w < THIN_THRESHOLD):
        continue
    if (h > MAX_SIZE) and (w > MAX_SIZE):
        continue
    idx += 1
    cv2.imwrite(str(idx) + '.png', roi)

完整脚本(使用Python 2.7.x和OpenCV 3.4.1)

import cv2

BLACK_THRESHOLD = 200
MIN_SIZE = 40
MAX_SIZE = 300
THIN_THRESHOLD = max(10, MIN_SIZE)
FILE_NAME = "numbers.png"
PADDING = 2

# ============================================================================

# Sort Contours on the basis of their x-axis coordinates in ascending order
def sort_contours(contours):
    # construct the list of bounding boxes and sort them from top to bottom
    boundingBoxes = [cv2.boundingRect(c) for c in contours]
    (contours, boundingBoxes) = zip(*sorted(zip(contours, boundingBoxes)
       , key=lambda b: b[1][0], reverse=False))
    # return the list of sorted contours
    return contours

# ============================================================================

img = cv2.imread(FILE_NAME)
gray = cv2.cvtColor(img, cv2.COLOR_BGR2GRAY) # Don't use magic numbers
thresh = cv2.threshold(gray, thresh=BLACK_THRESHOLD, maxval=255, type=cv2.THRESH_BINARY_INV)[1]

# Find the contours
_, contours, hierarchy = cv2.findContours(thresh, cv2.RETR_CCOMP, cv2.CHAIN_APPROX_SIMPLE)

hierarchy = hierarchy[0]  # get the actual inner list of hierarchy descriptions

# Grab only the innermost child components
inner_contours = [c[0] for c in zip(contours, hierarchy) if c[1][3] > 0]

sorted_contours = sort_contours(inner_contours)

idx = 0
# For each contour, find the bounding rectangle and extract it
for contour in sorted_contours:
    x, y, w, h = cv2.boundingRect(contour)
    roi = img[(y + PADDING):(y + h - PADDING), (x + PADDING):(x + w - PADDING)]
    # Skip thin contours (vertical and horizontal lines)
    if (h < THIN_THRESHOLD) or (w < THIN_THRESHOLD):
        continue
    if (h > MAX_SIZE) and (w > MAX_SIZE):
        continue
    idx += 1
    cv2.imwrite(str(idx) + '.png', roi)

以及它生成的图片:

输出图像缩略图截图


1
运行得非常好。这是一个如此简单而惊人的方法,与我最初想的完全不同。非常感谢@DanMašek。 - Aadit
感谢你的解决方案,但有没有办法让层次结构顺序与轮廓顺序同步?因为我想使用层次结构来检查对象内部是否被填充... - Hung Dang
@HungDang 一种间接排序方法可以完成这项工作。或者您可以将轮廓和层次数据合并在一起(例如使用zip函数),然后对结果进行排序。 - Dan Mašek
谢谢,我刚刚在boundingBoxes后面添加了层次变量,像下面的代码一样。然后它就可以工作了 :) - Hung Dang
# construct the list of bounding boxes and sort them from top to bottom boundingBoxes = [cv2.boundingRect(c) for c in contours] (contours, boundingBoxes, hierarchy) = zip(*sorted(zip(contours, boundingBoxes,hierarchy) , key=lambda b: b[1][0], reverse=False)) # return the list of sorted contours return (contours, np.array(hierarchy))```` - Hung Dang

网页内容由stack overflow 提供, 点击上面的
可以查看英文原文,
原文链接