如何向3D matplotlib散点图添加注释标签?

3
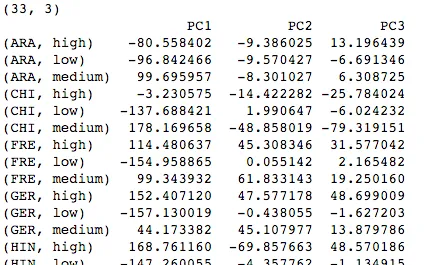
我已经在我的数据上运行了sklearn - 主成分分析,并使用3个主成分(PC1、PC2、PC3)进行了处理。数据看起来像这样(它是一个pandas DataFrame): enter image description here 以下是绘制主成分的代码:
from mpl_toolkits.mplot3d import axes3d
import matplotlib.pyplot as plt
%matplotlib
fig = plt.figure()
ax = fig.gca(projection='3d')
ax.set_title('3D Scatter Plot')
ax.set_xlabel('PC1')
ax.set_ylabel('PC2')
ax.set_zlabel('PC3')

ax.view_init(elev=12, azim=40)              # elevation and angle
ax.dist=10                                 # distance
ax.scatter(
       data_df_3dx['PC1'], data_df_3dx['PC2'], data_df_3dx['PC3'],  # data
       #color='purple',                            # marker colour
       #marker='o',                                # marker shape
       s=60                                       # marker size
       )

plt.show() 

我的问题是,如何将标签(例如“GER,medium”)添加到点上?希望有人能够帮助我 :)
2个回答

3
在下面的帖子[1][2]中,讨论了在matplotlib中绘制3D箭头。
类似地,可以创建Annotation3D类(从Annotation继承):
from mpl_toolkits.mplot3d.proj3d import proj_transform
from matplotlib.text import Annotation

class Annotation3D(Annotation):
    '''Annotate the point xyz with text s'''

    def __init__(self, s, xyz, *args, **kwargs):
        Annotation.__init__(self,s, xy=(0,0), *args, **kwargs)
        self._verts3d = xyz        

    def draw(self, renderer):
        xs3d, ys3d, zs3d = self._verts3d
        xs, ys, zs = proj_transform(xs3d, ys3d, zs3d, renderer.M)
        self.xy=(xs,ys)
        Annotation.draw(self, renderer)

此外,我们可以定义annotate3D()函数:
def annotate3D(ax, s, *args, **kwargs):
    '''add anotation text s to to Axes3d ax'''

    tag = Annotation3D(s, *args, **kwargs)
    ax.add_artist(tag)

使用此函数注释,可以像下面的示例一样向Axes3d添加标签:

3D graph example

import matplotlib.pyplot as plt    
from mpl_toolkits.mplot3d import axes3d
from mpl_toolkits.mplot3d.art3d import Line3DCollection

# data: coordinates of nodes and links
xn = [1.1, 1.9, 0.1, 0.3, 1.6, 0.8, 2.3, 1.2, 1.7, 1.0, -0.7, 0.1, 0.1, -0.9, 0.1, -0.1, 2.1, 2.7, 2.6, 2.0]
yn = [-1.2, -2.0, -1.2, -0.7, -0.4, -2.2, -1.0, -1.3, -1.5, -2.1, -0.7, -0.3, 0.7, -0.0, -0.3, 0.7, 0.7, 0.3, 0.8, 1.2]
zn = [-1.6, -1.5, -1.3, -2.0, -2.4, -2.1, -1.8, -2.8, -0.5, -0.8, -0.4, -1.1, -1.8, -1.5, 0.1, -0.6, 0.2, -0.1, -0.8, -0.4]
group = [1, 1, 1, 1, 1, 1, 1, 1, 1, 1, 2, 2, 3, 2, 2, 2, 3, 3, 3, 3]
edges = [(1, 0), (2, 0), (3, 0), (3, 2), (4, 0), (5, 0), (6, 0), (7, 0), (8, 0), (9, 0), (11, 10), (11, 3), (11, 2), (11, 0), (12, 11), (13, 11), (14, 11), (15, 11), (17, 16), (18, 16), (18, 17), (19, 16), (19, 17), (19, 18)]
xyzn = zip(xn, yn, zn)
segments = [(xyzn[s], xyzn[t]) for s, t in edges]                

# create figure        
fig = plt.figure(dpi=60)
ax = fig.gca(projection='3d')
ax.set_axis_off()

# plot vertices
ax.scatter(xn,yn,zn, marker='o', c = group, s = 64)    
# plot edges
edge_col = Line3DCollection(segments, lw=0.2)
ax.add_collection3d(edge_col)
# add vertices annotation.
for j, xyz_ in enumerate(xyzn): 
    annotate3D(ax, s=str(j), xyz=xyz_, fontsize=10, xytext=(-3,3),
               textcoords='offset points', ha='right',va='bottom')    
plt.show()

1
一种方法是在for循环内逐个绘制每个点,这样你就知道每个点的坐标并可以添加文本。
for i in range(len(data_df_3dx)):
    x, y, z = data_df_3dx.iloc[i]['PC1'], data_df_3dx.iloc[i]['PC2'], data_df_3dx.iloc[i]['PC3']
    ax.scatter(x, y, z)
    #now that you have the coordinates you can apply whatever text you need. I'm 
    #assuming you want the index, but you could also pass a column name if needed
    ax.text(x, y, z, '{0}'.format(data_df_3dx.index[i]), size=5)

嗨,johnchase,谢谢你的回答。我会测试一下。 - Oli

网页内容由stack overflow 提供, 点击上面的
可以查看英文原文,
原文链接