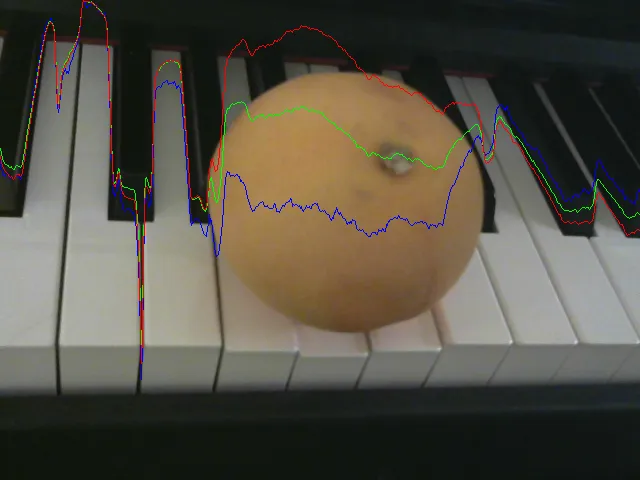
我经常使用opencv的绘图函数直接在从opencv网络摄像头流中获取的2D numpy数组图像缓冲区上绘制2D图。然后,我将numpy数组发送到imshow和video writer以监视和创建视频。
import cv2
import numpy as np

cap = cv2.VideoCapture(0)
ret, frame = cap.read()  # frame is a 2D numpy array w640 h480
h,w,_ = frame.shape # (480,640,3)
x = np.arange(w)

writer = cv2.VideoWriter( 'out.avi', cv2.cv.FOURCC('D','I','V','3'),
            fps=30, frameSize=(w,h), isColor=True )

while True:
    ret, frame = cap.read()  # frame is a 2D numpy array w640 h480

    B = frame[:,:,0].sum(axis=0)
    B = h - h * B / B.max()
    G = frame[:,:,1].sum(axis=0)
    G = h - h * G / G.max()
    R = frame[:,:,2].sum(axis=0)
    R = h - h * R / R.max()

    pts = np.vstack((x,B)).astype(np.int32).T
    cv2.polylines(frame, [pts], isClosed=False, color=(255,0,0))
    pts = np.vstack((x,G)).astype(np.int32).T
    cv2.polylines(frame, [pts], isClosed=False, color=(0,255,0))
    pts = np.vstack((x,R)).astype(np.int32).T
    cv2.polylines(frame, [pts], isClosed=False, color=(0,0,255))

    writer.write(frame)

    cv2.imshow('frame', frame)
    key = cv2.waitKey(33) & 0xFF # for 64 bit PC
    if key in 27: # ESC key
        break

cap.release()
writer.release()
这个方法很不错,但是我想知道是否可以像matplotlib一样做更多的事情,例如轴、刻度、网格、标题、柱状图等,而不需要使用基本的cv2绘图函数来制作自己的绘图库,虽然这是可能的,但我不想重复造轮子。
在https://wiki.python.org/moin/NumericAndScientific/Plotting中,有很多绘图库。所以,我觉得其中一个可能已经实现了这个功能。
我考虑使用matplotlib并通过savefig将绘图导出为图像。但这对于视频捕获来说会很慢。
(编辑) 我可以像接受的答案建议的那样使用mplfig_to_npimage将matplotlib绘图嵌入到帧中!它似乎足够快以支持视频速率。
import cv2
from pylab import *
from moviepy.video.io.bindings import mplfig_to_npimage
fp = r'C:/Users/Public/Videos/Sample Videos/Wildlife.wmv'
cap = cv2.VideoCapture(fp)
ret, frame = cap.read() # frame is a 2D numpy array
h,w,_ = frame.shape
writer = cv2.VideoWriter( 'out.avi', cv2.cv.FOURCC('D','I','V','3'),
fps=30, frameSize=(w,h), isColor=True )
# prepare a small figure to embed into frame
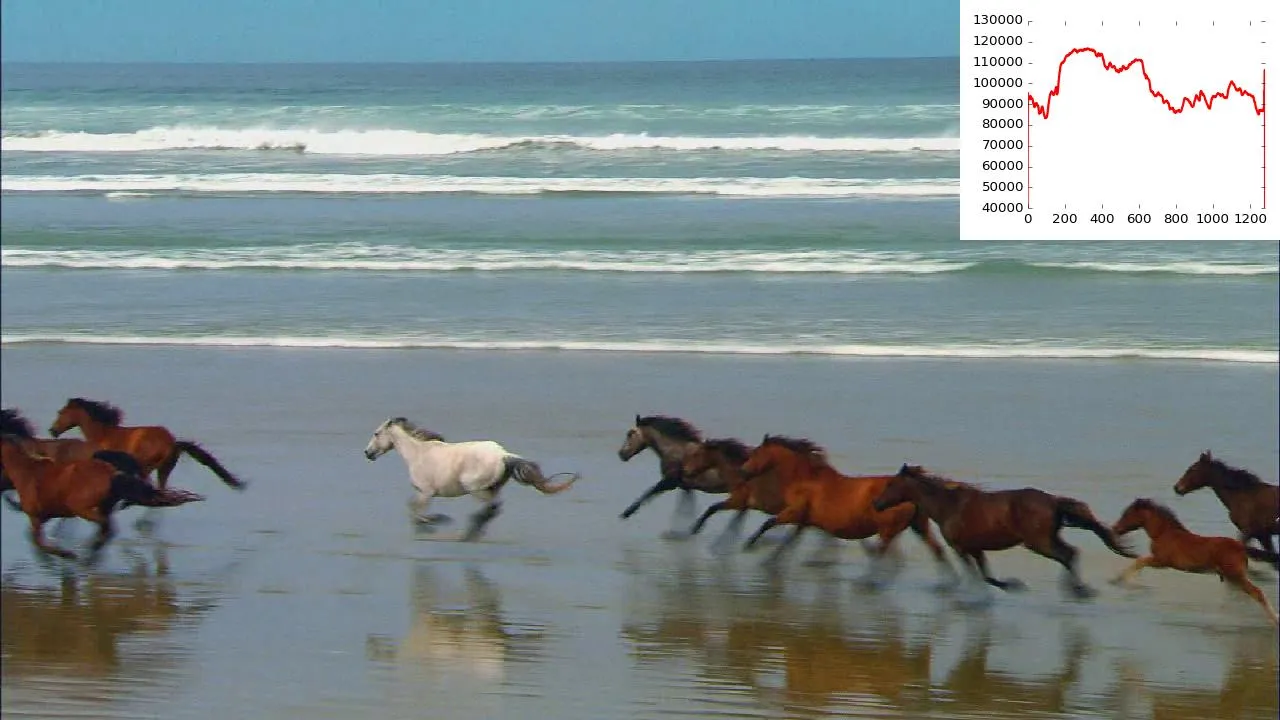
fig, ax = subplots(figsize=(4,3), facecolor='w')
B = frame[:,:,0].sum(axis=0)
line, = ax.plot(B, lw=3)
xlim([0,w])
ylim([40000, 130000]) # setup wide enough range here
box('off')
tight_layout()
graphRGB = mplfig_to_npimage(fig)
gh, gw, _ = graphRGB.shape
while True:
ret, frame = cap.read() # frame is a 2D numpy array
B = frame[:,:,0].sum(axis=0)
line.set_ydata(B)
frame[:gh,w-gw:,:] = mplfig_to_npimage(fig)
cv2.imshow('frame', frame)
writer.write(frame)
key = cv2.waitKey(33) & 0xFF # for 64 bit
if key in 27: # ESC key
break
cap.release()
writer.release()