如何使用ggplot在R中绘制降雨径流图?

7
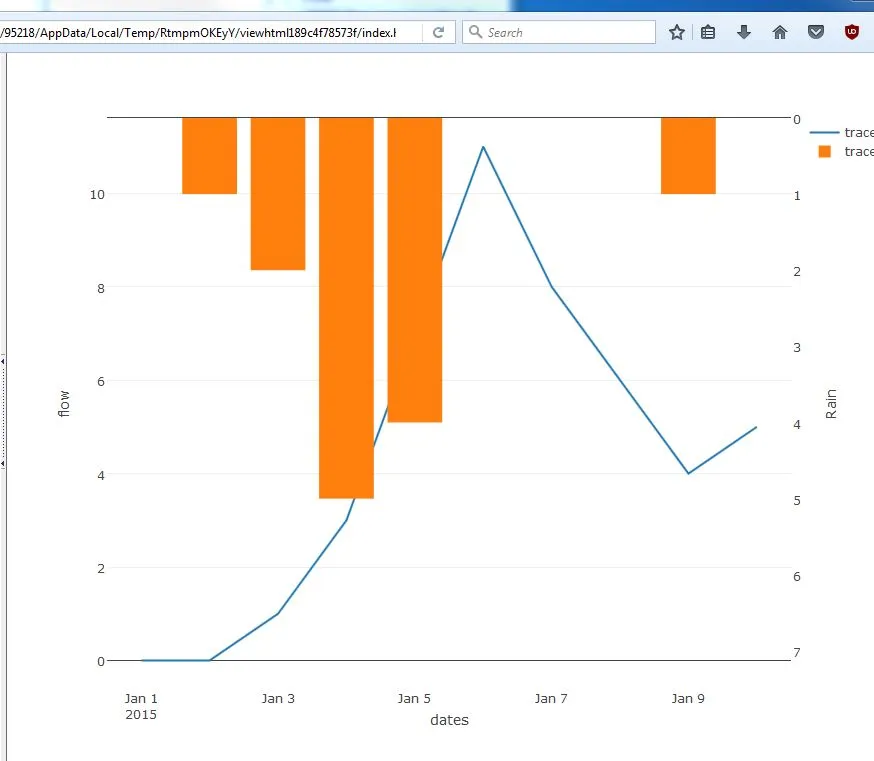
对于水文学家来说,雨量历时曲线和流量历时曲线是常用的。如下图所示:Hyteograph and Hydrograph 
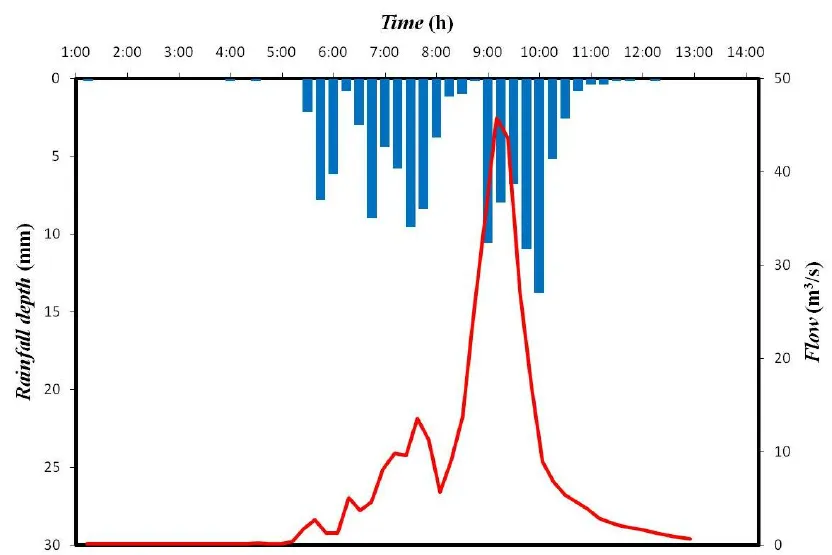
其中,X轴代表日期,左侧反向的Y轴代表降雨量,右侧的Y轴代表流量。
我有一个降雨表格和一个流量表格。
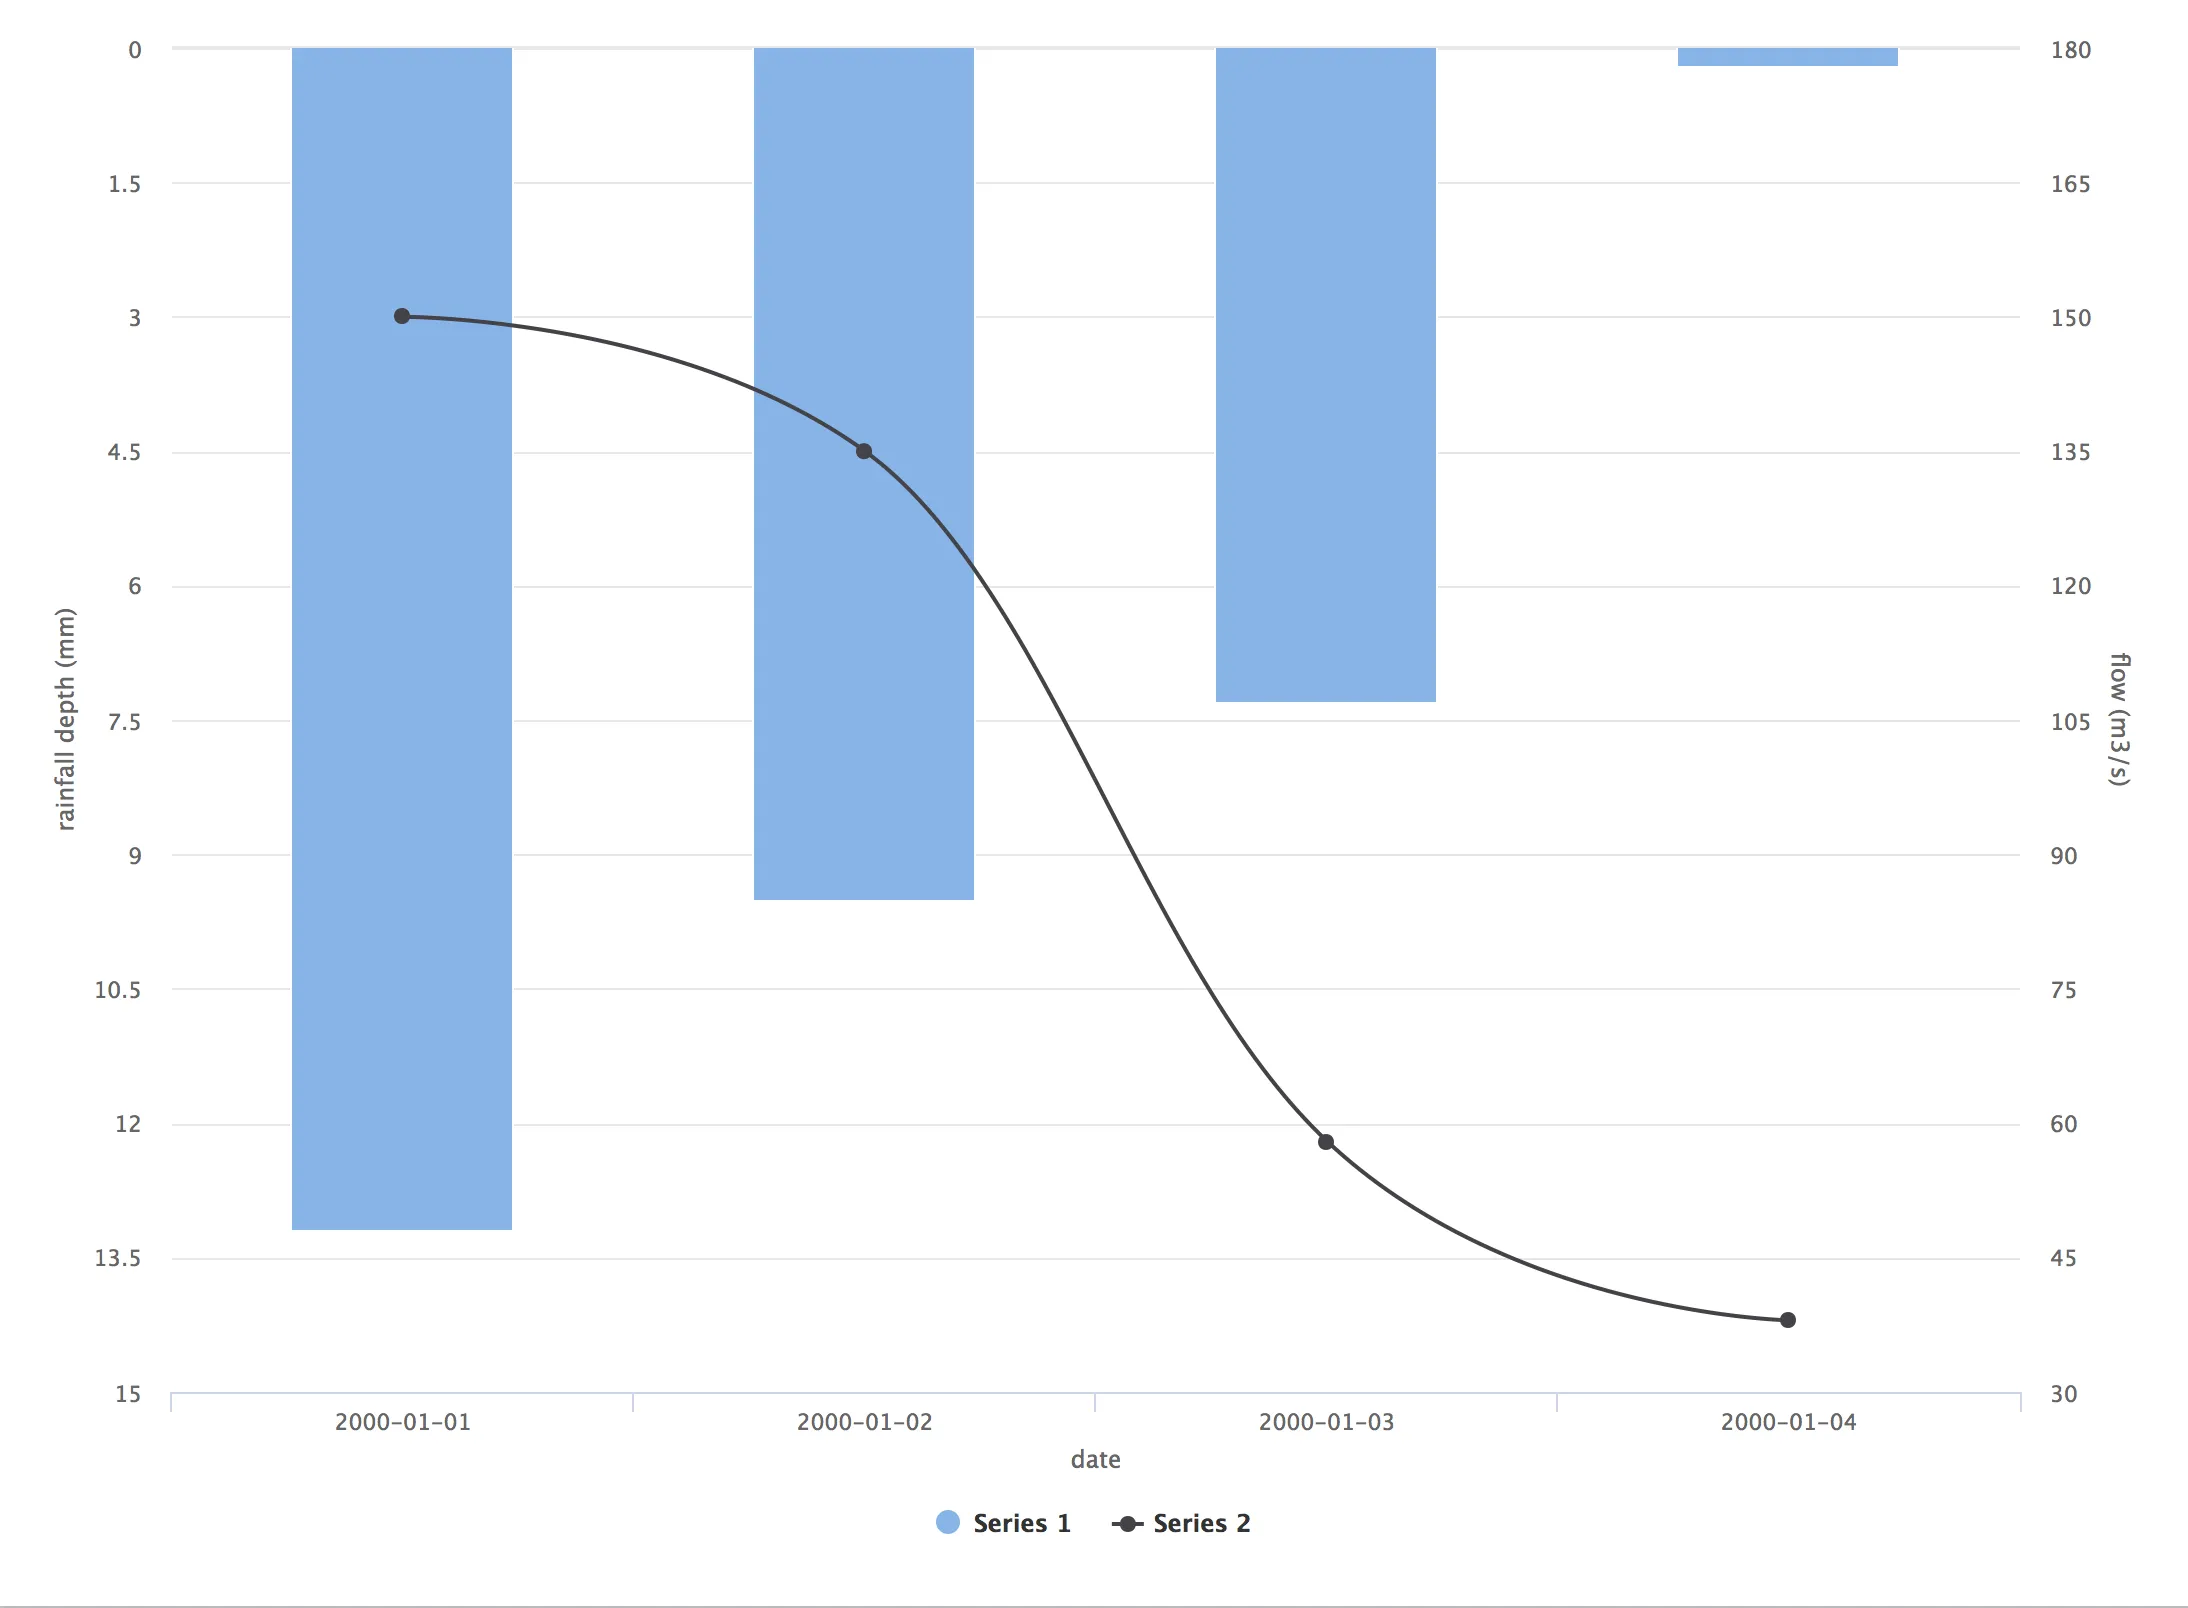
  ####Rain Table####                   ####Discharge Table####
   Date         Value                     Date         Value
2000-01-01       13.2                   2000-01-01      150
2000-01-02       9.5                    2000-01-01      135
2000-01-03       7.3                    2000-01-01      58
2000-01-04       0.2                    2000-01-01      38
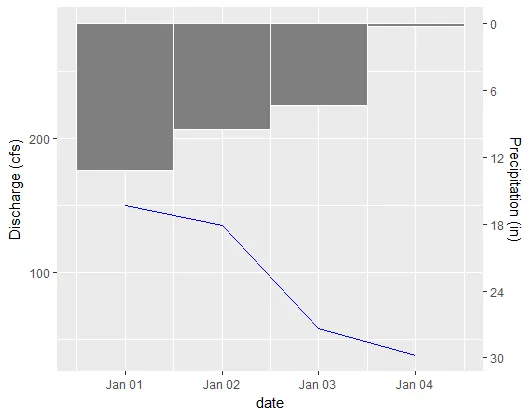
这是我的代码。
  ggplot(rain,aes(x=DATE,y=value)) + 
    geom_bar(stat = 'identity')+
    scale_y_reverse()+
    geom_line(data =discharge,aes(x=DATE,y=value))

但是我不知道如何在两个不同的Y轴上表示这些值。


3
ggplot2不支持双轴。可以通过网络搜索找到实现双轴的示例,但代码往往不美观。如果确实需要实现这个功能,可能最好使用rCharts和JavaScript库来绘制图表。 - neilfws
进一步回应第一条评论:最新的ggplot2支持双轴,这里有一个例子https://rpubs.com/MarkusLoew/226759。 - neilfws
2
即使使用sec_axis(),ggplot2仍需要手动进行1:1的转换工作才能正确缩放第二个轴。我理解这是该特定科学领域中的一个重要图表,但从长远来看,您可能需要考虑使用基本图形或叠加绘图代替。 - hrbrmstr
2
你真的想要复制 2000-01-01 作为出院值吗? - hrbrmstr
1
related - Axeman
5个回答

6

在ggplot中,使用sec_axis()函数可以显示第二个坐标轴,该坐标轴是第一个坐标轴的转换。由于降水可以通过流域面积(或流量转化为深度)转化为体积,因此可以使用sec_axis制作降雨图。

library(ggplot2)
library(readr)

df <- read_csv("date, precip_in, discharge_cfs
                2000-01-01, 13.2, 150
                2000-01-02, 9.5, 135
                2000-01-03, 7.3, 58
                2000-01-04, 0.2, 38")

watershedArea_sqft <- 100

# Convert the precipitation to the same units as discharge. These steps will based on your units
df$precip_ft <- df$precip_in/12
df$precip_cuft <- df$precip_ft * watershedArea_sqft

# Calculate the range needed to avoid having your hyetograph and hydrograph overlap 
maxRange <- 1.1*(max(df$precip_cuft) + max(df$discharge_cfs))

# Create a function to backtransform the axis labels for precipitation
precip_labels <- function(x) {(x / watershedArea_sqft) * 12}

# Plot the data
ggplot(data = df,
       aes(x = date)) +
  # Use geom_tile to create the inverted hyetograph. geom_tile has a bug that displays a warning message for height and width, you can ignore it.
  geom_tile(aes(y = -1*(precip_cuft/2-maxRange), # y = the center point of each bar
                height = precip_cuft,
                width = 1),
            fill = "gray50",
            color = "white") +
  # Plot your discharge data
  geom_line(aes(y = discharge_cfs),
            color = "blue") +
  # Create a second axis with sec_axis() and format the labels to display the original precipitation units.
  scale_y_continuous(name = "Discharge (cfs)",
                     sec.axis = sec_axis(trans = ~-1*(.-maxRange),
                                         name = "Precipitation (in)",
                                         labels = precip_labels))

Example hyeto-hydrograph


5
我认为评论很有力地表明不要使用ggplot2解决这个问题:它不会优雅或直观。因此,这里提供一个使用highcharter包的答案。

我使用了提供的示例数据,只是将排放日期更改为与雨日期相同。

这里发布了交互式结果的HTML文件。

这是一个屏幕截图。enter image description here 我想回应上面的评论:尽管这可能是水文学中的标准,但反转的双轴会带来很大的误导性。我认为,通过一些实验,您可以使用ggplot2实现更有信息量和吸引人的东西。

library(highcharter)
library(dplyr)

rainfall <- data.frame(date = as.Date(rep(c("2000-01-01", "2000-01-02", "2000-01-03", "2000-01-04"), 2), "%Y-%m-%d"), 
                       value = c(13.2, 9.5, 7.3, 0.2, 150, 135, 58, 38), 
                       variable = c(rep("rain", 4), rep("discharge", 4)))

hc <- highchart() %>% 
  hc_yAxis_multiples(list(title = list(text = "rainfall depth (mm)"), reversed = TRUE), 
                     list(title = list(text = "flow (m3/s)"), 
                      opposite = TRUE)) %>% 
  hc_add_series(data = filter(rainfall, variable == "rain") %>% mutate(value = -value) %>% .$value, type = "column") %>% 
  hc_add_series(data = filter(rainfall, variable == "discharge") %>% .$value, type = "spline", yAxis = 1) %>% 
  hc_xAxis(categories = dataset$rain.date, title = list(text = "date"))

hc

3

使用基础R:

## Make data
dates <- seq.Date(from=as.Date("2015-01-01"),
              to=as.Date("2015-01-10"), by="days")
flow <- c(0,0,1,3,7,11,8,6,4,5)
rain <- c(0,1,2,5,4,0,0,0,1,0)

## Plot rainfall first
par(xaxs="i", yaxs="i", mar=c(5,5,5,5))
plot(dates, rain, type="h", ylim=c(max(rain)*1.5,0),
 axes=FALSE, xlab=NA, ylab=NA, col="blue",
 lwd=50, lend="square")
axis(4)
mtext("Rainfall", side=4, line=3)

## Plot flow on top
par(new=TRUE)
plot(dates, flow, type="l", lwd=2, ylim=c(0, max(flow)*1.2))

基础R绘图

使用plotly:

## Plotly
library(plotly)
rainAx <- list(
  overlaying = "y",
  side = "right",
  title = "Rain",
  ##autorange="reversed",
  range = c(max(rain)*1.5,0),
  showgrid=FALSE
    )

plot_ly() %>%
add_trace(
    x=~dates, y=~flow,
    type="scatter", mode="lines") %>%
add_trace(
    x=~dates, y=~rain,
    type="bar", yaxis="y2") %>%
layout(yaxis2=rainAx)

plotly plot


0

我非常喜欢jpshanno的帖子,并且会使用它,因为它很灵活,适用于我正在进行的其他代码。这是我刚刚发现的一个打包解决方案:

library(EcoHydRology)
dataforhydrograph <- as.data.frame(cbind(date = 1:20, precipitation = runif(20,0,100),discharge  = runif(20,0,100)))
dataforhydrograph$date <- as.Date(dataforhydrograph$date, format = c("%Y-%m-%d"), origin = "1998-01-01")
hydrograph(input=dataforhydrograph)

0
使用“plotly”库的这段R代码可以显示降雨径流图。
library(plotly)  
rainAx = list(
  overlaying = "y",
  side = "right",
  title = "Rainfall (mm)",
  #autorange="reversed",
  range = c(300,0),
  showgrid=FALSE
)

date = hidromet.dia$date.daily #dates at daily format, however you can use any temporal resolution
flow = hidromet.dia$flow.daily # flow data
rainfall = hidromet.dia$rainfall.daily # rainfall data

plot_ly() %>%
add_trace(
  x=~date, y=~flow,
  type="scatter", mode="lines", line = list
  (color = 'black', width = 1, 
  dash = 'solid'),name ='Streamflow') %>%
add_trace(
 x=~date, y=~rainfall,
 type="bar", yaxis="y2", marker = list
 (color ="blue",width = 1),name = 'rainfall') %>%
 layout(title = "Rainfall-Streamflow",xaxis =list
 (title = "time (daily)"), yaxis=list
 (title="Q  m³/s",range=c(0,1300)),yaxis2=rainAx)

你的 hidromet.dia 是从哪里来的? - lz100
"hidromet.dia" 是您每日的水文气象数据(数据框架)。此代码是根据@joelnNC的答案进行调整的。 - geografoec

网页内容由stack overflow 提供, 点击上面的
可以查看英文原文,
原文链接