如何将轮廓从左到右、从上到下排序?

12

我正在尝试使用Python构建一个字符识别程序。我在对轮廓进行排序时遇到了困难。我正在使用这个页面作为参考。

我成功地使用以下代码找到了轮廓:

mo_image = di_image.copy()
contour0 = cv2.findContours(mo_image.copy(),cv2.RETR_EXTERNAL,cv2.CHAIN_APPROX_SIMPLE)
contours = [cv2.approxPolyDP(cnt,3,True) for cnt in contour0[0]]

并使用代码的这一部分添加了边界矩形并对图像进行了分割:

maxArea = 0
rect=[]
for ctr in contours:
    maxArea = max(maxArea,cv2.contourArea(ctr))

if img == "Food.jpg":
    areaRatio = 0.05
elif img == "Plate.jpg":
    areaRatio = 0.5

for ctr in contours:    
    if cv2.contourArea(ctr) > maxArea * areaRatio: 
        rect.append(cv2.boundingRect(cv2.approxPolyDP(ctr,1,True)))

symbols=[]
for i in rect:
    x = i[0]
    y = i[1]
    w = i[2]
    h = i[3]
    p1 = (x,y)
    p2 = (x+w,y+h)
    cv2.rectangle(mo_image,p1,p2,255,2)
    image = cv2.resize(mo_image[y:y+h,x:x+w],(32,32))
    symbols.append(image.reshape(1024,).astype("uint8"))

testset_data = np.array(symbols)

cv2.imshow("segmented",mo_image)
plt.subplot(2,3,6)
plt.title("Segmented")
plt.imshow(mo_image,'gray')
plt.xticks([]),plt.yticks([]);

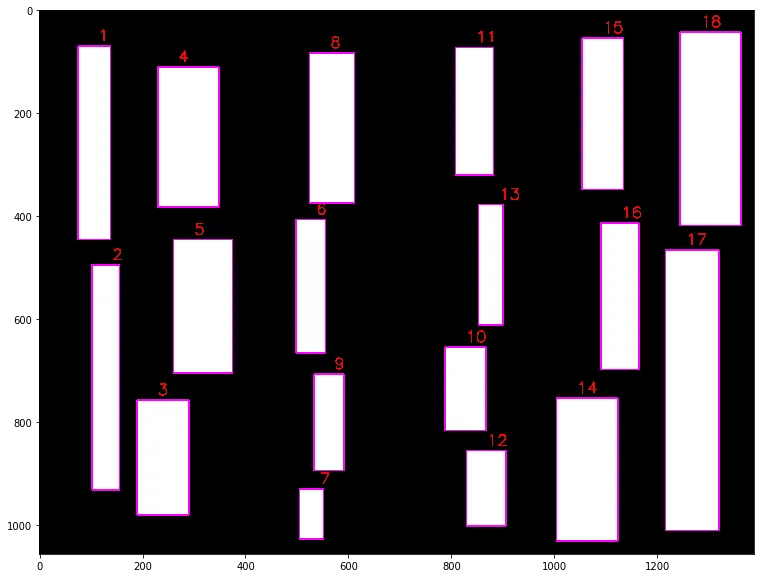
然而,最终生成的片段似乎是随机排序的。 以下是原始图像以及检测到的片段的处理后的图像。

segments

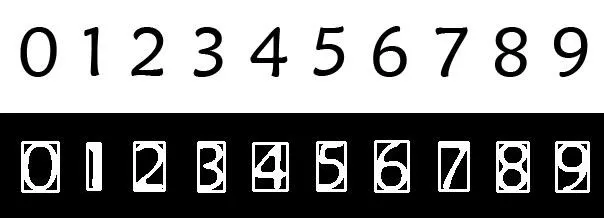
程序然后单独输出每个片段,但是它们的顺序为:4 1 9 8 7 5 3 2 0 6,而不是 0 1 2 3 4 5 6 7 8 9。 
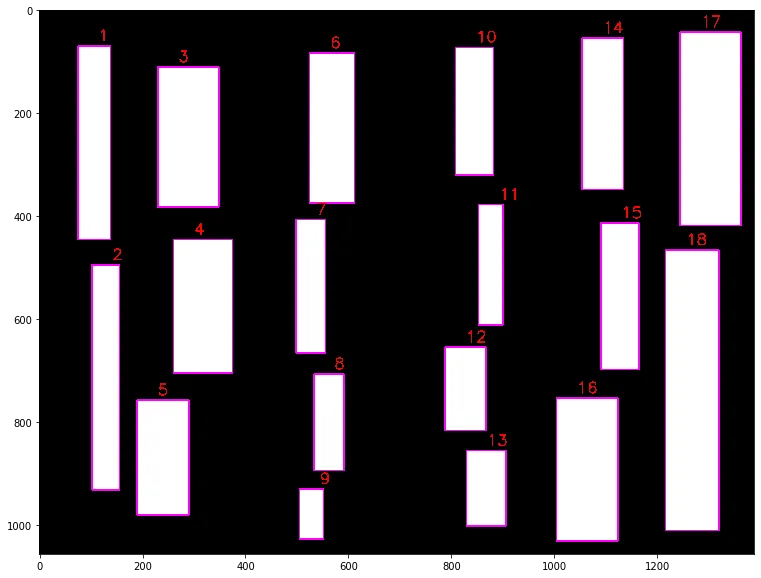
在 "rect" 中简单地添加一个排序操作可以解决这个问题,但同样的解决方法对于具有多行的文档不起作用。

因此,我的问题是:如何将轮廓从左到右、从上到下排序?


你可以添加一个关于rect的示例内容吗? - Martin Evans
每个检测到的轮廓都包含(x,y,w,h)的矩形,如下所示: [(287, 117, 13, 46), (102, 117, 34, 47), (513, 116, 36, 49), (454, 116, 32, 49), (395, 116, 28, 48), (334, 116, 31, 49), (168, 116, 26, 49), (43, 116, 30, 48), (224, 115, 33, 50), (211, 33, 34, 47), ( 45, 33, 13, 46), (514, 32, 32, 49), (455, 32, 31, 49), (396, 32, 29, 48), (275, 32, 28, 48), (156, 3 2, 26, 49), (91, 32, 30, 48), (333, 31, 33, 50)] - Nissan
@ZdaR 我先问的,另一个是重复的。 - Nissan
好的,我明白了。但你可以从那个问题中获取一些指针来解决你的问题。 - ZdaR
7个回答

5
我认为您无法直接按正确顺序生成轮廓,但以下简单的排序方法应该能满足您的需求: 第一种方法 使用排序首先将相似的y值分组到行值中,然后按矩形的x偏移量进行排序。关键是一个列表,其中包含估计的行和x偏移量。
计算单个矩形的最大高度以确定nearest的合适分组值。 1.4值是行间距值。因此,对于您的两个示例,nearest约为70。
import numpy as np

c = np.load(r"rect.npy")
contours = list(c)

# Example - contours = [(287, 117, 13, 46), (102, 117, 34, 47), (513, 116, 36, 49), (454, 116, 32, 49), (395, 116, 28, 48), (334, 116, 31, 49), (168, 116, 26, 49), (43, 116, 30, 48), (224, 115, 33, 50), (211, 33, 34, 47), ( 45, 33, 13, 46), (514, 32, 32, 49), (455, 32, 31, 49), (396, 32, 29, 48), (275, 32, 28, 48), (156, 32, 26, 49), (91, 32, 30, 48), (333, 31, 33, 50)] 

max_height = np.max(c[::, 3])
nearest = max_height * 1.4

contours.sort(key=lambda r: [int(nearest * round(float(r[1]) / nearest)), r[0]])

for x, y, w, h in contours:
    print(f"{x:4} {y:4} {w:4} {h:4}") 
    

第二种方法
这种方法不需要估计可能的行高,并且可以通过行号进行处理:

  1. 按其 y 值对所有轮廓进行排序。
  2. 迭代每个轮廓并为每个轮廓分配行号。
  3. 当新的 y 值大于 max_height 时,增加行号。
  4. 对结果的 by_line 列表进行排序,该列表将按 (line, x, y, w, h) 的顺序排列。
  5. 最终可以使用列表推导式删除行号,如果不需要,则可以如此操作(但是可能有用?)
# Calculate maximum rectangle height
c = np.array(contours)
max_height = np.max(c[::, 3])

# Sort the contours by y-value
by_y = sorted(contours, key=lambda x: x[1])  # y values

line_y = by_y[0][1]       # first y
line = 1
by_line = []

# Assign a line number to each contour
for x, y, w, h in by_y:
    if y > line_y + max_height:
        line_y = y
        line += 1
        
    by_line.append((line, x, y, w, h))

# This will now sort automatically by line then by x
contours_sorted = [(x, y, w, h) for line, x, y, w, h in sorted(by_line)]

for x, y, w, h in contours:
    print(f"{x:4} {y:4} {w:4} {h:4}")

两者都会显示以下输出:

  36   45   33   40
  76   44   29   43
 109   43   29   45
 145   44   32   43
 184   44   21   43
 215   44   21   41
 241   43   34   45
 284   46   31   39
 324   46    7   39
 337   46   14   41
 360   46   26   39
 393   46   20   41
 421   45   45   41
 475   45   32   41
 514   43   38   45
  39  122   26   41
  70  121   40   48
 115  123   27   40
 148  121   25   45
 176  122   28   41
 212  124   30   41
 247  124   91   40
 342  124   28   39
 375  124   27   39
 405  122   27   43
  37  210   25   33
  69  199   28   44
 102  210   21   33
 129  199   28   44
 163  210   26   33
 195  197   16   44
 214  210   27   44
 247  199   25   42
 281  212    7   29
 292  212   11   42
 310  199   23   43
 340  199    7   42
 355  211   43   30
 406  213   24   28
 437  209   31   35
 473  210   28   43
 506  210   28   43
 541  210   17   31
  37  288   21   33
  62  282   15   39
  86  290   24   28
 116  290   72   30
 192  290   23   30
 218  290   26   41
 249  288   20   33
 

这对于上面的数字确实有效,但是它们似乎无法对文本轮廓进行排序。 这是检测到的示例文本轮廓:https://i.imgur.com/b3fnDFP.jpg 轮廓(排序后)不是按照文本顺序而是按照“Dkhdf?oyou....”的顺序排列的。 我有办法解决这个问题吗? - Nissan
你能给我更新的矩形列表吗?这只是调整“nearest”值的问题,该值应该大致等于一个单词的预期高度。例如尝试20。 - Martin Evans
这是我使用的另一张图片。https://i.imgur.com/VUHrGDQ.jpg 这是矩形列表 https://drive.google.com/open?id=0BwuAHXrh5YRTSlV0UG5XSEsxVlU - Nissan
对于您提供的示例,似乎值在70左右可以工作。我已经更新了脚本,根据最高的矩形和估计的行间距值来进行估算。 - Martin Evans
@MartinEvans 感谢您的出色方法。我们如何自动找到行间距值?如果对于每个图像都是动态的,那就更好了。 - quents
显示剩余6条评论

3

在解决我的任务时,我采用了以下方法(这种方法并不是最优化的,可能还有改进的空间):

import pandas as pd
import cv2
import cv2
import matplotlib.pyplot as plt
import numpy as np
%matplotlib inline
import matplotlib
matplotlib.rcParams['figure.figsize'] = (20.0, 10.0)
matplotlib.rcParams['image.cmap'] = 'gray'

imageCopy = cv2.imread("./test.png")
imageGray = cv2.imread("./test.png", 0)
image = imageCopy.copy()

contours, hierarchy = cv2.findContours(imageGray, cv2.RETR_EXTERNAL, 
                                           cv2.CHAIN_APPROX_SIMPLE)
bboxes = [cv2.boundingRect(i) for i in contours]
bboxes=sorted(bboxes, key=lambda x: x[0])

df=pd.DataFrame(bboxes, columns=['x','y','w', 'h'], dtype=int)
df["x2"] = df["x"]+df["w"] # adding column for x on the right side
df = df.sort_values(["x","y", "x2"]) # sorting

for i in range(2): # change rows between each other by their coordinates several times 
# to sort them completely 
    for ind in range(len(df)-1):
    #     print(ind, df.iloc[ind][4] > df.iloc[ind+1][0])
        if df.iloc[ind][4] > df.iloc[ind+1][0] and df.iloc[ind][1]> df.iloc[ind+1][1]:
            df.iloc[ind], df.iloc[ind+1] = df.iloc[ind+1].copy(), df.iloc[ind].copy()
num=0
for box in df.values.tolist():

    x,y,w,h, hy = box
    cv2.rectangle(image, (x,y), (x+w,y+h), (255,0,255), 2)
    # Mark the contour number
    cv2.putText(image, "{}".format(num + 1), (x+40, y-10), cv2.FONT_HERSHEY_SIMPLEX, 1, 
                (0, 0, 255), 2);
    num+=1
plt.imshow(image[:,:,::-1])

原始排序: original sorting 从上到下,从左到右: up-to-bottom left-to-right 如果您想测试原始图像: original image


1

给定一张二值图像 - thresh,我认为最短的方法是 -

import numpy as np
import cv2 

contours,hierarchy = cv2.findContours(thresh,cv2.RETR_EXTERNAL,cv2.CHAIN_APPROX_NON) #thresh is a bia
cntr_index_LtoR = np.argsort([cv2.boundingRect(i)[0] for i in contours])

在这里,cv2.boundingRect(i)[0] 仅返回从 x,y,w,h = cv2.boundingRect(i) 中获取的第 i 个轮廓的 x 值。
同样地,您可以使用从上到下的方式。

0

contours.sort(key=lambda r: round( float(r[1] / nearest)))会产生类似于(int(nearest * round(float(r[1])/nearest)) * max_width + r[0])的效果。


0
一个简单的方法来按照轮廓的边界框(x,y,w,h)从左到右,从上到下排序是如下所示。
您可以使用 boundingBoxes = cv2.boundingRect() 方法获取边界框。
def sort_bbox(boundingBoxes):
'''
function to sort bounding boxes from left to right, top to bottom
'''
    # combine x and y as a single list and sort based on that 
    boundingBoxes = sorted(boundingBoxes, key=lambda b:b[0]+b[1], reverse=False))
    return boundingboxes

这种方法并没有经过所有情况的广泛测试,但在我所做的项目中发现非常有效。

链接到排序函数文档以供参考 https://docs.python.org/3/howto/sorting.html


0

使用contours=cv2.findContours()找到轮廓后,使用-

boundary=[]
for c,cnt in enumerate(contours):
    x,y,w,h = cv2.boundingRect(cnt)
    boundary.append((x,y,w,h))
count=np.asarray(boundary)
max_width = np.sum(count[::, (0, 2)], axis=1).max()
max_height = np.max(count[::, 3])
nearest = max_height * 1.4
ind_list=np.lexsort((count[:,0],count[:,1]))

c=count[ind_list]

现在,C将按从左到右和从上到下的顺序排序。


0
def sort_contours(contours, x_axis_sort='LEFT_TO_RIGHT', y_axis_sort='TOP_TO_BOTTOM'):
    # initialize the reverse flag
    x_reverse = False
    y_reverse = False
    if x_axis_sort == 'RIGHT_TO_LEFT':
        x_reverse = True
    if y_axis_sort == 'BOTTOM_TO_TOP':
        y_reverse = True
    
    boundingBoxes = [cv2.boundingRect(c) for c in contours]
    
    # sorting on x-axis 
    sortedByX = zip(*sorted(zip(contours, boundingBoxes),
    key=lambda b:b[1][0], reverse=x_reverse))
    
    # sorting on y-axis 
    (contours, boundingBoxes) = zip(*sorted(zip(*sortedByX),
    key=lambda b:b[1][1], reverse=y_reverse))
    # return the list of sorted contours and bounding boxes
    return (contours, boundingBoxes)
    

contours, hierarchy = cv2.findContours(img_vh, cv2.RETR_TREE, cv2.CHAIN_APPROX_SIMPLE)
contours, boundingBoxes = sort_contours(contours, x_axis_sort='LEFT_TO_RIGHT', y_axis_sort='TOP_TO_BOTTOM')

网页内容由stack overflow 提供, 点击上面的
可以查看英文原文,
原文链接