如何在ConstraintLayout中将元素居中

295

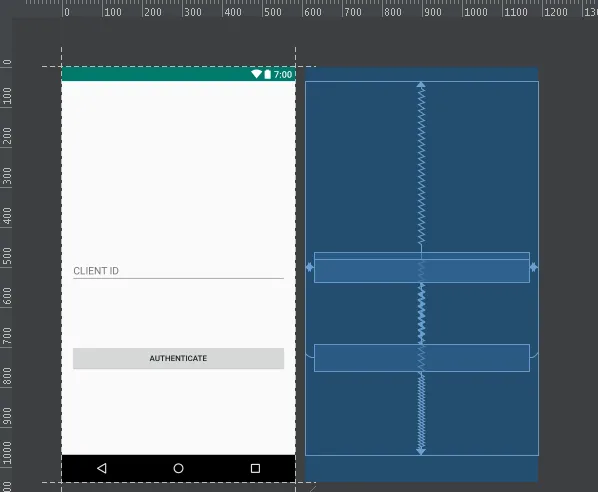
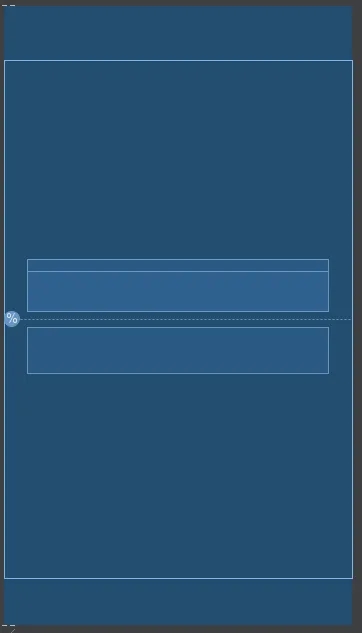
我在我的应用程序中使用ConstraintLayout来制作应用程序布局。我正在尝试创建一个屏幕,在该屏幕上,一个EditText和一个Button应该位于中心,并且Button应该在EditText下方,只有16dp的marginTop。

这是我的布局和屏幕截图,显示它目前的效果。

activity_authenticate_content.xml

<android.support.constraint.ConstraintLayout xmlns:android="http://schemas.android.com/apk/res/android"
    xmlns:app="http://schemas.android.com/apk/res-auto"
    xmlns:tools="http://schemas.android.com/tools"
    android:layout_width="match_parent"
    android:layout_height="match_parent"
    android:paddingLeft="16dp"
    android:paddingRight="16dp"
    tools:context="com.icici.iciciappathon.login.AuthenticationActivity">

    <android.support.design.widget.TextInputLayout
        android:id="@+id/client_id_input_layout"
        android:layout_width="0dp"
        android:layout_height="wrap_content"
        app:layout_constraintBottom_toBottomOf="parent"
        app:layout_constraintLeft_toLeftOf="parent"
        app:layout_constraintRight_toRightOf="parent"
        app:layout_constraintTop_toTopOf="parent">

        <android.support.design.widget.TextInputEditText
            android:layout_width="match_parent"
            android:layout_height="wrap_content"
            android:hint="@string/login_client_id"
            android:inputType="textEmailAddress" />

    </android.support.design.widget.TextInputLayout>

    <android.support.v7.widget.AppCompatButton
        android:id="@+id/authenticate"
        android:layout_width="0dp"
        android:layout_height="wrap_content"
        android:layout_marginTop="16dp"
        android:text="@string/login_auth"
        app:layout_constraintBottom_toBottomOf="parent"
        app:layout_constraintLeft_toLeftOf="@id/client_id_input_layout"
        app:layout_constraintRight_toRightOf="@id/client_id_input_layout"
        app:layout_constraintTop_toTopOf="@id/client_id_input_layout" />

</android.support.constraint.ConstraintLayout>

输入图像描述

9个回答

488

有一个更简单的方法。如果您将布局约束设置如下,并且您的EditText具有固定大小,则它将居中于ConstraintLayout中:

有一个更简单的方法。如果您将布局约束设置如下,并且您的EditText具有固定大小,则它将居中于ConstraintLayout中:

app:layout_constraintLeft_toLeftOf="parent"
app:layout_constraintRight_toRightOf="parent"
app:layout_constraintTop_toTopOf="parent"
app:layout_constraintBottom_toBottomOf="parent"

左/右配对使视图水平居中,上/下配对使其垂直居中。这是因为当您将左、右或上、下约束设置为大于视图本身时,视图会在两个约束之间居中显示,即偏移量设置为50%。您还可以通过自己设置偏移量将视图向上/下或向右/左移动。尝试一下,您会看到它如何影响视图的位置。


5
这种方法比使用指南要好得多。 - ssand
1
这更为恰当,而且我在许多官方的演讲和示例中也看到过这种做法。 - TapanHP
2
指南更好,因为一旦您拥有复杂的布局(这将会在营销部门介入后发生),简单的居中对齐就不再起作用。最好有指南并将顶部和底部居中于指南。 - Nick Turner
1
只有在您想要居中的TextView不用于调整其他视图对象的位置时,这才是有用的... - Bénédicte Lagouge
@Gojir4 iOS有这个功能,为什么Android没有还是个谜。 - El Sushiboi
好答案!需要注意的是,我认为最新的做法是尝试使用:app:layout_constraintStart_toStartOf="parent"app:layout_constraintEnd_toEndOf="parent"而不是Left_toLeftOf和Right_toRightOf。 - Ola Ström

174

更新:

您现在可以像Eugene的回答中描述的那样,在packed模式下使用chain功能。


指南

您可以在50%位置使用水平指南,并添加底部和顶部(8dp)约束以编辑文本和按钮:

<android.support.constraint.ConstraintLayout xmlns:android="http://schemas.android.com/apk/res/android"
    xmlns:app="http://schemas.android.com/apk/res-auto"
    xmlns:tools="http://schemas.android.com/tools"
    android:layout_width="match_parent"
    android:layout_height="match_parent"
    android:paddingLeft="16dp"
    android:paddingRight="16dp">

    <android.support.design.widget.TextInputLayout
        android:id="@+id/client_id_input_layout"
        android:layout_width="0dp"
        android:layout_height="wrap_content"
        android:layout_marginBottom="8dp"
        app:layout_constraintBottom_toTopOf="@+id/guideline"
        android:layout_marginRight="8dp"
        app:layout_constraintRight_toRightOf="parent"
        android:layout_marginLeft="8dp"
        app:layout_constraintLeft_toLeftOf="parent">

        <android.support.design.widget.TextInputEditText
            android:layout_width="match_parent"
            android:layout_height="wrap_content"
            android:hint="@string/login_client_id"
            android:inputType="textEmailAddress"/>

    </android.support.design.widget.TextInputLayout>

    <android.support.v7.widget.AppCompatButton
        android:id="@+id/authenticate"
        android:layout_width="0dp"
        android:layout_height="wrap_content"
        android:text="@string/login_auth"
        app:layout_constraintTop_toTopOf="@+id/guideline"
        android:layout_marginTop="8dp"
        android:layout_marginRight="8dp"
        app:layout_constraintRight_toRightOf="parent"
        android:layout_marginLeft="8dp"
        app:layout_constraintLeft_toLeftOf="parent"/>

    <android.support.constraint.Guideline
        android:layout_width="wrap_content"
        android:layout_height="wrap_content"
        android:id="@+id/guideline"
        android:orientation="horizontal"
        app:layout_constraintGuide_percent="0.5"/>

</android.support.constraint.ConstraintLayout>

布局编辑器


1
谢谢@Pycpik,我不理解<android.support.constraint.Guideline的使用方式是什么?每次我们使用ConstraintLayout时是否都需要使用它? - N Sharma
layout_constraintGuide_percent 的作用是什么? - N Sharma
1
“Guideline”只是一个无形的项目,您可以将其用作视图的锚点。“layout_constraintGuide_percent”是相对于父级的百分比。这里的0.5表示50%的高度。 - Pycpik
谢谢。明白了。我现在有两个TextInputEditText和一个Button。我想把它们放在屏幕中央。但目前还没有实现。这是代码:https://pastebin.com/iXYtuXHg 这是截图:https://www.dropbox.com/s/k7997q2buvw76cp/q.png?dl=0 - N Sharma
2
你可以将中间的一个居中,并在上方和下方添加一个,或者将它们放在LinearLayout中并居中。 - Pycpik
LinearLayout打败了Constraints的全部意义。只需将第一个设置为“顶部”和“底部”,然后将第二个约束到顶部编辑框即可。 - Nick Turner

82

指南中提供的解决方案仅适用于具有单行EditText的特定情况。要使其适用于多行EditText,您应该使用layout_constraintVertical_chainStyle="packed"

<android.support.constraint.ConstraintLayout xmlns:android="http://schemas.android.com/apk/res/android"
    xmlns:app="http://schemas.android.com/apk/res-auto"
    android:layout_width="match_parent"
    android:layout_height="match_parent"
    android:paddingLeft="16dp"
    android:paddingRight="16dp">

    <android.support.design.widget.TextInputLayout
        android:id="@+id/client_id_input_layout"
        android:layout_width="0dp"
        android:layout_height="wrap_content"
        app:layout_constraintBottom_toTopOf="@+id/authenticate"
        app:layout_constraintLeft_toLeftOf="parent"
        app:layout_constraintRight_toRightOf="parent"
        app:layout_constraintTop_toTopOf="parent"
        app:layout_constraintVertical_chainStyle="packed">

        <android.support.design.widget.TextInputEditText
            android:layout_width="match_parent"
            android:layout_height="wrap_content"
            android:hint="@string/login_client_id"
            android:inputType="textEmailAddress" />

    </android.support.design.widget.TextInputLayout>

    <android.support.v7.widget.AppCompatButton
        android:id="@+id/authenticate"
        android:layout_width="0dp"
        android:layout_height="wrap_content"
        android:layout_marginTop="16dp"
        android:text="@string/login_auth"
        app:layout_constraintBottom_toBottomOf="parent"
        app:layout_constraintLeft_toLeftOf="@id/client_id_input_layout"
        app:layout_constraintRight_toRightOf="@id/client_id_input_layout"
        app:layout_constraintTop_toBottomOf="@id/client_id_input_layout" />

</android.support.constraint.ConstraintLayout>

这是它的外观:

在Nexus 5上查看

您可以在以下文章中了解有关使用链的更多信息:


1
这绝对是最好的答案。其他答案只适用于一两个视图。而这个答案更具可扩展性,因为它适用于一个、两个或任意数量的视图。 - mdelolmo
为什么使用简单的按钮,也可以使用android:layout_width="wrap_content" - CodeToLife

32

你可以将视图的中心设置为屏幕大小的百分比。

该示例使用50%的宽度和高度:

<android.support.constraint.ConstraintLayout xmlns:android="http://schemas.android.com/apk/res/android"
    xmlns:app="http://schemas.android.com/apk/res-auto"
    android:layout_width="match_parent"
    android:layout_height="match_parent">

    <LinearLayout xmlns:android="http://schemas.android.com/apk/res/android"
        android:layout_width="0dp"
        android:layout_height="0dp"
        android:background="#FF0000"
        android:orientation="vertical"
        app:layout_constraintBottom_toBottomOf="parent"
        app:layout_constraintHeight_percent=".5"
        app:layout_constraintLeft_toLeftOf="parent"
        app:layout_constraintRight_toRightOf="parent"
        app:layout_constraintTop_toTopOf="parent"
        app:layout_constraintWidth_percent=".5"></LinearLayout>

</android.support.constraint.ConstraintLayout>

使用ConstraintLayout 1.1.3版本完成。别忘了在gradle的依赖中添加它,并在有新版本时升级:

dependencies {
...
    implementation 'com.android.support.constraint:constraint-layout:1.1.3'
}

输入图片描述


22

在你的视图中添加这些标签

    app:layout_constraintCircleRadius="0dp"
    app:layout_constraintEnd_toEndOf="parent"
    app:layout_constraintHorizontal_bias="0.5"
    app:layout_constraintStart_toStartOf="parent"

你可以在设计模式下右键单击并选择居中。


14
你可以使用 layout_constraintCircleConstraintLayout 中居中视图。
<android.support.constraint.ConstraintLayout
        xmlns:android="http://schemas.android.com/apk/res/android"
        xmlns:app="http://schemas.android.com/apk/res-auto"
        xmlns:tools="http://schemas.android.com/tools"
        android:id="@+id/mparent"
        android:layout_width="match_parent"
        android:layout_height="match_parent">

        <ImageButton
            android:id="@+id/btn_settings"
            android:layout_width="wrap_content"
            android:layout_height="wrap_content"
            app:srcCompat="@drawable/ic_home_black_24dp"
            app:layout_constraintCircle="@id/mparent"
            app:layout_constraintCircleRadius="0dp" />

</android.support.constraint.ConstraintLayout>

通过将约束圆设置为父级并将半径设置为零,您可以使视图位于父级的中心。


最佳解决方案。就像一个“app:layout_constraintCenter_in =”parent“”(这个并不存在)一样。 - Bénédicte Lagouge
1
这个视图没有限制。它只有设计时的位置,所以在运行时会跳到(0,0),除非你添加约束。 - Min2

5
只需在布局中添加android:gravity="center"即可完成 :)

4

使用

app:layout_constraintEnd_toEndOf="parent"
app:layout_constraintStart_toStartOf="parent"

例子

<ImageView
    android:id="@+id/ivIcon"
    android:layout_width="wrap_content"
    android:layout_height="wrap_content"
    android:src="@drawable/ic_launcher_background"
    android:contentDescription="@string/app_name"
    app:layout_constraintEnd_toEndOf="parent"
    app:layout_constraintStart_toStartOf="parent" />

0

以下代码将使图片居中显示

<?xml version="1.0" encoding="utf-8"?><androidx.constraintlayout.widget.ConstraintLayout xmlns:android="http://schemas.android.com/apk/res/android"
xmlns:app="http://schemas.android.com/apk/res-auto"
xmlns:tools="http://schemas.android.com/tools"
android:layout_width="match_parent"
android:layout_height="match_parent">

<ImageView
    android:id="@+id/imageView"
    android:layout_width="wrap_content"
    android:layout_height="wrap_content"
    app:layout_constraintEnd_toEndOf="parent"
    app:layout_constraintStart_toStartOf="parent"
    app:layout_constraintBottom_toBottomOf="parent"
    app:layout_constraintTop_toTopOf="parent"
    android:src="@drawable/logo" />
</androidx.constraintlayout.widget.ConstraintLayout>

网页内容由stack overflow 提供, 点击上面的
可以查看英文原文,
原文链接