透明背景下图标和元素的部分边框

5
如何在透明背景上创建可调整大小(或甚至设置宽度)的边框以包围页面上的图标和其他元素,如下所示? 元素1 元素2和3
------[element]------

目前最佳的思路是:
<div class="outer"> Border left / right
  outer:before - Border top/ bottom; width:10%
    Element
  outer:after- Border top/ bottom; width:10%
</div>

但是,我该如何将横线纳入整个中间部分的两侧?

边框样式几乎与此相似,可以在此处找到:http://css-shapes.xyz/border-styles - Akshay
4个回答

5

让我再添加一种方法。在html中,我不使用任何额外的div,只使用包装器(wrapper)和span。

Span获取带括号的类名以绘制括号。我使用线性渐变作为边框。在这个例子中,我使用简单的黑-透明-黑渐变,但当然你可以使用更复杂的渐变。

然后,在包装器div上使用两个伪元素来绘制水平线条。同样,在这里,你可以比简单的黑色边框更花哨。

body {
 background: linear-gradient(to right, #ffc, #ccf);
}
.bracketed{
 padding: 15px 20px;
 border: 1px solid;
 border-image: linear-gradient(to right, black 0%, black 29%, transparent 30%, transparent 70%, black 71%, black 100%);
 border-image-slice: 1;
}
.bordered {
 text-align: center;
 margin: 20px;
 display: flex;
}
.bordered::before, .bordered::after{
 content: "";
 flex: 1;
 align-self: center;
 border: 1px solid black;
 border-width: 1px 0px 0px;
 height: 0;
}
<div class="bordered"><span class="bracketed">A</span></div>

如果您想在图像上使用此功能,则只需在HTML中添加以下内容:
<div class="bordered"><img /></div>

codepen上查看一个带有font-awesome图标的示例。


谢谢,这个页面上的所有示例都很棒 - 由于边框图像在ie 8/9/10兼容性方面的问题,我不确定现在使用它是否是最好的选择。 - acasperw
我喜欢这个,非常优雅,没有使用大量的标记,除了 flex 容器可能在旧浏览器上无法工作之外,如果我正在开发一个 ng 网站,我肯定会选择这个。 - MacK

3
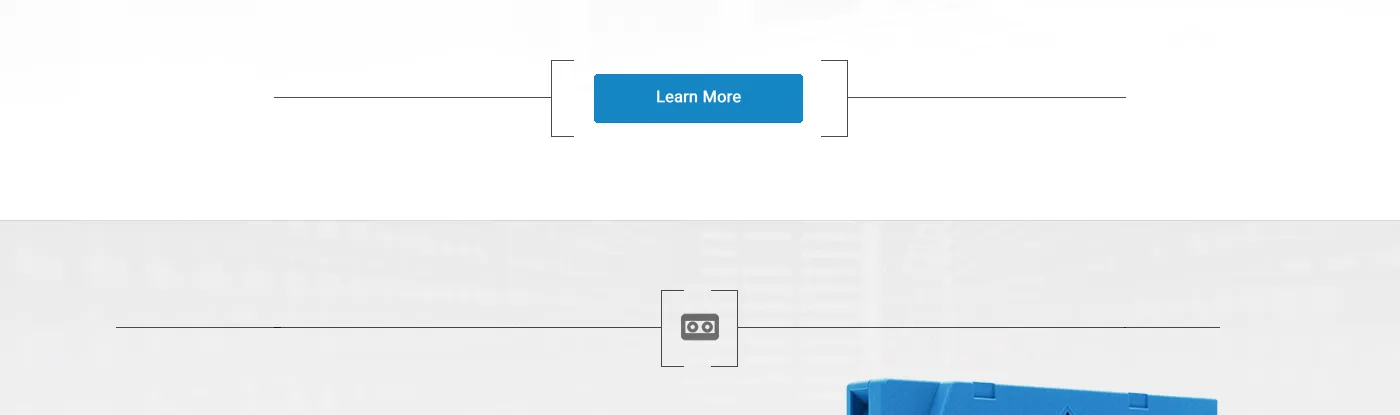
老实说,我喜欢完全使用CSS而不使用任何类型的图片。我会在图标左右两侧使用2个额外的div元素,它们充当“括号”。
<div class="icon-container">
    <div class="icon-border icon-border-left"></div>
    <i class="fa fa-rocket"></i> <!-- or your central element -->
    <div class="icon-border icon-border-right"></div>
</div>

我会像这样以传统方式设置括号的样式:

.icon-container .icon-border {
    border: 1px solid black;
    width: 25px;
    position: relative;
}

然后在括号上应用一个伪元素来创建“线”,使用绝对定位并设置非常长的宽度。
.icon-container .icon-border:before {
    content: '';
    position: absolute;
    top: 50%;
    height: 1px;
    width: 2048px;
    background: black;
}

最后,将所有的例外应用于移动括号靠近图标,以给人一种包裹它的错觉,然后为伪类指定左右位置,以便从括号末尾绘制一条线到屏幕末尾:

.icon-container .icon-border.icon-border-left {
    border-right-width: 0px;
    margin-right: -21px;
}
.icon-container .icon-border.icon-border-left:before {
    right: 100%;
}
.icon-container .icon-border.icon-border-right {
    border-left-width: 0px;
    margin-left: -21px;
}
.icon-container .icon-border.icon-border-right:before {
    left: 100%;
}

最后一个关键问题,你的主要图标容器必须具有overflow: hidden,否则你的线条将横跨整个屏幕,可能会超出容器和页面边缘,导致非常糟糕的水平滚动条。

演示: http://codepen.io/luigimannoni/pen/epPBXJ


谢谢,这是最好的答案,因为它允许元素响应式地使用,只需将 .icon-container .icon-border:before {} 的宽度设置为您可能会使用的最长宽度(200em?),然后它就成为响应式容器内的响应式元素。 - acasperw

0

这应该让你朝着正确的方向前进。

<div class="wrapper">
   <div class="left"></div>
       <button>Test</button>
   <div class="right"></div>
</div>

<style>
.wrapper {
  text-align: center;
  background: #ccc;
  padding: 20px;
}

button {
  vertical-align: middle;
  display: inline-block;
  position: relative;
  z-index: 2;
}

.left {
  position: relative;
  vertical-align: middle;
  height: 100px;
  box-sizing: border-box;
  padding-right: 30px;
  width: 400px;
  display: inline-block;
  margin: 0 -10px 0 0;
}

.left::before {
  position: absolute;
  border-top: 1px solid #333;
  top: 50%;
  z-index: 1;
  width: 100%;
  content: "";
  right: 30px;
}

.left::after {
  position: absolute;
  border-top: 1px solid #333;
  border-left: 1px solid #333;
  border-bottom: 1px solid #333;
  top: 0;
  z-index: 1;
  width: 30px;
  content: "";
  right: 0;
  height: 100%;
  box-sizing: border-box;
}

.right {
  position: relative;
  height: 100px;
  box-sizing: border-box;
  padding-right: 30px;
  width: 400px;
  display: inline-block;
  vertical-align: middle;
  margin: 0 0 0 -10px;
}

.right::before {
  position: absolute;
  border-top: 1px solid #333;
  top: 50%;
  z-index: 1;
  width: 100%;
  content: "";
  left: 30px;
}

.right::after {
  position: absolute;
  border-top: 1px solid #333;
  border-right: 1px solid #333         
  border-bottom: 1px solid #333;
  top: 0;
  z-index: 1;
  width: 30px;
  content: "";
  left: 0;
  height: 100%;
  box-sizing: border-box;
}
</style>

http://codepen.io/robotslater/pen/LpgxGe


谢谢,这个页面上的所有示例都很棒。 - acasperw

0

对于这条水平线,您可以使用background-image属性,并将其设置为repeat-x和position left center。而对于这些括号,您可以使用:before和:after伪类,使用DIV元素在按钮元素的两侧绝对定位,高度为100%,宽度为20px。这只是我首先想到的几个解决方案之一 :)


网页内容由stack overflow 提供, 点击上面的
可以查看英文原文,
原文链接