OpenCV [Python]返回的minAreaRect裁剪矩形

21
在OpenCV中,minAreaRect函数返回一个旋转的矩形。我该如何截取矩形内的图像部分?boxPoints函数返回旋转矩形角点的坐标,因此可以通过循环遍历盒子内的点来访问像素,但是在Python中是否有更快的裁剪方式?
注:请查看我的下面的答案中的代码。

您可以:1)为旋转矩形创建掩模(使用fillConvexPolydrawContours(... CV_FILLED)非常容易)。2)黑色初始化一个与原始图像大小相同的矩阵。3)仅将掩模内容复制到新图像中(new_image.setTo(old_image, mask))。4)在旋转矩形的边界框上裁剪新图像。 - Miki
5个回答

37

这里是一个完成此任务的函数:

import cv2
import numpy as np

def crop_minAreaRect(img, rect):

    # rotate img
    angle = rect[2]
    rows,cols = img.shape[0], img.shape[1]
    M = cv2.getRotationMatrix2D((cols/2,rows/2),angle,1)
    img_rot = cv2.warpAffine(img,M,(cols,rows))

    # rotate bounding box
    rect0 = (rect[0], rect[1], 0.0) 
    box = cv2.boxPoints(rect0)
    pts = np.int0(cv2.transform(np.array([box]), M))[0]    
    pts[pts < 0] = 0

    # crop
    img_crop = img_rot[pts[1][1]:pts[0][1], 
                       pts[1][0]:pts[2][0]]

    return img_crop

这里是一个使用示例

# generate image
img = np.zeros((1000, 1000), dtype=np.uint8)
img = cv2.line(img,(400,400),(511,511),1,120)
img = cv2.line(img,(300,300),(700,500),1,120)

# find contours / rectangle
_,contours,_ = cv2.findContours(img, 1, 1)
rect = cv2.minAreaRect(contours[0])

# crop
img_croped = crop_minAreaRect(img, rect)

# show
import matplotlib.pylab as plt
plt.figure()
plt.subplot(1,2,1)
plt.imshow(img)
plt.subplot(1,2,2)
plt.imshow(img_croped)
plt.show()

这是输出内容

原始和裁剪后的图片


1
这正是我想要的,函数完全清晰!然而,我无法让它与这个图像一起工作。https://i.imgur.com/4E8ILuI.jpg 它最终会稍微旋转错误,并且边缘被切掉了。你能否愿意看一下? - Hatshepsut
6
图像应该围绕旋转矩形的中心旋转,而不是图像中心。这里有一个正确答案(链接:https://dev59.com/kmgu5IYBdhLWcg3wDSwG#48553593)。 - jdhao
1
感谢@oliver-wilken的决定,但是如果angle = 90,那么你会得到除以零的结果。我的决定是将rect0 = (rect[0], rect[1], 0.0)更改为rect0 = (rect[0], rect[1], angle) - Volkov Maxim

15

@AbdulFatir提供了一个不错的解决方案,但是根据评论(@Randika @epinal)所述,它对我也没有完全起作用,所以我稍微修改了一下,现在看来对我的情况是有效的。这是我正在使用的图片。mask_of_image

im, contours, hierarchy = cv2.findContours(open_mask, cv2.RETR_TREE, cv2.CHAIN_APPROX_SIMPLE)
print("num of contours: {}".format(len(contours)))


mult = 1.2   # I wanted to show an area slightly larger than my min rectangle set this to one if you don't
img_box = cv2.cvtColor(img.copy(), cv2.COLOR_GRAY2BGR)
for cnt in contours:
    rect = cv2.minAreaRect(cnt)
    box = cv2.boxPoints(rect)
    box = np.int0(box)
    cv2.drawContours(img_box, [box], 0, (0,255,0), 2) # this was mostly for debugging you may omit

    W = rect[1][0]
    H = rect[1][1]

    Xs = [i[0] for i in box]
    Ys = [i[1] for i in box]
    x1 = min(Xs)
    x2 = max(Xs)
    y1 = min(Ys)
    y2 = max(Ys)

    rotated = False
    angle = rect[2]

    if angle < -45:
        angle+=90
        rotated = True

    center = (int((x1+x2)/2), int((y1+y2)/2))
    size = (int(mult*(x2-x1)),int(mult*(y2-y1)))
    cv2.circle(img_box, center, 10, (0,255,0), -1) #again this was mostly for debugging purposes

    M = cv2.getRotationMatrix2D((size[0]/2, size[1]/2), angle, 1.0)

    cropped = cv2.getRectSubPix(img_box, size, center)    
    cropped = cv2.warpAffine(cropped, M, size)

    croppedW = W if not rotated else H 
    croppedH = H if not rotated else W

    croppedRotated = cv2.getRectSubPix(cropped, (int(croppedW*mult), int(croppedH*mult)), (size[0]/2, size[1]/2))

    plt.imshow(croppedRotated)
    plt.show()

plt.imshow(img_box)
plt.show()

这应该会生成一系列像这样的图像:隔离轮廓 1隔离轮廓 2隔离轮廓 3 同时,它还会给出一个结果图像,如下所示:结果

14

这是执行上述任务的代码。为了加快进程,不要先旋转整个图像然后再剪切,而是先剪切包含旋转矩形的部分图像,然后进行旋转,再次剪切以得到最终结果。

# Let cnt be the contour and img be the input

rect = cv2.minAreaRect(cnt)  
box = cv2.boxPoints(rect) 
box = np.int0(box)

W = rect[1][0]
H = rect[1][1]

Xs = [i[0] for i in box]
Ys = [i[1] for i in box]
x1 = min(Xs)
x2 = max(Xs)
y1 = min(Ys)
y2 = max(Ys)

angle = rect[2]
if angle < -45:
    angle += 90

# Center of rectangle in source image
center = ((x1+x2)/2,(y1+y2)/2)
# Size of the upright rectangle bounding the rotated rectangle
size = (x2-x1, y2-y1)
M = cv2.getRotationMatrix2D((size[0]/2, size[1]/2), angle, 1.0)
# Cropped upright rectangle
cropped = cv2.getRectSubPix(img, size, center)
cropped = cv2.warpAffine(cropped, M, size)
croppedW = H if H > W else W
croppedH = H if H < W else W
# Final cropped & rotated rectangle
croppedRotated = cv2.getRectSubPix(cropped, (int(croppedW),int(croppedH)), (size[0]/2, size[1]/2))

1
我尝试了这段代码,但它没有给我ROI。自那以后有任何改进吗? - Randika Hapugoda

2
您没有提供样例代码,所以我将在没有代码的情况下回答。您可以按照以下步骤进行操作:
  1. 从矩形的角落确定相对于水平轴的旋转角度alpha。
  2. 通过alpha旋转图像,使裁剪的矩形与图像边框平行。确保临时图像尺寸更大,以便不会丢失任何信息(参见:Rotate image without cropping OpenCV
  3. 使用numpy切片裁剪图像(参见:How to crop an image in OpenCV using Python
  4. 将图像旋转回-alpha。

1
对于大尺寸的图像,这不会很耗费资源吗? - Abdul Fatir
我的猜测是,内置函数总是比对像素进行嵌套循环更快。但找出答案的唯一方法就是测量它,只需要像上面描述的那样写几行代码即可。 - tfv
如果我有很多矩形,那么它们可能会显示出来。我会编写代码并在尝试后回复您。 - Abdul Fatir
可能会有其他方法,取决于您想如何使用裁剪后的图像:您想在其原始方向上使用它,还是旋转它以使裁剪区域的边界与图像边界平行? - tfv
不,我不想使用它的原始方向。只想从裁剪的部分提取一些信息。 - Abdul Fatir

2

很遗憾,Oliver Wilken 的答案没有显示出图片。可能是因为使用了不同的 openCV 版本?这里是我采用的版本,增加了几个功能:

  • 对矩形进行缩放和填充,即获取原始矩形外部的部分
  • 可以根据矩形配置生成图像的角度,例如 0 或 90 [deg] 的角度将水平或垂直返回矩形
  • 返回旋转其他物体(例如点、线等)所需的转换矩阵
  • numpy 和 openCV 数组索引和矩形操作的辅助函数

代码

import cv2
import numpy as np


def img_rectangle_cut(img, rect=None, angle=None):
    """Translate an image, defined by a rectangle. The image is cropped to the size of the rectangle
    and the cropped image can be rotated.
    The rect must be of the from (tuple(center_xy), tuple(width_xy), angle).
    The angle are in degrees.
    PARAMETER
    ---------
    img: ndarray
    rect: tuple, optional
        define the region of interest. If None, it takes the whole picture
    angle: float, optional
        angle of the output image in respect to the rectangle.
        I.e. angle=0 will return an image where the rectangle is parallel to the image array axes
        If None, no rotation is applied.
    RETURNS
    -------
    img_return: ndarray
    rect_return: tuple
        the rectangle in the returned image
    t_matrix: ndarray
        the translation matrix
    """
    if rect is None:
        if angle is None:
            angle = 0
        rect = (tuple(np.array(img.shape) * .5), img.shape, 0)
    box = cv2.boxPoints(rect)

    rect_target = rect_rotate(rect, angle=angle)
    pts_target = cv2.boxPoints(rect_target)

    # get max dimensions
    size_target = np.int0(np.ceil(np.max(pts_target, axis=0) - np.min(pts_target, axis=0)))

    # translation matrix
    t_matrix = cv2.getAffineTransform(box[:3].astype(np.float32),
                                      pts_target[:3].astype(np.float32))

    # cv2 needs the image transposed
    img_target = cv2.warpAffine(cv2.transpose(img), t_matrix, tuple(size_target))

    # undo transpose
    img_target = cv2.transpose(img_target)
    return img_target, rect_target, t_matrix


def reshape_cv(x, axis=-1):
    """openCV and numpy have a different array indexing (row, cols) vs (cols, rows), compensate it here."""
    if axis < 0:
        axis = len(x.shape) + axis
    return np.array(x).astype(np.float32)[(*[slice(None)] * axis, slice(None, None, -1))]

def connect(x):
    """Connect data for a polar or closed loop plot, i.e. np.append(x, [x[0]], axis=0)."""
    if isinstance(x, np.ma.MaskedArray):
        return np.ma.append(x, [x[0]], axis=0)
    else:
        return np.append(x, [x[0]], axis=0)


def transform_np(x, t_matrix):
    """Apply a transform on a openCV indexed array and return a numpy indexed array."""
    return transform_cv2np(reshape_cv(x), t_matrix)


def transform_cv2np(x, t_matrix):
    """Apply a transform on a numpy indexed array and return a numpy indexed array."""
    return reshape_cv(cv2.transform(np.array([x]).astype(np.float32), t_matrix)[0])


def rect_scale_pad(rect, scale=1., pad=40.):
    """Scale and/or pad a rectangle."""
    return (rect[0],
            tuple((np.array(rect[1]) + pad) * scale),
            rect[2])


def rect_rotate(rect, angle=None):
    """Rotate a rectangle by an angle in respect to it's center.
    The rect must be of the from (tuple(center_xy), tuple(width_xy), angle).
    The angle is in degrees.
    """
    if angle is None:
        angle = rect[2]
    rad = np.deg2rad(np.abs(angle))
    rot_matrix_2d = np.array([[np.cos(rad), np.sin(rad)],
                              [np.sin(rad), np.cos(rad)]])

    # cal. center of rectangle
    center = np.sum(np.array(rect[1]).reshape(1, -1) * rot_matrix_2d, axis=-1) * .5
    center = np.abs(center)

    return tuple(center), rect[1], angle
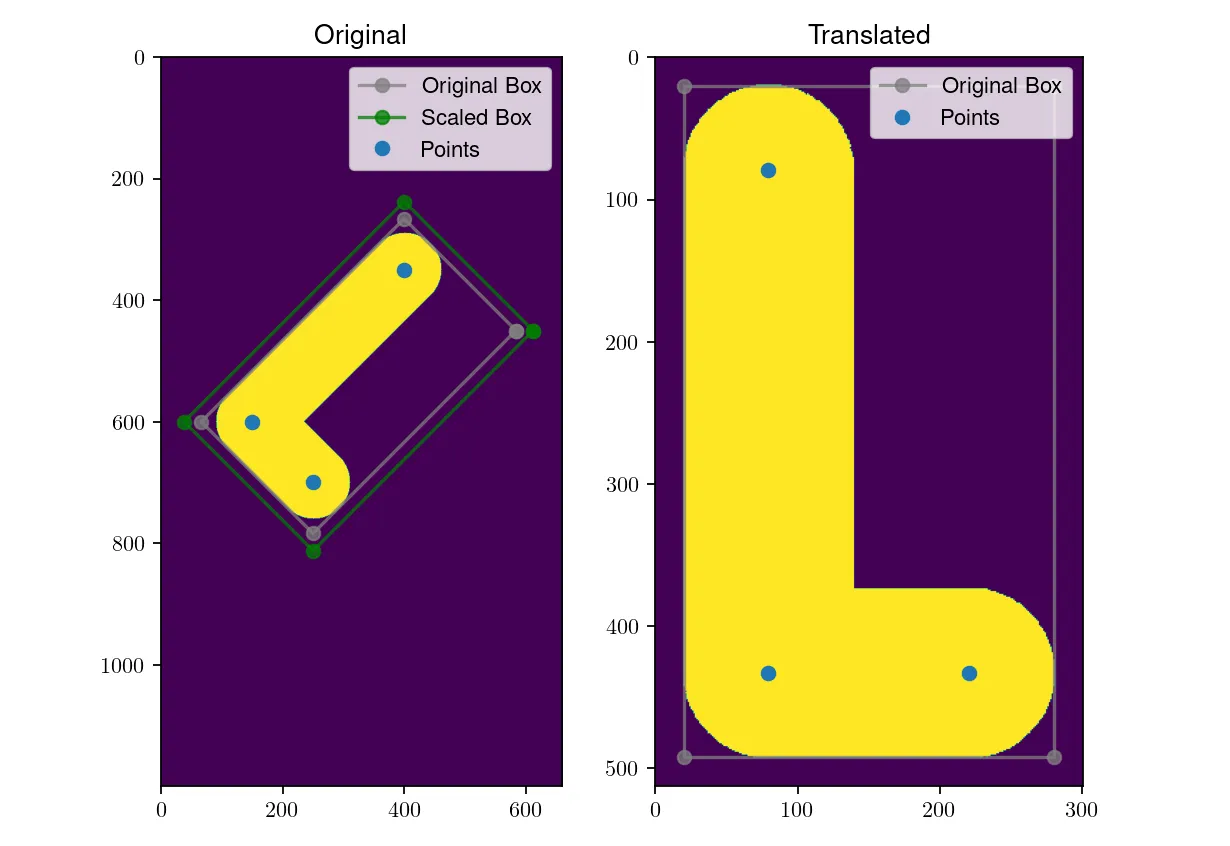
例子:

# Generate Image
img = np.zeros((1200, 660), dtype=np.uint8)

# Draw some lines and gen. points
x_0 = np.array([150,600])
x_1 = np.int0(x_0 + np.array((100, 100)))
x_2 = np.int0(x_0 + np.array((100, -100))*2.5)
img = cv2.line(img,tuple(x_0),tuple(x_1),1,120)
img = cv2.line(img,tuple(x_0),tuple(x_2),1,120)
points = np.array([x_0, x_1, x_2])

# Get Box
rect = cv2.minAreaRect(np.argwhere(img))

# Apply transformation
rect_scale = rect_scale_pad(rect, scale = 1., pad = 40.)
img_return, rect_target, t_matrix = img_rectangle_cut(
    img, 
    rect_scale, 
    angle=0,
    angle_normalize=True  # True <-> angel=0 vertical; angel=90 horizontal
   )

# PLOT
fig, ax = plt.subplots(ncols=2, figsize=(10,5))
ax = ax.flatten()
ax[0].imshow(img)

box_i = reshape_cv(cv2.boxPoints(rect))
ax[0].plot(*connect(box_i).T, 'o-', color='gray', alpha=.75, label='Original Box')
box_i = reshape_cv(cv2.boxPoints(rect_scale))
ax[0].plot(*connect(box_i).T, 'o-', color='green', alpha=.75, label='Scaled Box')
ax[0].plot(*points.T, 'o', label='Points')


ax[1].imshow(img_return)
box_i = transform_cv2np(cv2.boxPoints(rect), t_matrix)
ax[1].plot(*connect(box_i).T, 'o-', color='gray', alpha=.75, label='Original Box')

point_t = transform_np(points, t_matrix)
ax[1].plot(*point_t.T, 'o', label='Points')

ax[0].set_title('Original')
ax[1].set_title('Translated')

for axi in ax:
    axi.legend(loc=1)
    
plt.tight_layout()

Result of example


网页内容由stack overflow 提供, 点击上面的
可以查看英文原文,
原文链接