贝塞尔路径(Canny边缘检测)中绘制图像轮廓的算法。

3
我正在尝试根据每个像素的透明度使用BezierPath绘制图像的轮廓。
然而,我在逻辑上遇到了一个问题;我的逻辑也会绘制内部轮廓。
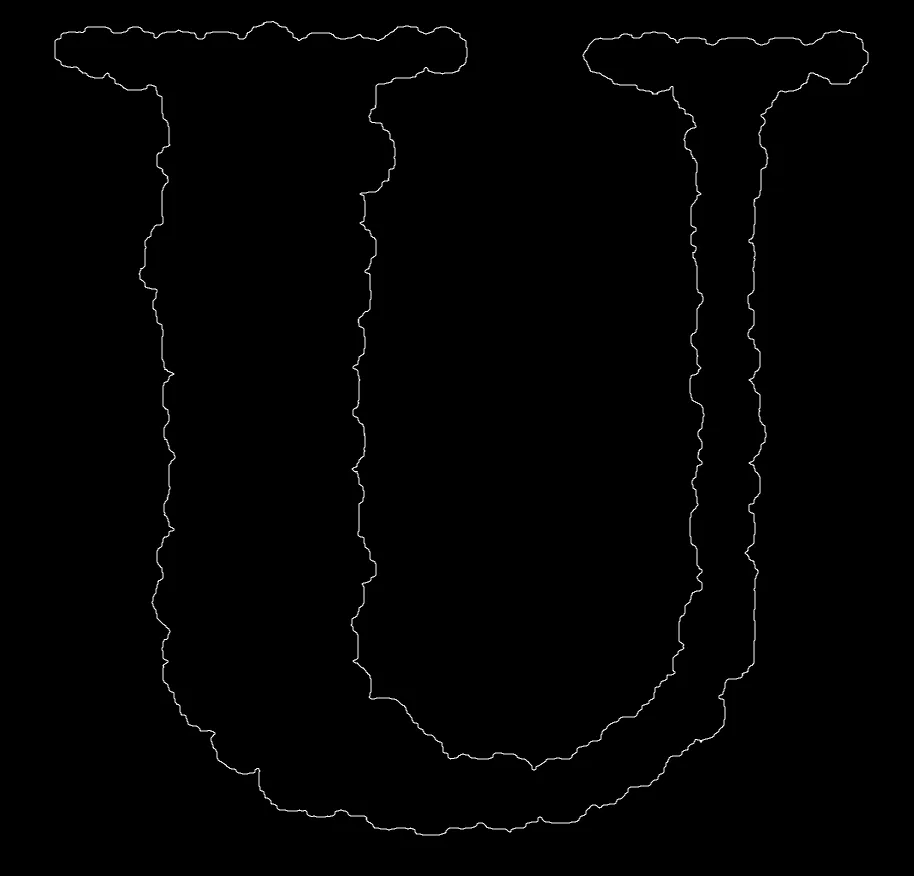
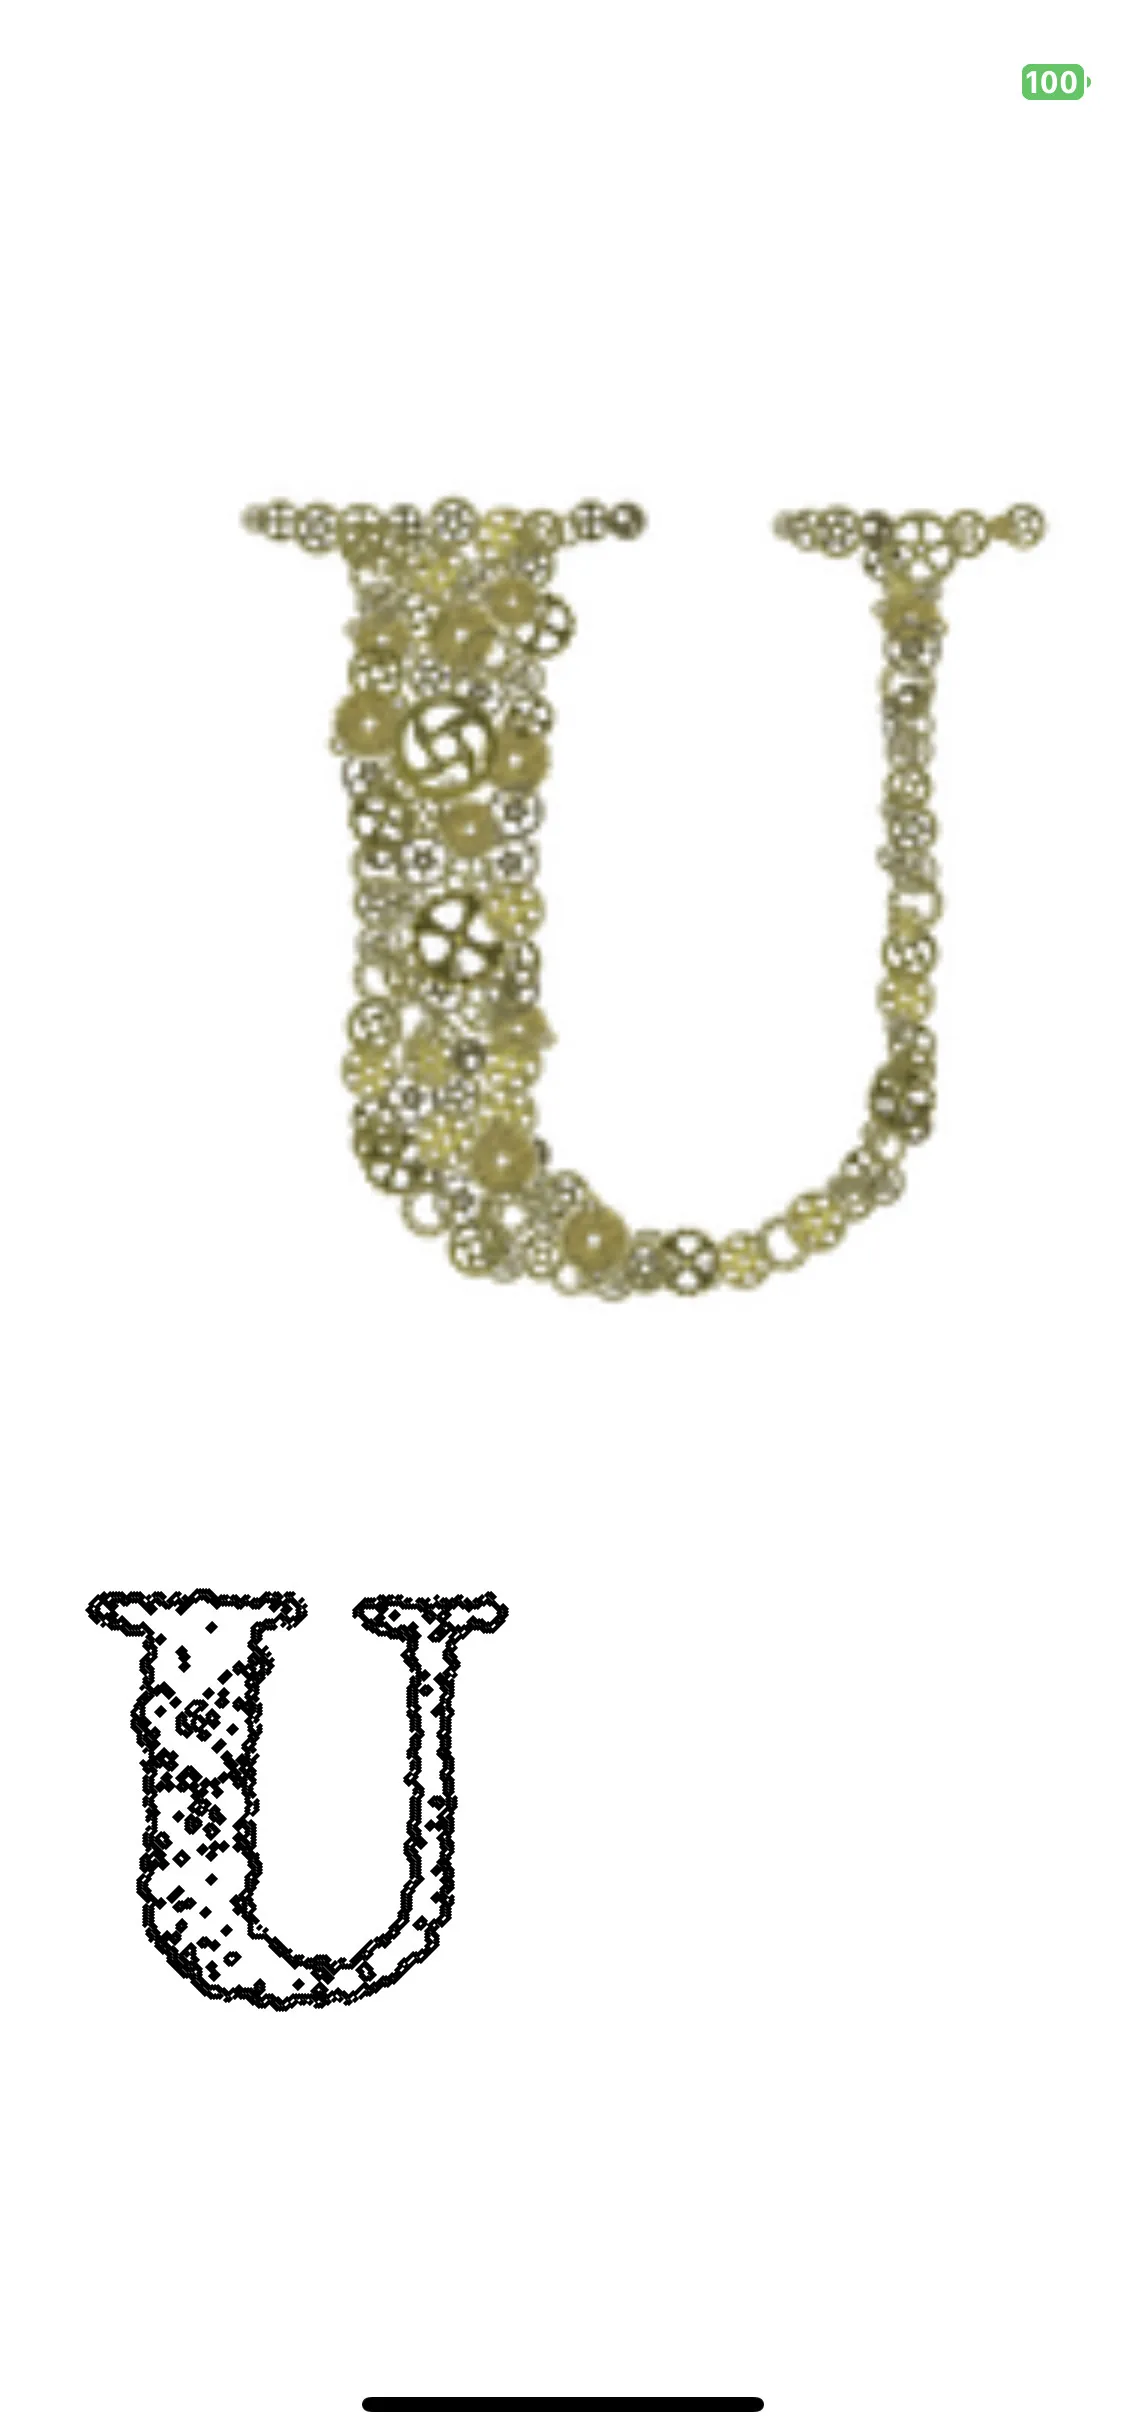
我只想使用BezierPath绘制外部轮廓。 我得到的结果(第一个形状是原始图像,第二个是bezierPath):

enter image description here

我的代码:
func processImage(_ image: UIImage) -> UIBezierPath? {
   guard let cgImage = image.cgImage else {
       print("Error: Couldn't get CGImage from UIImage")
       return nil
   }

   let width = cgImage.width
   let height = cgImage.height

   // Create a context to perform image processing
   let colorSpace = CGColorSpaceCreateDeviceGray()
   let context = CGContext(data: nil, width: width, height: height, bitsPerComponent: 8, bytesPerRow: width, space: colorSpace, bitmapInfo: CGImageAlphaInfo.none.rawValue)

   guard let context = context else {
       print("Error: Couldn't create CGContext")
       return nil
   }

   // Draw the image into the context
   context.draw(cgImage, in: CGRect(x: 0, y: 0, width: width, height: height))

   // Perform Canny edge detection
   guard let edgeImage = context.makeImage() else {
       print("Error: Couldn't create edge image")
       return nil
   }

   // Create a bezier path for the outline of the shape
   let bezierPath = UIBezierPath()
   
   // Iterate over the image pixels to find the edges
   for y in 0..<height {
       for x in 0..<width {
           let pixel = edgeImage.pixel(x: x, y: y)
           
           if pixel > 0 {
               let leftPixel = (x > 0) ? edgeImage.pixel(x: x - 1, y: y) : 0
               let rightPixel = (x < width - 1) ? edgeImage.pixel(x: x + 1, y: y) : 0
               let abovePixel = (y > 0) ? edgeImage.pixel(x: x, y: y - 1) : 0
               let belowPixel = (y < height - 1) ? edgeImage.pixel(x: x, y: y + 1) : 0
               
               if leftPixel == 0 || rightPixel == 0 || abovePixel == 0 || belowPixel == 0 {
                   bezierPath.move(to: CGPoint(x: CGFloat(x), y: CGFloat(y)))
                   bezierPath.addLine(to: CGPoint(x: CGFloat(x) + 1.0, y: CGFloat(y) + 1.0))
               }
           }
       }
   }

   return bezierPath
}

extension CGImage {
    func pixel(x: Int, y: Int) -> UInt8 {
        let data = self.dataProvider!.data
        let pointer = CFDataGetBytePtr(data)
        let bytesPerRow = self.bytesPerRow
        
        let pixelInfo = (bytesPerRow * y) + x
        return pointer![pixelInfo]
    }
}

你想要一个泛洪填充算法,从图像外部开始,找到所有“不在”形状中的内容。然后在此基础上进行边缘检测。https://en.wikipedia.org/wiki/Flood_fill 还有许多其他方法,但这个方法相当容易实现,并且在边缘没有间隙的情况下可以合理地工作。你也可以像你现在这样找到边缘的第一个像素,然后通过测试周围的像素来“绕着它走”。 - undefined
请注意,生成成千上万个两像素线条可能非常昂贵且难以处理。在创建实际的贝塞尔路径之前,您可能希望使用类似Ramer-Douglas-Peucker的方法来简化最终曲线。 - undefined
1
话虽如此,如果上述字体是字母P,你希望它是如何工作的呢?我会假设会有一个大的内部空洞,你希望将其视为边缘,即使你不想捕捉其他较小的内部空洞。解决这个问题很可能很复杂,并且需要你检测“特征”,而不仅仅是相邻的像素。一种方法是使用较大的(3x3、5x5等)重叠的“块”进行扫描,如果其任何像素都被填充,则被视为填充。这将忽略小的空洞,同时捕捉较大的空洞。这是一个具有挑战性的问题。 - undefined
1
谢谢您的回复。我将尝试实施泛洪填充算法;它似乎是我正在寻找的。确实,我可能需要简化路径,这将在第二步中完成。至于字母P的例子,我对内部的空洞不感兴趣,只关注外部轮廓。我会随时向您更新。非常感谢! - undefined
只是为了再次确认目标。目标是特别要得到贝塞尔路径,还是只是得到轮廓作为一张图像,你可以绘制?获得轮廓的图像要比获得良好路径简单得多,也更快。 (这是一个有趣的问题。不过,我还在努力解决这个问题。) - undefined
1
我的目标是将轮廓转换为贝塞尔路径。经过进一步调查,我发现需要使用另一种算法,即Moore-Neighbor追踪算法。 - undefined
1个回答

3
从评论中,你找到了算法(Moore邻域跟踪)。这里有一个对你的问题很有效的实现。我会对一些你可以考虑改进的地方进行评论。
首先,你需要将数据存储在一个缓冲区中,每个像素一个字节。你似乎知道如何做到这一点,所以我不会再多说了。0应该是“透明”的,非0应该是“填充”的。在文献中,它们通常是黑色(1)线条在白色(0)背景上,所以我会使用这个命名。
我找到的最好的介绍(并经常引用)是Abeer George Ghuneim的Contour Tracing网站。真是一个非常有用的网站。我看到一些MNT的实现对一些像素进行了过多的检查。我尽量仔细遵循Abeer描述的算法来避免这种情况。
对于这段代码,我还想进行更多的测试,但它可以处理你的情况。
首先,该算法在一个单元格的网格上操作:
public struct Cell: Equatable {
    public var x: Int
    public var y: Int
}

public struct Grid: Equatable {
    public var width: Int
    public var height: Int
    public var values: [UInt8]

    public var columns: Range<Int> { 0..<width }
    public var rows: Range<Int> { 0..<height }

    // The pixels immediately outside the grid are white. 
    // Accessing beyond that is a runtime error.
    public subscript (p: Cell) -> Bool {
        if p.x == -1 || p.y == -1 || p.x == width || p.y == height { return false }
        else { return values[p.y * width + p.x] != 0 }
    }

    public init?(width: Int, height: Int, values: [UInt8]) {
        guard values.count == height * width else { return nil }
        self.height = height
        self.width = width
        self.values = values
    }
}

还有一个概念叫做“方向”。它有两种形式:从中心到8个邻居之一的方向,以及“回溯”方向,即在搜索过程中一个单元格被“进入”的方向。
enum Direction: Equatable {
    case north, northEast, east, southEast, south, southWest, west, northWest
    
    mutating func rotateClockwise() {
        self = switch self {
        case .north: .northEast
        case .northEast: .east
        case .east: .southEast
        case .southEast: .south
        case .south: .southWest
        case .southWest: .west
        case .west: .northWest
        case .northWest: .north
        }
    }

    //
    // Given a direction from the center, this is the direction that box was entered from when
    // rotating clockwise.
    //
    // +---+---+---+
    // + ↓ + ← + ← +
    // +---+---+---+
    // + ↓ +   + ↑ +
    // +---+---+---+
    // + → + → + ↑ +
    // +---+---+---+
    func backtrackDirection() -> Direction {
        switch self {
        case .north: .west
        case .northEast: .west
        case .east: .north
        case .southEast: .north
        case .south: .east
        case .southWest: .east
        case .west: .south
        case .northWest: .south
        }
    }
}

细胞可以朝着特定的方向前进。
extension Cell {
    func inDirection(_ direction: Direction) -> Cell {
        switch direction {
        case .north:     Cell(x: x,     y: y - 1)
        case .northEast: Cell(x: x + 1, y: y - 1)
        case .east:      Cell(x: x + 1, y: y    )
        case .southEast: Cell(x: x + 1, y: y + 1)
        case .south:     Cell(x: x    , y: y + 1)
        case .southWest: Cell(x: x - 1, y: y + 1)
        case .west:      Cell(x: x - 1, y: y    )
        case .northWest: Cell(x: x - 1, y: y - 1)
        }
    }
}

最后,是摩尔邻居算法:
public struct BorderFinder {
    public init() {}

    // Returns the point and the direction of the previous point
    // Since this scans left-to-right, the previous point is always to the west
    // The grid includes x=-1, so it's ok if this is an edge.
    func startingPoint(for grid: Grid) -> (point: Cell, direction: Direction)? {
        for y in grid.rows {
            for x in grid.columns {
                let point = Cell(x: x, y: y)
                if grid[point] {
                    return (point, .west)
                }
            }
        }
        return nil
    }

    /// Finds the boundary of a blob within `grid`
    ///
    /// - Parameter grid: an Array of bytes representing a 2D grid of UInt8. Each cell is either zero (white) or non-zero (black).
    /// - Returns: An array of points defining the boundary. The boundary includes only black points.
    ///            If multiple "blobs" exist, it is not defined which will be returned.
    ///            If no blob is found, an empty array is returned
    public func findBorder(in grid: Grid) -> [Cell] {
        guard let start = startingPoint(for: grid) else { return [] }
        var (point, direction) = start
        var boundary: [Cell] = [point]

        var rotations = 0
        repeat {
            direction.rotateClockwise()
            let nextPoint = point.inDirection(direction)
            if grid[nextPoint] {
                boundary.append(nextPoint)
                point = nextPoint
                direction = direction.backtrackDirection()
                rotations = 0
            } else {
                rotations += 1
            }
        } while (point, direction) != start && rotations <= 7

        return boundary
    }
}

这将返回一个单元格列表。可以按照以下方式将其转换为CGPath:
let data = ... Bitmap data with background as 0, and foreground as non-0 ...
let grid = Grid(width: image.width, height: image.height, values: Array(data))!

let points = BorderFinder().findBorder(in: grid)

let path = CGMutablePath()
let start = points.first!

path.move(to: CGPoint(x: start.x, y: start.y))
for point in points.dropFirst() {
    let cgPoint = CGPoint(x: point.x, y: point.y)
    path.addLine(to: cgPoint)
}
path.closeSubpath()

生成以下路径:

Contour of original picture

这是我使用的完整示例代码的要点。 (这个示例代码并不是如何为处理图像做好准备的好例子。我只是随便拼凑了一下来研究算法。)
未来工作的一些想法:
- 通过首先将图像缩小到某个较小的尺寸,很可能可以获得更好和更快的结果。半比例肯定效果不错,但考虑一下1/10比例。 - 通过先对图像应用一个小的高斯模糊,可能可以获得更好的结果。这将消除边缘上的小间隙,这些间隙可能会给算法带来麻烦,并减少轮廓的复杂性。 - 管理5000个路径元素,每个元素都是2像素线条,可能不是很好。预先缩放图像可以帮助很多。另一种方法是应用Ramer-Douglas-Peucker算法进一步简化轮廓。

工作得很完美,谢谢你的帮助。你在回复中只是忘了'inDirection'方法。但我已经理解了:func inDirection(_ direction: Direction) -> Cell { switch direction { case .north: return Cell(x: x, y: y - 1).... - undefined
哦,是的!对不起,我忘了。已添加。 - undefined

网页内容由stack overflow 提供, 点击上面的
可以查看英文原文,
原文链接