我尝试了不同的方法来拉伸Matplotlib中文本的宽度,但没有成功。可能他们还没有正确实现拉伸,我甚至在文档中看到了这样的通知,比如对于一个字体拉伸函数,
此功能尚未实现!。
因此,我决定编写自己的辅助函数来完成此任务。它使用PIL模块的绘图函数,您必须安装下面的模块:
python -m pip install pillow numpy matplotlib。
请注意,我的辅助函数
text_draw_mpl(...)接受以您的绘图单位表示的x、y偏移量和宽度、高度,例如,如果您的绘图范围从0到1,则必须在函数中使用值如0.1、0.2、0.3、0.4。
我的另一个辅助函数
text_draw_np(...)是低级别函数,您可能永远不会直接使用它,它使用以像素表示的宽度和高度,并在输出上产生形状为
(height,width,3)(3个RGB颜色)的RGB数组。
在我的函数中,您可以将背景颜色(
bg参数)和前景颜色(
color参数)都作为字符串颜色名称(如
'magenta'或
'blue')和RGB元组(例如
(0, 255, 0)表示绿色)传递。如果未提供前景色,则默认为黑色,背景色为白色。
请注意,我的函数支持remove_gaps参数。如果它是True,则绘制的文本图片的所有边缘都将删除空格;如果它是False,则保留空格。空格是由字形在字体文件内部绘制的方式引入的,例如小写字母m在顶部有更多的空间,大写字母T在顶部的空间较少。字体具有这些空间,以便整个文本具有相同的高度,并且两行文本之间有一定的间隙而不会合并。
另外请注意,我提供了默认的Windows Arial字体路径
c:/windows/fonts/arial.ttf,如果您使用Linux或者想要其他字体,只需从互联网上下载任何免费的Unicode TrueType (.ttf)字体(例如
从这里),并将该字体放在脚本附近,并修改下面我的代码中的路径。此外,PIL模块支持其他格式,如其文档所述
支持:TrueType和OpenType字体(以及FreeType库支持的其他字体格式)。
在线试用!
def text_draw_np(text, width, height, *, font = 'c:/windows/fonts/arial.ttf', bg = (255, 255, 255), color = (0, 0, 0), remove_gaps = False, cache = {}):
import math, numpy as np, PIL.Image, PIL.ImageDraw, PIL.ImageFont, PIL.ImageColor
def get_font(fname, size):
key = ('font', fname, size)
if key not in cache:
cache[key] = PIL.ImageFont.truetype(fname, size = size, encoding = 'unic')
return cache[key]
width, height = math.ceil(width), math.ceil(height)
pil_font = get_font(font, 24)
text_width, text_height = pil_font.getsize(text)
pil_font = get_font(font, math.ceil(1.2 * 24 * max(width / text_width, height / text_height)))
text_width, text_height = pil_font.getsize(text)
canvas = PIL.Image.new('RGB', (text_width, text_height), bg)
draw = PIL.ImageDraw.Draw(canvas)
draw.text((0, 0), text, font = pil_font, fill = color)
if remove_gaps:
a = np.asarray(canvas)
bg_rgb = PIL.ImageColor.getrgb(bg)
b = np.zeros_like(a)
b[:, :, 0] = bg_rgb[0]; b[:, :, 1] = bg_rgb[1]; b[:, :, 2] = bg_rgb[2]
t0 = np.any((a != b).reshape(a.shape[0], -1), axis = -1)
top, bot = np.flatnonzero(t0)[0], np.flatnonzero(t0)[-1]
t0 = np.any((a != b).transpose(1, 0, 2).reshape(a.shape[1], -1), axis = -1)
lef, rig = np.flatnonzero(t0)[0], np.flatnonzero(t0)[-1]
a = a[top : bot, lef : rig]
canvas = PIL.Image.fromarray(a)
canvas = canvas.resize((width, height), PIL.Image.LANCZOS)
return np.asarray(canvas)
def text_draw_mpl(fig, ax, text, offset_x, offset_y, width, height, **nargs):
axbb = ax.get_window_extent().transformed(fig.dpi_scale_trans.inverted())
pxw, pxh = axbb.width * fig.dpi * width / (ax.get_xlim()[1] - ax.get_xlim()[0]), axbb.height * fig.dpi * height / (ax.get_ylim()[1] - ax.get_ylim()[0])
ax.imshow(text_draw_np(text, pxw * 1.2, pxh * 1.2, **nargs), extent = (offset_x, offset_x + width, offset_y, offset_y + height), aspect = 'auto', interpolation = 'lanczos')
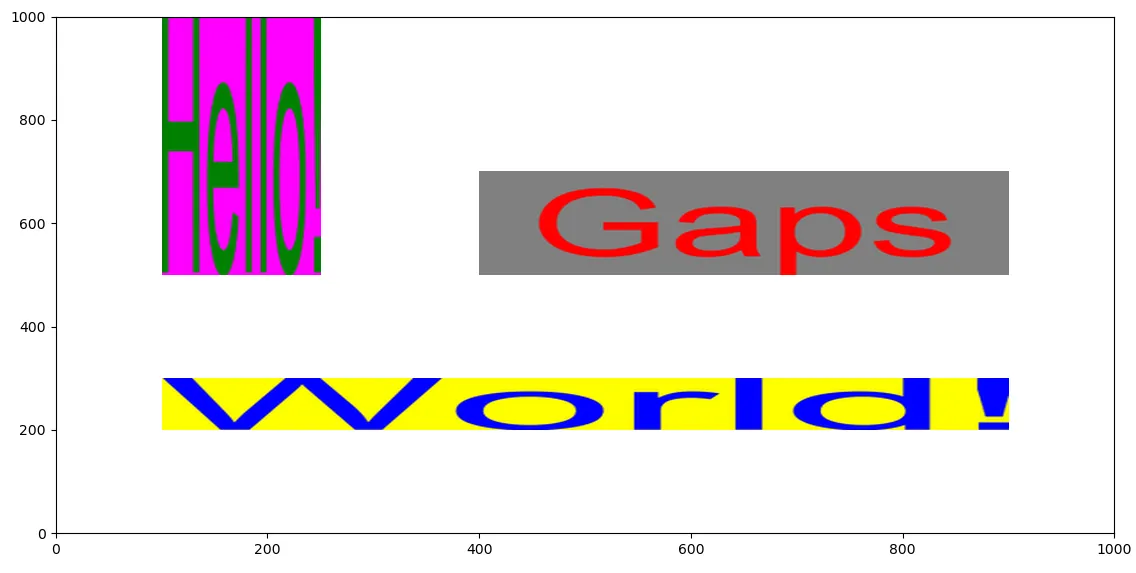
import matplotlib.pyplot as plt
fig, ax = plt.subplots()
ax.set_ylim(0, 1000)
ax.set_xlim(0, 1000)
text_draw_mpl(fig, ax, 'Hello!', 100, 500, 150, 500, color = 'green', bg = 'magenta', remove_gaps = True)
text_draw_mpl(fig, ax, 'World!', 100, 200, 800, 100, color = 'blue', bg = 'yellow', remove_gaps = True)
text_draw_mpl(fig, ax, ' Gaps ', 400, 500, 500, 200, color = 'red', bg = 'gray', remove_gaps = False)
plt.show()
输出:
ax.text(1,1,"A", fontsize = 20).....,但这是不改变宽高比的。你想让宽高比不是默认值吗? - Arty.set_transform不起作用,您也可以将变换对象作为参数传递ax.text(1,1,"A", transform = .....Affine2D....)。 - ArtyAffine2D().scale(0.5,1)也可以对文本起作用,但结果是文本粘在了图像的左下角。 - Iwano Natsuki