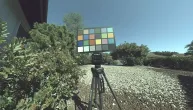
以下代码采用数组操作方式将原始YUV图像转换为RGB格式,但是执行速度极慢。
然而输出结果现在是:
基于NumPy的代码输出
 我相信我可能遗漏了一些简单的东西,如果有帮助,将不胜感激。
原始文件链接
我相信我可能遗漏了一些简单的东西,如果有帮助,将不胜感激。
原始文件链接
from PIL import Image
from struct import *
import array


image_name = "frame2.raw" #Change to user input
width = int(3864) #Assumed to be static
height = int(2192) #Assumed to be static

y = array.array('B')  #B unsigned Char, I is unsigned int
u = array.array('B')  #The raw file is unsigned int 8
v = array.array('B')

f_y = open(image_name, "rb")
f_uv = open(image_name, "rb")
f_uv.seek(width*height, 1) #Change position of File handle seek(offset, from)

image_out = Image.new("RGB", (width, height))
pix = image_out.load()

for i in range(0, height//2): #Run height/2 times
    for j in range(0, width//2): #Run width/2 times for each height count
        u.append(ord(f_uv.read(1)));   #append adds to the end of the array; Ord returns the Unicode
        v.append(ord(f_uv.read(1)));   #read byte by byte

for i in range(0,height): #Run height times
    for j in range(0, width): #Run width times for each height count
        y.append(ord(f_y.read(1))); #build y byte by byte in unicode from f_y
        Y_val = y[(i*width)+j]
        U_val = u[((i//2)*(width//2))+(j//2)]
        V_val = v[((i//2)*(width//2))+(j//2)]
        B = 1.164 * (Y_val-16) + 2.018 * (U_val - 128)
        G = 1.164 * (Y_val-16) - 0.813 * (V_val - 128) - 0.391 * (U_val - 128)
        R = 1.164 * (Y_val-16) + 1.596*(V_val - 128)
        pix[j, i] = int(R), int(G), int(B)

######################################################
# B = 1.164(Y - 16)                   + 2.018(U - 128)
# G = 1.164(Y - 16) - 0.813(V - 128) - 0.391(U - 128)
# R = 1.164(Y - 16) + 1.596(V - 128)
######################################################

image_out.save("out.bmp")
但是生成了一个精确的图像:
基于数组的输出
为了提高效率,我改用了NumPy,并使用相同的系数进行颜色转换。
from PIL import Image
import numpy as np


image_name = "frame2.raw" #Change to user input
width = int(3864) #Assumed to be static
height = int(2192) #Assumed to be static
y_end = width*height

yuv = np.fromfile(image_name, dtype='uint8')

y = yuv[0:y_end].reshape(height,width)
u = yuv[y_end::2].reshape(height//2, width//2)
v = yuv[y_end+1::2].reshape(height//2, width//2)

#y = y.astype(y.dtype) -16
#u = u.astype(u.dtype) -128
#v = v.astype(v.dtype) -128
u = u.repeat(2, axis=0).repeat(2, axis=1)
v = v.repeat(2, axis=0).repeat(2, axis=1)

y = y.reshape((y.shape[0], y.shape[1], 1))
u = u.reshape((u.shape[0], u.shape[1], 1))
v = v.reshape((v.shape[0], v.shape[1], 1))

yuv_array = np.concatenate((y, u, v), axis=2)

yuv_array[:, :, 0] = yuv_array[:, :, 0].clip(16, 235).astype(yuv_array.dtype) - 16
yuv_array[:, :, 1:] = yuv_array[:, :, 1:].clip(16, 240).astype(yuv_array.dtype) - 128

convert = np.array([#[1.164,  0.000,  1.793],[1.164, -0.213, -0.533],[1.164,  2.112,  0.000]
                    [1.164,  0.000,  2.018], [1.164, -0.813, -0.391],[1.164,  1.596,  0.000]
                   ])
rgb = np.matmul(yuv_array, convert.T).clip(0,255).astype('uint8')


rgb_image = Image.fromarray(rgb)

rgb_image.save('numpyout.bmp')
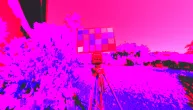
然而输出结果现在是:
基于NumPy的代码输出
我相信我可能遗漏了一些简单的东西,如果有帮助,将不胜感激。
原始文件链接