在你所提供的代码中,你正在将相机纹理(
image.Y)的
Y通道复制到一个
单一通道RGB纹理(
TextureFormat.R8)中,而没有做任何转换。
YUV和
RGB有三个通道,但你只使用了一个通道。
在RGB中,通道通常具有相同的大小,但在YUV中,它们的大小经常是不同的。U和V可以是Y大小的一部分,具体的分数取决于使用的格式。
由于这个纹理来自安卓相机,所以特定的格式应该是
Y′UV420p,这是一种平面格式,请参见维基百科页面,了解频道值如何分组的
有用的视觉表示:
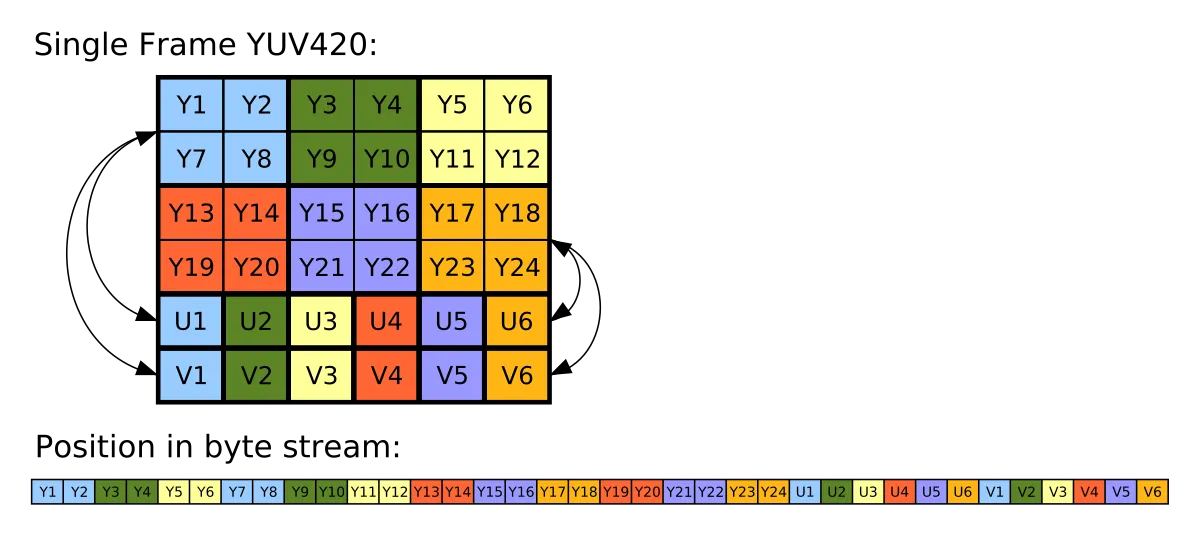
。
CameraImageBytes API结构需要您分别提取通道,然后通过编程将它们组合在一起。请注意,有一种更简单的方法可以获取已转换为RGB的相机纹理,但只能通过着色器访问,而非C#代码。
假设您仍想在C#中完成此操作,要从YUV纹理中收集所有通道,您需要将UV通道与Y通道区分对待,并创建一个独立的缓冲区来存储UV通道。在Unity-Technologies/experimental-ARInterface github库的
issue中有一个如何执行此操作的示例。
bufferSize = imageBytes.Width * imageBytes.Height / 2;
cameraImage.uv = new byte[bufferSize];
unsafe
{
fixed (byte* uvPtr = cameraImage.uv)
{
byte* UV = uvPtr;
byte* U = (byte*) imageBytes.U.ToPointer();
byte* V = (byte*) imageBytes.V.ToPointer();
for (int i = 0; i < bufferSize; i+= 2)
{
*UV++ = *U;
*UV++ = *V;
U += imageBytes.UVPixelStride;
V += imageBytes.UVPixelStride;
}
}
}
这段代码将生成原始的纹理数据,可以加载到格式为
TextureFormat.RG16的Texture2D中:
Texture2D texUVchannels = new Texture2D(imageBytes.Width / 2, imageBytes.Height / 2, TextureFormat.RG16, false, false);
texUVchannels.LoadRawTextureData(rawImageUV);
texUVchannels.Apply();
现在你已经将3个通道存储在2个Texture2D中,你可以通过着色器或C#将它们转换。
用于Android相机YUV图像的特定转换公式可以在YUV维基百科页面中找到:
void YUVImage::yuv2rgb(uint8_t yValue, uint8_t uValue, uint8_t vValue,
        uint8_t *r, uint8_t *g, uint8_t *b) const {
    int rTmp = yValue + (1.370705 * (vValue-128));
    int gTmp = yValue - (0.698001 * (vValue-128)) - (0.337633 * (uValue-128));
    int bTmp = yValue + (1.732446 * (uValue-128));
    *r = clamp(rTmp, 0, 255);
    *g = clamp(gTmp, 0, 255);
    *b = clamp(bTmp, 0, 255);
}
翻译成Unity着色器将会是:
float3 YUVtoRGB(float3 c)
{
    float yVal = c.x;
    float uVal = c.y;
    float vVal = c.z;

    float r = yVal + 1.370705 * (vVal - 0.5);
    float g = yVal - 0.698001 * (vVal - 0.5) - (0.337633 * (uVal - 0.5));
    float b = yVal + 1.732446 * (uVal - 0.5);

    return float3(r, g, b);
}
通过这种方式获得的纹理与来自ARCore的背景视频大小不同,因此如果您想要它们在屏幕上匹配,您需要使用来自Frame.CameraImage的UV和其他数据。
因此,要将UV传递到着色器:
var uvQuad = Frame.CameraImage.ImageDisplayUvs;
mat.SetVector("_UvTopLeftRight",
              new Vector4(uvQuad.TopLeft.x, uvQuad.TopLeft.y, uvQuad.TopRight.x, uvQuad.TopRight.y));
mat.SetVector("_UvBottomLeftRight",
              new Vector4(uvQuad.BottomLeft.x, uvQuad.BottomLeft.y, uvQuad.BottomRight.x, uvQuad.BottomRight.y));

camera.projectionMatrix = Frame.CameraImage.GetCameraProjectionMatrix(camera.nearClipPlane, camera.farClipPlane);
并且在着色器中使用它们,您需要像EdgeDetectionBackground shader中那样对它们进行lerp处理。
在同一个着色器中,您会找到一个示例,说明如何从着色器中访问RGB相机图像,而无需进行任何转换,这可能更容易适用于您的用例。
有一些要求:
- 着色器必须使用glsl
- 只能在OpenGL ES3中完成
- 必须支持
GL_OES_EGL_image_external_essl3扩展