如何使用Core Graphics创建凸起或阴影效果(用于指尖绘画)

5

我在我的绘图中实现“浮雕/阴影效果”遇到了问题。目前,使用自定义的UIView功能良好,下面是我的drawRect方法代码:

所有方法的编辑代码:

- (void)drawRect:(CGRect)rect
{
    CGPoint mid1 = midPoint(previousPoint1, previousPoint2); 
    CGPoint mid2 = midPoint(currentPoint, previousPoint1);

    CGContextRef context = UIGraphicsGetCurrentContext(); 
    [self.layer renderInContext:context];

    CGContextMoveToPoint(context, mid1.x, mid1.y);
    CGContextAddQuadCurveToPoint(context, previousPoint1.x, previousPoint1.y, mid2.x, mid2.y); 
    CGContextSetLineCap(context, kCGLineCapRound);
    CGContextSetLineWidth(context, self.lineWidth);
    CGContextSetStrokeColorWithColor(context, self.lineColor.CGColor);
    CGContextSaveGState(context);

    // for shadow  effects
    CGContextSetShadowWithColor(context, CGSizeMake(0, 2),3, self.lineColor.CGColor);
    CGContextStrokePath(context);
    [super drawRect:rect];
}

CGPoint midPoint(CGPoint p1, CGPoint p2)
{
    return CGPointMake((p1.x + p2.x) * 0.5, (p1.y + p2.y) * 0.5);
}


-(void)touchesBegan:(NSSet *)touches withEvent:(UIEvent *)event
{

    UITouch *touch = [touches anyObject];

    previousPoint1 = [touch previousLocationInView:self];
    previousPoint2 = [touch previousLocationInView:self];
    currentPoint = [touch locationInView:self];

    [self touchesMoved:touches withEvent:event];
}

-(void)touchesMoved:(NSSet *)touches withEvent:(UIEvent *)event
{

    UITouch *touch  = [touches anyObject];

    previousPoint2  = previousPoint1;
    previousPoint1  = [touch previousLocationInView:self];
    currentPoint    = [touch locationInView:self];


    // calculate mid point
    CGPoint mid1    = midPoint(previousPoint1, previousPoint2); 
    CGPoint mid2    = midPoint(currentPoint, previousPoint1);

    CGMutablePathRef path = CGPathCreateMutable();
    CGPathMoveToPoint(path, NULL, mid1.x, mid1.y);
    CGPathAddQuadCurveToPoint(path, NULL, previousPoint1.x, previousPoint1.y, mid2.x, mid2.y);
    CGRect bounds = CGPathGetBoundingBox(path);
    CGPathRelease(path);

    CGRect drawBox = bounds;

    //Pad our values so the bounding box respects our line width
    drawBox.origin.x        -= self.lineWidth * 2;
    drawBox.origin.y        -= self.lineWidth * 2;
    drawBox.size.width      += self.lineWidth * 4;
    drawBox.size.height     += self.lineWidth * 4;

    UIGraphicsBeginImageContext(drawBox.size);
    [self.layer renderInContext:UIGraphicsGetCurrentContext()];
    curImage = UIGraphicsGetImageFromCurrentImageContext();
    [curImage retain];
    UIGraphicsEndImageContext();


   [self setNeedsDisplayInRect:drawBox];

}

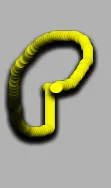
当我实现这个功能时,我发现出现了带有省略号的绘图效果...
请看下方的图片(没有任何阴影或凸起效果)。如果你有添加这些效果的想法,请给我一些建议。如何解决这个问题? enter image description here
3个回答

4
看起来你正在创建数百,甚至数千个单独的路径,每个路径都在drawRect中绘制。虽然你使用了`[self.layer renderInContext]`将其展平,但我认为这不是一个好方法。相反,我认为你想做的是创建一个UIBezierPath来跟踪手指,将路径附加到其中,并将UIBezierPath绘制到屏幕上。如果你创建两个图层(或视图),你可以将顶部的图层(透明)设置为“绘制”。当用户抬起手指时,你就会将整个UIBezierPath渲染到第二个图层(以及之前绘制的数据),并创建一个新的UIBezierPath来绘制下一个手指跟踪。这样,当你跟踪某人的手指时,只更新一个图层(顶部的那个),这将有助于防止设备由于绘制太多路径而变慢。
尽管如此,我必须说,你当前的方法确实产生了一个很酷的“3D”效果。

我很感谢您的建议。我已经使用了UIBezierPath并实现了它,但我们遇到了一些问题,比如擦除功能和选择不同颜色的画笔。所以最终我改变了功能并使用CGContext。现在所有的功能,如擦除、更改画笔颜色都正常工作。问题只是创建浮雕或阴影效果。这些效果不能正常工作。直线与阴影效果一起工作得很好,但曲线效果(平滑)不能正常工作。请告诉我一些使用CGContext的建议。 - Hitarth
快速问题:您希望擦除功能如何工作?大多数“绘图”程序将擦除每个单独的“路径”(定义为一个手指触摸/拖动/结束事件)。这与我的建议/答案相符。但是,如果您想要擦除每个路径点甚至每个像素...那将更加困难实现。 - Aaron Hayman
抱歉,我不确定你的意思。 - Aaron Hayman
没问题,请查看我的完整绘画源代码。http://stackoverflow.com/questions/11132546/how-to-erase-fingure-paint-on-custom-uiview-in-iphone。我们正在使用这个代码来进行平滑绘画。如果您有任何想法,请尝试使用此代码。阴影效果代码未在此代码中实现。 - Hitarth

0

边框上出现了阴影,因为您正在绘制小线段,这会产生这种效果。您需要创建一个路径,然后只需描边一次即可。这段代码可能会对您有所帮助 :)

for (int i=0; i<[currentPath count]; i++) 
{
    CGPoint mid1 = [[self midPoint:[currentPath objectAtIndex:i+1]  :[currentPath objectAtIndex:i]] CGPointValue]; 
    CGPoint mid2 = [[self midPoint:[currentPath objectAtIndex:i+2] :[currentPath objectAtIndex:i+1]] CGPointValue];
    CGContextMoveToPoint(context, mid1.x, mid1.y);
    CGContextAddQuadCurveToPoint(context, [[currentPath objectAtIndex:i+1] CGPointValue].x, [[currentPath objectAtIndex:i+1] CGPointValue].y, mid2.x, mid2.y); 
    CGContextSetShadow(context, CGSizeMake(-2, -2), 3);

    CGContextSetLineCap(context, kCGLineCapRound);
    CGContextSetStrokeColorWithColor(context,[color CGColor]);              
    CGContextSetLineWidth(context, linewidth);              

    i+=2;
}
CGContextStrokePath(context);

尝试这种方式...这可能解决您的问题...首先创建您的路径,等它完全创建后再描边。这是因为在每条小线上描边,因此创建的阴影在其边界上产生一个点,从而产生这种效果。


你的代码中的CurrentPath是什么,为什么要使用循环?我不明白...请查看我的完整源代码(已编辑)。 - Hitarth
我正在创建一个点数组,当前路径就是这个数组。这个数组是由一系列点构成的,从触摸开始到触摸结束 :) - DivineDesert

0

我不确定浮雕效果,但如果您想要对逐步更新的绘图应用阴影效果,则一个好的方法是使用CALayers(教程链接)。基本上,您的逐步绘图将会更新一个透明图像(在此图像中不尝试绘制任何阴影),并且通过其CALayer配置该图像以显示带有阴影的效果。


网页内容由stack overflow 提供, 点击上面的
可以查看英文原文,
原文链接