我需要在我的绘图应用程序中画出带有箭头的线。由于不擅长三角学,因此无法解决这个问题。
用户手指触摸屏幕并朝任何方向绘制直线。因此,箭头应出现在线的末端。
我需要在我的绘图应用程序中画出带有箭头的线。由于不擅长三角学,因此无法解决这个问题。
用户手指触摸屏幕并朝任何方向绘制直线。因此,箭头应出现在线的末端。
这是一个有趣的小问题。首先,有许多绘制箭头的方法,可以使用曲线或直线。 让我们选择一种非常简单的方式,并标记我们需要的测量值:
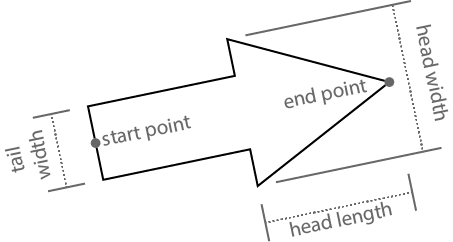
我们想要编写一个函数,该函数接受起点、终点、尾部宽度、头部宽度和头部长度,并返回概述箭头形状的路径。 让我们创建一个名为dqd_arrowhead的类别,将此方法添加到UIBezierPath中:
// UIBezierPath+dqd_arrowhead.h

@interface UIBezierPath (dqd_arrowhead)

+ (UIBezierPath *)dqd_bezierPathWithArrowFromPoint:(CGPoint)startPoint
                                           toPoint:(CGPoint)endPoint
                                         tailWidth:(CGFloat)tailWidth
                                         headWidth:(CGFloat)headWidth
                                        headLength:(CGFloat)headLength;

@end
由于箭头路径上有七个拐角,让我们从给这个常量命名开始实现:
// UIBezierPath+dqd_arrowhead.m

#import "UIBezierPath+dqd_arrowhead.h"

#define kArrowPointCount 7

@implementation UIBezierPath (dqd_arrowhead)

+ (UIBezierPath *)dqd_bezierPathWithArrowFromPoint:(CGPoint)startPoint
                                           toPoint:(CGPoint)endPoint
                                         tailWidth:(CGFloat)tailWidth
                                         headWidth:(CGFloat)headWidth
                                        headLength:(CGFloat)headLength {
好的,容易的部分已经完成了。现在,我们怎么样才能找到路径上那七个点的坐标呢?如果箭头沿着X轴对齐,那么找到这些点就会容易得多:

计算轴向箭头上的点坐标非常简单,但我们需要箭头的整体长度才能做到这一点。我们将使用标准库中的hypotf函数:
CGFloat length = hypotf(endPoint.x - startPoint.x, endPoint.y - startPoint.y);
我们将调用一个辅助方法来实际计算这七个点:
    CGPoint points[kArrowPointCount];
    [self dqd_getAxisAlignedArrowPoints:points
                              forLength:length
                              tailWidth:tailWidth
                              headWidth:headWidth
                             headLength:headLength];
但我们需要转换这些点,因为通常我们并不试图创建一个沿轴对齐的箭头。幸运的是,Core Graphics支持一种被称为仿射变换的变换类型,它允许我们对点进行旋转和平移(滑动)。我们将调用另一个辅助方法来创建将我们的轴对齐箭头转换为所要求箭头的变换:
    CGAffineTransform transform = [self dqd_transformForStartPoint:startPoint
                                                          endPoint:endPoint
                                                            length:length];
现在,我们可以使用轴对齐箭头的点和将其转换为所需箭头的变换,创建一个核心图形路径:
    CGMutablePathRef cgPath = CGPathCreateMutable();
    CGPathAddLines(cgPath, &transform, points, sizeof points / sizeof *points);
    CGPathCloseSubpath(cgPath);
最后,我们可以用CGPath包围UIBezierPath并返回它:
    UIBezierPath *uiPath = [UIBezierPath bezierPathWithCGPath:cgPath];
    CGPathRelease(cgPath);
    return uiPath;
}
这是计算点坐标的帮助方法。它非常简单。如果需要,请参考轴对齐箭头的图示。
+ (void)dqd_getAxisAlignedArrowPoints:(CGPoint[kArrowPointCount])points
                            forLength:(CGFloat)length
                            tailWidth:(CGFloat)tailWidth
                            headWidth:(CGFloat)headWidth
                           headLength:(CGFloat)headLength {
    CGFloat tailLength = length - headLength;
    points[0] = CGPointMake(0, tailWidth / 2);
    points[1] = CGPointMake(tailLength, tailWidth / 2);
    points[2] = CGPointMake(tailLength, headWidth / 2);
    points[3] = CGPointMake(length, 0);
    points[4] = CGPointMake(tailLength, -headWidth / 2);
    points[5] = CGPointMake(tailLength, -tailWidth / 2);
    points[6] = CGPointMake(0, -tailWidth / 2);
}
计算仿射变换比较复杂。这就是三角学发挥作用的地方。你可以使用atan2函数和CGAffineTransformRotate以及CGAffineTransformTranslate函数来创建它,但如果你记得足够多的三角学,你可以直接创建它。请参考“矩阵背后的数学”在Quartz 2D编程指南中了解更多信息:
+ (CGAffineTransform)dqd_transformForStartPoint:(CGPoint)startPoint
                                       endPoint:(CGPoint)endPoint
                                         length:(CGFloat)length {
    CGFloat cosine = (endPoint.x - startPoint.x) / length;
    CGFloat sine = (endPoint.y - startPoint.y) / length;
    return (CGAffineTransform){ cosine, sine, -sine, cosine, startPoint.x, startPoint.y };
}

@end
我已经把所有的代码放在一个Gist中,方便拷贝粘贴。
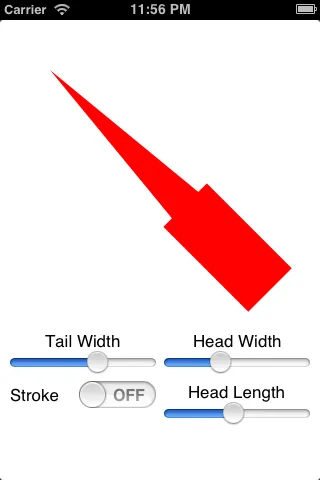
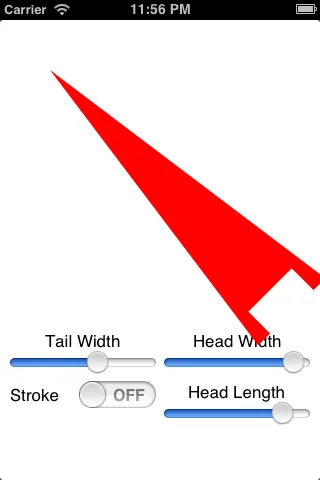
有了这个类别,你可以轻松地绘制箭头:
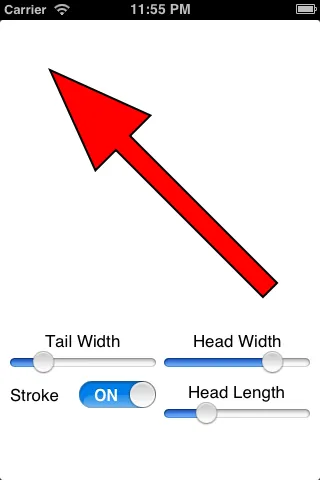
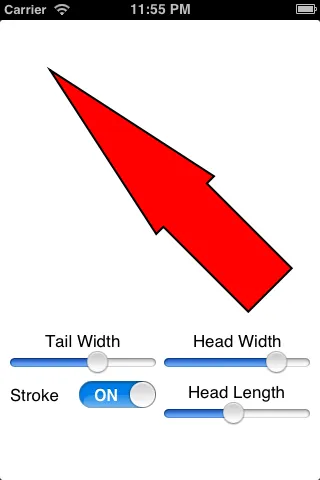
由于你只是生成路径,所以可以选择不填充它,或者不像这个例子一样描边:
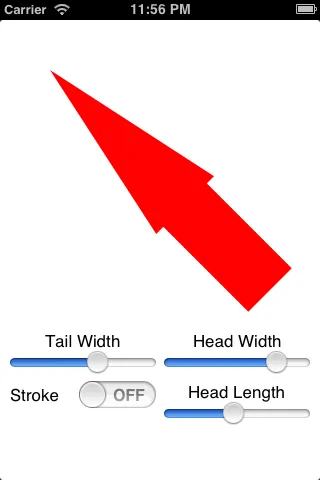
但是你必须小心。如果你使头部宽度小于尾部宽度,或者使头部长度大于总箭头长度,这段代码就不能防止你得到奇怪的结果:
这是我旧的Objective-C代码的Swift版本,原链接。它应该适用于Swift 3.2及更高版本。
extension UIBezierPath {

    static func arrow(from start: CGPoint, to end: CGPoint, tailWidth: CGFloat, headWidth: CGFloat, headLength: CGFloat) -> UIBezierPath {
        let length = hypot(end.x - start.x, end.y - start.y)
        let tailLength = length - headLength

        func p(_ x: CGFloat, _ y: CGFloat) -> CGPoint { return CGPoint(x: x, y: y) }
        let points: [CGPoint] = [
            p(0, tailWidth / 2),
            p(tailLength, tailWidth / 2),
            p(tailLength, headWidth / 2),
            p(length, 0),
            p(tailLength, -headWidth / 2),
            p(tailLength, -tailWidth / 2),
            p(0, -tailWidth / 2)
        ]

        let cosine = (end.x - start.x) / length
        let sine = (end.y - start.y) / length
        let transform = CGAffineTransform(a: cosine, b: sine, c: -sine, d: cosine, tx: start.x, ty: start.y)

        let path = CGMutablePath()
        path.addLines(between: points, transform: transform)
        path.closeSubpath()

        return self.init(cgPath: path)
    }

}
以下是如何调用它的示例:
let arrow = UIBezierPath.arrow(from: CGPoint(x: 50, y: 100), to: CGPoint(x: 200, y: 50),
        tailWidth: 10, headWidth: 25, headLength: 40)
//This is the integration into the view of the previous exemple
//Attach the following class to your view in the xib file

#import <UIKit/UIKit.h>

@interface Arrow : UIView

@end

#import "Arrow.h"
#import "UIBezierPath+dqd_arrowhead.h"

@implementation Arrow
{
    CGPoint startPoint;
    CGPoint endPoint;
    CGFloat tailWidth;
    CGFloat headWidth;
    CGFloat headLength;
    UIBezierPath *path;

}


- (id)initWithCoder:(NSCoder *)aDecoder
{
    if (self = [super initWithCoder:aDecoder])
    {
        [self setMultipleTouchEnabled:NO];
        [self setBackgroundColor:[UIColor whiteColor]];

    }
    return self;
}

- (void)drawRect:(CGRect)rect {

    [[UIColor redColor] setStroke];
    tailWidth = 4;
    headWidth = 8;
    headLength = 8;
    path = [UIBezierPath dqd_bezierPathWithArrowFromPoint:(CGPoint)startPoint
                                                  toPoint:(CGPoint)endPoint
                                                tailWidth:(CGFloat)tailWidth
                                                headWidth:(CGFloat)headWidth
                                               headLength:(CGFloat)headLength];
    [path setLineWidth:2.0];

    [path stroke];

}
- (void) touchesBegan:(NSSet*)touches withEvent:(UIEvent*)event
{
    UITouch* touchPoint = [touches anyObject];
    startPoint = [touchPoint locationInView:self];
    endPoint = [touchPoint locationInView:self];


    [self setNeedsDisplay];
}

-(void)touchesEnded:(NSSet *)touches withEvent:(UIEvent *)event
{
    UITouch* touch = [touches anyObject];
    endPoint=[touch locationInView:self];
    [self setNeedsDisplay];
}

-(void)touchesMoved:(NSSet *)touches withEvent:(UIEvent *)event
{
    UITouch* touch = [touches anyObject];
    endPoint = [touch locationInView:self];
    [self setNeedsDisplay];
}


@end
CAShapeLayer可能比实现drawRect:更有效率。 - rob mayoffextension UIBezierPath {
class func arrow(from start: CGPoint, to end: CGPoint, tailWidth: CGFloat, headWidth: CGFloat, headLength: CGFloat) -> Self {
let length = hypot(end.x - start.x, end.y - start.y)
let tailLength = length - headLength
func p(_ x: CGFloat, _ y: CGFloat) -> CGPoint { return CGPoint(x: x, y: y) }
var points: [CGPoint] = [
p(0, tailWidth / 2),
p(tailLength, tailWidth / 2),
p(tailLength, headWidth / 2),
p(length, 0),
p(tailLength, -headWidth / 2),
p(tailLength, -tailWidth / 2),
p(0, -tailWidth / 2)
]
let cosine = (end.x - start.x) / length
let sine = (end.y - start.y) / length
var transform = CGAffineTransform(a: cosine, b: sine, c: -sine, d: cosine, tx: start.x, ty: start.y)
let path = CGMutablePath()
path.addLines(between: points, transform: transform)
path.closeSubpath()
return self.init(cgPath: path)
}
}