在Core Graphics中绘制子弹箭头

4
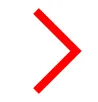
我不想重复造轮子,除非绝对必要,所以我想知道如何使用Core Graphics绘制这样的箭头:

enter image description here

有谁知道我该如何入手呢? 目前我已经做到了这一步,但它只绘制了一个普通的三角形,而不是括号形状:

    CGPoint origin = CGPointMake(100, 20);
    UIBezierPath *path = [UIBezierPath bezierPath];
    [path moveToPoint:origin];
    [path addLineToPoint:CGPointMake(origin.x-10, origin.y-20)];
    [path addLineToPoint:CGPointMake(origin.x-10, origin.y+20)];
    [[UIColor redColor] set];
    [path fill];

4
这就是Paintcodeapp可以派上用场的地方。 - 0x8badf00d
2
天啊,太棒了!我不知道这样的东西存在.. - Snowman
我可能会将其绘制为一个六点形状,而不是描绘一个三点路径。 - macserv
有没有其他像Paintcodeapp一样的酷应用程序,可以帮助绘图或动画制作? - Snowman
4个回答

9
如果按照@NSGod的建议用笔画图,你需要移动到上部或下部的尖端,然后连线到箭头头部,再将线连接到下部或上部的尖端。如果想要像你所画的那样是45度角的话,添加或减去坐标的数量应该是相等的。
另外,你还需要为路径设置线宽,这个线宽需要与尺寸成比例。
CGPoint origin = CGPointMake(100, 20);

UIBezierPath *path = [UIBezierPath bezierPath];
// Upper tip
[path moveToPoint:CGPointMake(origin.x+20, origin.y-20)];
// Arrow head
[path addLineToPoint:CGPointMake(origin.x, origin.y)];
// Lower tip
[path addLineToPoint:CGPointMake(origin.x+20, origin.y+20)];

[[UIColor redColor] set];
// The line thickness needs to be proportional to the distance from the arrow head to the tips.  Making it half seems about right.
[path setLineWidth:10];
[path stroke];

结果是这样的形状。 由上面代码绘制的箭头 如果你想填充而不是描边(如果你想要勾勒出你的箭头可能需要这样做),你需要绘制6个点然后关闭路径。

2
只是想补充一下,在iOS 5及以上版本中,您可以使用CGPathCreateCopyByStrokingPath而不是自己绘制角点来实现可以填充而不是描边的路径。 - Henri Normak

3

问题的一个潜在原因是您使用了fill而不是stroke

[path fill]更改为[path stroke],您将得到以下结果:

CGPoint origin = CGPointMake(100, 20);
UIBezierPath *path = [UIBezierPath bezierPath];
[path moveToPoint:origin];
[path addLineToPoint:CGPointMake(origin.x - 10, origin.y - 20)];
[path addLineToPoint:CGPointMake(origin.x - 10, origin.y + 20)];
[[UIColor redColor] set];
// [path fill];
[path stroke];

输入图像说明

这引发了一个问题,你在起点(origin)上的意图是什么。它实际上会被翻译成箭头指向的位置,而不是传统意义上的起点(即表示正在绘制的对象的左上角)。

如果你想保持起点(origin)的意思,你需要修改代码如下:

CGPoint origin = CGPointMake(100, 20);
UIBezierPath *path = [UIBezierPath bezierPath];
[path moveToPoint:CGPointMake(origin.x - 20, origin.y - 20)];
[path addLineToPoint:origin];
[path addLineToPoint:CGPointMake(origin.x - 20, origin.y + 20)];
path.lineWidth = 4.0;
[[UIColor redColor] set];
[path stroke];

或者,如果你想使用“起源”的传统意义,你可以使用:

CGPoint origin = CGPointMake(100, 20);
UIBezierPath *path = [UIBezierPath bezierPath];
[path moveToPoint:origin];
[path addLineToPoint:CGPointMake(origin.x + 20, origin.y + 20)];
[path addLineToPoint:CGPointMake(origin.x, origin.y + 20 * 2)];
path.lineWidth = 4.0;
[[UIColor redColor] set];
[path stroke];

这将产生以下效果:

在此输入图片描述


我也在尝试做这件事。我需要将它添加到viewDidLoad吗? - haris

1
这是一份与Swift 3.0兼容的类,原始代码来自@Dondragmer在上面的答案中。您可以更改以下内容:
- lineHeight: CGFloat - lineColor: UIColor - direction: Arrow.Direction(枚举类型包括.up、.down、.left和.right)
class Arrow : UIView {
//箭头方向 enum Direction { case up, down, left, right }
var direction : Direction = Direction.right { didSet { review() } }
//线条颜色 var lineColor = UIColor.red { didSet { review() } }
//线条宽度 var lineWidth : CGFloat = 20 { didSet { review() } }
//重新绘制箭头 func review(){ setNeedsDisplay() }
//将方向转换为弧度 static func directionToRadians(_ direction: Arrow.Direction) -> CGFloat{ switch direction { case .up: return Arrow.degreesToRadians(90) case .down: return Arrow.degreesToRadians(-90) case .left: return Arrow.degreesToRadians(0) case .right: return Arrow.degreesToRadians(180) } }
//将角度转换为弧度 static func degreesToRadians(_ degrees: CGFloat) -> CGFloat { return degrees * CGFloat(M_PI) / 180 }
//绘制箭头 override func draw(_ rect: CGRect) { let origin = CGPoint(x: 12, y: self.frame.height / 2) let path = UIBezierPath() path.lineJoinStyle = CGLineJoin.round path.move(to: CGPoint(x: origin.x + self.frame.width * (1/2), y: frame.height - 10)) path.addLine(to: CGPoint(x: origin.x, y: origin.y)) path.addLine(to: CGPoint(x: origin.x + self.frame.width * (1/2), y: 10)) lineColor.set() path.lineWidth = lineWidth path.stroke() self.backgroundColor = UIColor.clear self.transform = CGAffineTransform(rotationAngle: Arrow.directionToRadians(self.direction)) } }

现在你可以使用它了

这也兼容自动布局

let arrow = Arrow(frame: CGRect(x: 0, y: 0, width: 400, height: 400))
arrow.lineWidth = 20
arrow.lineColor = UIColor.blue
arrow.direction = .up

很高兴我往下滑动了一下。非常好。 - Adam Waite

0

我现在没有电脑在身边写代码,但基本上你需要创建一个CGMutablePath,然后添加并执行。

CGContextStrokePath(context);

您可以设置描边宽度和线条端点以实现所需效果


我知道那个..我需要帮助的是几何学。 - Snowman

网页内容由stack overflow 提供, 点击上面的
可以查看英文原文,
原文链接