使用Core Graphics绘制带有减去文本的路径

7
在Core Graphics中创建填充路径和填充文本非常简单。但是,我还没有找到除子路径中的文本之外的其他路径填充示例。我的文本绘制模式、剪切等实验都没有进展。 
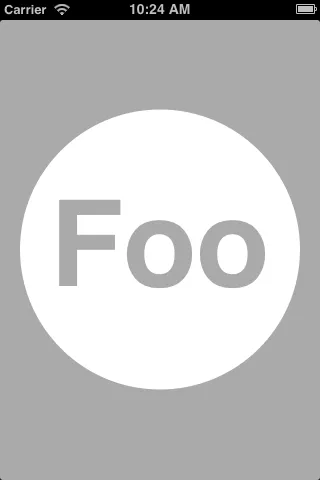
以下是一个示例(在Photoshop中创建)。您如何在Core Graphics中创建前景形状? 请参考下图: Example of text subtracted from path (created in photoshop) 值得一提的是,这种技术似乎在一款主要移动操作系统的即将推出的版本中被广泛使用,但我不想触犯SO的NDA政策 ;)

请注意,目前被接受的 Christian 的答案无法正确地将文本居中于任何大小为 128 点或更小的视图。 - memmons
2个回答

12

这是我运行和测试过的一些代码,可以为您工作。请参阅内联注释以了解详情:

更新: 我已删除 manualYOffset: 参数。现在,它会进行计算,使文本在圆中垂直居中。享受吧!

- (void)drawRect:(CGRect)rect {
    // Make sure the UIView's background is set to clear either in code or in a storyboard/nib

    CGContextRef context = UIGraphicsGetCurrentContext();

    [[UIColor whiteColor] setFill];
    CGContextAddArc(context, CGRectGetMidX(rect), CGRectGetMidY(rect), CGRectGetWidth(rect)/2, 0, 2*M_PI, YES);
    CGContextFillPath(context);

    // Manual offset may need to be adjusted depending on the length of the text
    [self drawSubtractedText:@"Foo" inRect:rect inContext:context];
}

- (void)drawSubtractedText:(NSString *)text inRect:(CGRect)rect inContext:(CGContextRef)context {
    // Save context state to not affect other drawing operations
    CGContextSaveGState(context);

    // Magic blend mode
    CGContextSetBlendMode(context, kCGBlendModeDestinationOut);

    // This seemingly random value adjusts the text
    // vertically so that it is centered in the circle.
    CGFloat Y_OFFSET = -2 * (float)[text length] + 5;

    // Context translation for label
    CGFloat LABEL_SIDE = CGRectGetWidth(rect);
    CGContextTranslateCTM(context, 0, CGRectGetHeight(rect)/2-LABEL_SIDE/2+Y_OFFSET);

    // Label to center and adjust font automatically
    UILabel *label = [[UILabel alloc] initWithFrame:CGRectMake(0, 0, LABEL_SIDE, LABEL_SIDE)];
    label.font = [UIFont boldSystemFontOfSize:120];
    label.adjustsFontSizeToFitWidth = YES;
    label.text = text;
    label.textAlignment = NSTextAlignmentCenter;
    label.backgroundColor = [UIColor clearColor];
    [label.layer drawInContext:context];

    // Restore the state of other drawing operations
    CGContextRestoreGState(context);
}

这是结果(您可以更改背景为任何颜色,仍然可以透过文本看到):

Result


@ChristianDiLorenzo的技巧确实有效,所以我已经把答案授予了他,但是我最终使用了一种不同的技术,涉及将字符串转换为CGPathRef,然后使用even-odd绘图从外部路径进行剪切(它不能处理像Christian的建议那样的部分重叠,但在iOS和OSX之间更容易移植)。感谢Christian,对延迟接受表示歉意。 - Jaysen Marais
注意:这仅适用于较大的点大小。如果您有一个小于或等于128点的正方形视图,则文本不会居中。 - memmons
对于那些想要快速渲染已经绘制的“穿透”效果的人,可以使用 CGContextSetBlendMode(UIGraphicsGetCurrentContext(), kCGBlendModeDestinationOut),然后使用当前图形上下文或 -[UIBezierPath fill] 和其他方法绘制任何文本和属性。 - Nate Symer

3
以下是一个UIView子类,可以实现您想要的效果。它将正确地调整圆形中的一个或多个字母的大小和位置。以下是在不同大小(32、64、128、256)下有1至3个字母的示例:

Screenshot

通过 Interface Builder 中用户定义的运行时属性的可用性,您甚至可以从 IB 中配置视图。只需将 text 属性设置为运行时属性,并将 backgroundColor 设置为您想要的圆形颜色即可。

User Defined Runtime Attributes

这里是代码:
@interface MELetterCircleView : UIView

/**
 * The text to display in the view. This should be limited to 
 * just a few characters.
 */
@property (nonatomic, strong) NSString *text;

@end


@interface MELetterCircleView ()

@property (nonatomic, strong) UIColor *circleColor;

@end

@implementation MELetterCircleView

- (instancetype)initWithFrame:(CGRect)frame text:(NSString *)text
{
    NSParameterAssert(text);
    self = [super initWithFrame:frame];
    if (self)
    {
        self.text = text;
    }

    return self;
}

// Override to set the circle's background color. 
// The view's background will always be clear.
-(void)setBackgroundColor:(UIColor *)backgroundColor
{
    self.circleColor = backgroundColor;
    [super setBackgroundColor:[UIColor clearColor]];
}


- (void)drawRect:(CGRect)rect
{
    CGContextRef context = UIGraphicsGetCurrentContext();

    [self.circleColor setFill];
    CGContextAddArc(context, CGRectGetMidX(rect), CGRectGetMidY(rect),
                             CGRectGetWidth(rect)/2, 0, 2*M_PI, YES);
    CGContextFillPath(context);

    [self drawSubtractedText:self.text inRect:rect inContext:context];

}

- (void)drawSubtractedText:(NSString *)text inRect:(CGRect)rect 
                 inContext:(CGContextRef)context
{
    CGContextSaveGState(context);

    // Magic blend mode
    CGContextSetBlendMode(context, kCGBlendModeDestinationOut);


    CGFloat pointSize = 
           [self optimumFontSizeForFont:[UIFont boldSystemFontOfSize:100.f]
                                 inRect:rect 
                               withText:text];

    UIFont *font = [UIFont boldSystemFontOfSize:pointSize];

    // Move drawing start point for centering label.
    CGContextTranslateCTM(context, 0, 
                           (CGRectGetMidY(rect) - (font.lineHeight/2)));

    CGRect frame = CGRectMake(0, 0, CGRectGetWidth(rect), font.lineHeight)];
    UILabel *label = [[UILabel alloc] initWithFrame:frame];
    label.font = font;
    label.text = text;
    label.textAlignment = NSTextAlignmentCenter;
    label.backgroundColor = [UIColor clearColor];
    [label.layer drawInContext:context];

    // Restore the state of other drawing operations
    CGContextRestoreGState(context);
}

-(CGFloat)optimumFontSizeForFont:(UIFont *)font inRect:(CGRect)rect 
                        withText:(NSString *)text
{
    // For current font point size, calculate points per pixel
    CGFloat pointsPerPixel = font.lineHeight / font.pointSize;

    // Scale up point size for the height of the label. 
    // This represents the optimum size of a single letter.
    CGFloat desiredPointSize = rect.size.height * pointsPerPixel;

    if ([text length] == 1)
    {
            // In the case of a single letter, we need to scale back a bit
            //  to take into account the circle curve.
            // We could calculate the inner square of the circle, 
            // but this is a good approximation.
        desiredPointSize = .80*desiredPointSize;
    }
    else
    {
        // More than a single letter. Let's make room for more.
        desiredPointSize = desiredPointSize / [text length];
    }

    return desiredPointSize;
}
@end

网页内容由stack overflow 提供, 点击上面的
可以查看英文原文,
原文链接