NV12转YUV444加速

3

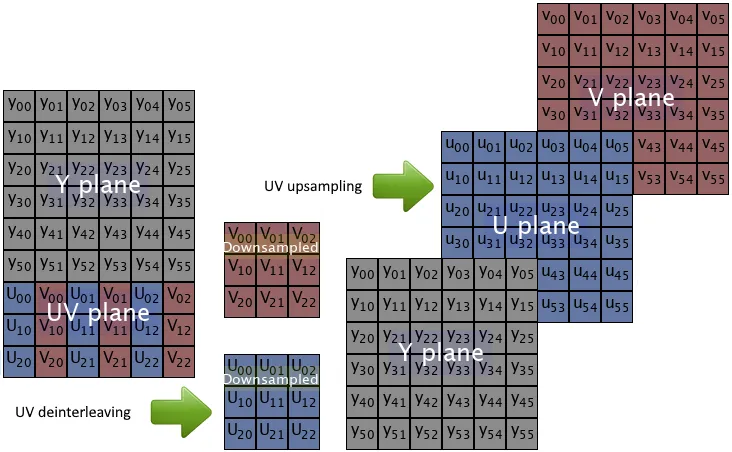
我有一段代码,可以将从nv12格式转换为yuv444格式的图像

for h in range(self.img_shape[0]):
    # centralize yuv 444 data for inference framework
    for w in range(self.img_shape[1]):
        yuv444_res[h][w][0] = (nv12_y_data[h * self.img_shape[1] +w]).astype(np.int8)
        yuv444_res[h][w][1] = (nv12_u_data[int(h / 2) * int(self.img_shape[1] / 2) +int(w / 2)]).astype(np.int8)
        yuv444_res[h][w][2] = (nv12_v_data[int(h / 2) * int(self.img_shape[1] / 2) +int(w / 2)]).astype(np.int8)

由于在Python中,for循环非常慢,比NumPy慢得多。所以我想知道是否可以通过NumPy计算来完成此转换。

2021年6月15日更新:

我从这个页面外部链接获取了这段使用花式索引的代码:

    yuv444 = np.empty([self.height, self.width, 3], dtype=np.uint8)
    yuv444[:, :, 0] = nv12_data[:self.width * self.height].reshape(
        self.height, self.width)
    u = nv12_data[self.width * self.height::2].reshape(
        self.height // 2, self.width // 2)
    yuv444[:, :, 1] = Image.fromarray(u).resize((self.width, self.height))
    v = nv12_data[self.width * self.height + 1::2].reshape(
        self.height // 2, self.width // 2)
    yuv444[:, :, 2] = Image.fromarray(v).resize((self.width, self.height))

    data[0] = yuv444.astype(np.int8)

如果使用PIL替换弃用的imresize,则代码与旧代码完全匹配100%。

更新于2021年06月19日:

经过对Rotem所给答案的仔细审查,我意识到他的方法更快。

    #nv12_data is reshaped to one dimension
    y = nv12_data[:self.width * self.height].reshape(
        self.height, self.width)
    shrunk_u = nv12_data[self.width * self.height::2].reshape(
        self.height // 2, self.width // 2)
    shrunk_v = nv12_data[self.width * self.height + 1::2].reshape(
        self.height // 2, self.width // 2)
    u = cv2.resize(shrunk_u, (self.width, self.height),
                   interpolation=cv2.INTER_NEAREST)
    v = cv2.resize(shrunk_v, (self.width, self.height),
                   interpolation=cv2.INTER_NEAREST)
    yuv444 = np.dstack((y, u, v))

另外,我对处理1000张图片所需的时间进行了比较。结果表明,cv reshape 更快,且保证相同的结果。

cv time: 4.417593002319336, pil time: 5.395732164382935

2021年6月25日更新:

Pillowresize函数在不同版本中具有不同的默认重采样参数值。

5.1.0版本:

def resize(self, size, resample=NEAREST, box=None):

8.1.0:

def resize(self, size, resample=BICUBIC, box=None, reducing_gap=None):

最好明确指定使用的重采样策略。

3个回答

2
您可以按照我下面的帖子中描述的过程,按相反的顺序进行(不包括RGB部分)。
说明:
enter image description here
首先使用命令行工具FFmpeg在NV12格式中创建一个合成样本图像。
这个样本图像用于测试。
使用subprocess模块从Python中执行:
import subprocess as sp
import shlex

sp.run(shlex.split('ffmpeg -y -f lavfi -i testsrc=size=192x108:rate=1:duration=1 -vcodec rawvideo -pix_fmt nv12 nv12.yuv'))
sp.run(shlex.split('ffmpeg -y -f rawvideo -video_size 192x162 -pixel_format gray -i nv12.yuv -pix_fmt gray nv12_gray.png'))

阅读示例图片,并执行您发布的代码(用作参考):

import numpy as np
import cv2

nv12 = cv2.imread('nv12_gray.png', cv2.IMREAD_GRAYSCALE)
cols, rows = nv12.shape[1], nv12.shape[0]*2//3

# Reference implementation - using for-loops (the solution is in the part below):
################################################################################
nv12_y_data = nv12[0:rows, :].flatten()
nv12_u_data = nv12[rows:, 0::2].flatten()
nv12_v_data = nv12[rows:, 1::2].flatten()

yuv444_res = np.zeros((rows, cols, 3), np.uint8)

for h in range(rows):
    # centralize yuv 444 data for inference framework
    for w in range(cols):
        yuv444_res[h][w][0] = (nv12_y_data[h * cols + w]).astype(np.int8)
        yuv444_res[h][w][1] = (nv12_u_data[int(h / 2) * int(cols / 2) + int(w / 2)]).astype(np.int8)
        yuv444_res[h][w][2] = (nv12_v_data[int(h / 2) * int(cols / 2) + int(w / 2)]).astype(np.int8)

################################################################################

我的建议解决方案包含以下步骤:

  • 将U和V分别分成两个“半尺寸”矩阵shrunk_ushrunk_v
  • 使用cv2.resizeshrunk_ushrunk_v调整为完整的图像大小矩阵。
    在我的代码示例中,我使用最近邻插值来获得与您的结果相同的结果。
    建议使用线性插值以获得更好的质量。
  • 使用np.dstack将Y、U和V合并为YUV(3个颜色通道)图像。

这是完整的代码示例:

import numpy as np
import subprocess as sp
import shlex
import cv2

sp.run(shlex.split('ffmpeg -y -f lavfi -i testsrc=size=192x108:rate=1:duration=1 -vcodec rawvideo -pix_fmt nv12 nv12.yuv'))
sp.run(shlex.split('ffmpeg -y -f rawvideo -video_size 192x162 -pixel_format gray -i nv12.yuv -pix_fmt gray nv12_gray.png'))
#sp.run(shlex.split('ffmpeg -y -f rawvideo -video_size 192x108 -pixel_format nv12 -i nv12.yuv -vcodec rawvideo -pix_fmt yuv444p yuv444.yuv'))
#sp.run(shlex.split('ffmpeg -y -f rawvideo -video_size 192x324 -pixel_format gray -i yuv444.yuv -pix_fmt gray yuv444_gray.png'))
#sp.run(shlex.split('ffmpeg -y -f rawvideo -video_size 192x108 -pixel_format yuv444p -i yuv444.yuv -pix_fmt rgb24 rgb.png'))
#sp.run(shlex.split('ffmpeg -y -f rawvideo -video_size 192x108 -pixel_format gbrp -i yuv444.yuv -filter_complex "extractplanes=g+b+r[g][b][r],[r][g][b]mergeplanes=0x001020:gbrp[v]" -map "[v]" -vcodec rawvideo -pix_fmt rgb24 yuvyuv.yuv'))
#sp.run(shlex.split('ffmpeg -y -f rawvideo -video#_size 576x108 -pixel_format gray -i yuvyuv.yuv -pix_fmt gray yuvyuv_gray.png'))

nv12 = cv2.imread('nv12_gray.png', cv2.IMREAD_GRAYSCALE)
cols, rows = nv12.shape[1], nv12.shape[0]*2//3

nv12_y_data = nv12[0:rows, :].flatten()
nv12_u_data = nv12[rows:, 0::2].flatten()
nv12_v_data = nv12[rows:, 1::2].flatten()

yuv444_res = np.zeros((rows, cols, 3), np.uint8)

for h in range(rows):
    # centralize yuv 444 data for inference framework
    for w in range(cols):
        yuv444_res[h][w][0] = (nv12_y_data[h * cols + w]).astype(np.int8)
        yuv444_res[h][w][1] = (nv12_u_data[int(h / 2) * int(cols / 2) + int(w / 2)]).astype(np.int8)
        yuv444_res[h][w][2] = (nv12_v_data[int(h / 2) * int(cols / 2) + int(w / 2)]).astype(np.int8)

y = nv12[0:rows, :]
shrunk_u = nv12[rows:, 0::2].copy()
shrunk_v = nv12[rows:, 1::2].copy()

u = cv2.resize(shrunk_u, (cols, rows), interpolation=cv2.INTER_NEAREST)  # Resize U channel (use NEAREST interpolation - fastest, but lowest quality).
v = cv2.resize(shrunk_v, (cols, rows), interpolation=cv2.INTER_NEAREST)  # Resize V channel

yuv444 = np.dstack((y, u, v))

is_eqaul = np.all(yuv444 == yuv444_res)
print('is_eqaul = ' + str(is_eqaul))  # is_eqaul = True

# Convert to RGB for display
yvu = np.dstack((y, v, u))  # Use COLOR_YCrCb2BGR, because it's uses the corrected conversion coefficients.
rgb = cv2.cvtColor(yvu, cv2.COLOR_YCrCb2BGR)

# Show results:
cv2.imshow('nv12', nv12)
cv2.imshow('yuv444_res', yuv444_res)
cv2.imshow('yuv444', yuv444)
cv2.imshow('rgb', rgb)
cv2.waitKey()
cv2.destroyAllWindows()

输入(NV12显示为灰度):
enter image description here

输出(转换为RGB后):
enter image description here


这是图片转换的100%正确方法,但不幸的是,for循环是我的烦恼, 我一直试图摆脱它。您的方法仍然有for循环。我已经使用从另一个地方找到的代码更新了我的帖子。它使用了高级索引并解决了我的问题。 - Johnzy
我的建议解决方案是不使用for循环。我保留了你的for循环作为参考,以证明我的建议解决方案和你的for循环实现得到相同的结果。 - Rotem
哦,我真的很抱歉。你的解决方案也是完全正确的。非常非常抱歉我没有从你的代码中看到那个。你的解决方案绝对聪明而准确。 - Johnzy

1

这个答案只是另一种做法,并不是最快的方法来完成工作,但肯定很容易理解。我也使用yuvplayer应用程序检查了生成的文件以确认它可以正常工作。

#height mentioned is height of nv12 file and so is the case with width
def convert_nv12toyuv444(filename= 'input.nv12',height=2358,width=2040):

    nv12_data = np.fromfile(filename, dtype=np.uint8)        
    imageSize = (height, width)
    npimg = nv12_data.reshape(imageSize) 
    y_height = npimg.shape[0] * (2/3)
    y_wid = npimg.shape[1]        
    y_height = int(y_height)
    y_wid = int(y_wid)
    y_data= npimg[:y_height,:y_wid]
    uv_data=npimg[y_height:,:y_wid]     
    shrunkU= uv_data[:, 0 : :2] 
    shrunkV= uv_data[:, 1 : :2]       
    u = cv2.resize(shrunkU, (y_wid, y_height),
                   interpolation=cv2.INTER_NEAREST)    
    v = cv2.resize(shrunkV, (y_wid, y_height),
                   interpolation=cv2.INTER_NEAREST)
    yuv444 = np.dstack((y_data, u, v))

1

看起来这是一个高级索引(fancy indexing)的典型案例。

像这样的代码应该可以解决问题,但我没有在实际图像上验证过。我在开头添加了一个重新构建图像的部分,因为整个数组比分成部分更容易处理。可能你可以重构它并避免一开始就分割它。

# reconstruct image array
y = nv12_y_data.reshape(self.image_shape[0], self.image_shape[1])
u = nv12_u_data.reshape(self.image_shape[0], self.image_shape[1])
v = nv12_v_data.reshape(self.image_shape[0], self.image_shape[1])
img = np.stack((y,u,v), axis=-1)

# take every index twice until half the range
idx_h = np.repeat(np.arange(img.shape[0] // 2), 2)[:, None]
idx_w = np.repeat(np.arange(img.shape[1] // 2), 2)[None, :]

# convert
yuv444 = np.empty_like(img, dtype=np.uint8)
yuv444[..., 0] = img[..., 0]
yuv444[..., 1] = img[idx_h, idx_w, 1]
yuv444[..., 2] = img[idx_h, idx_w, 2]


如果这个操作在你的关键路径上,并且你想要提高一点性能,你可以考虑首先处理图像通道,在现代CPU上速度会更快(但不是GPU)。

是的,我需要的是高级索引,但是发布的答案没有给我正确的图像。我更新了问题并发布了另一段代码。你能帮我解决为什么它不完全与以前相同吗? - Johnzy
我使用了更新后的PIL函数,现在匹配度达到了100%。这种高级索引避免了for循环带来的所有时间成本,正是我所需要的。 - Johnzy
@Johnzy 很高兴你已经解决了问题。如果你正在使用 PIL,你可以考虑一下 scikit-imageimageio。很有可能 skimage 已经有一个函数可以为你完成这个转换,而且经过了充分的测试,速度也相当快。如果没有,社区对于建议和新功能非常积极响应。 - FirefoxMetzger

网页内容由stack overflow 提供, 点击上面的
可以查看英文原文,
原文链接