使用NumPy将sRGB转换为NV12格式
本文旨在演示转换过程。
下面的Python实现使用NumPy,有意避免使用OpenCV。
RGB到NV12转换步骤:
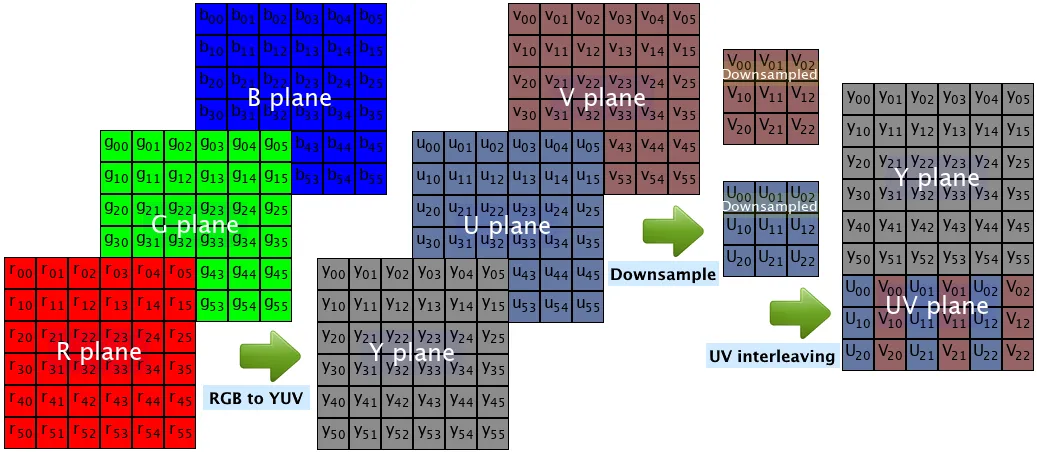
- 色彩空间转换-从sRGB转换为YUV色彩空间:
使用sRGB到YCbCr转换公式。
将每个RGB三元组乘以3x3转换矩阵,并加上一个3个偏移量的向量。
该文章展示了BT.709和BT.601两种转换(唯一的区别是系数矩阵)。
- 色度下采样-在每个轴上缩小U、V通道的因子x2(从YUV444转换为YUV420)。
该实现使用双线性插值将U、V调整了0.5倍大小。
注意:双线性插值不是最优的下采样方法,但通常足够好。
代码不使用cv2.resize,而是使用每2x2像素的平均值(结果等效于双线性插值)。
注意:如果输入分辨率两个维度不同,则实现会失败。
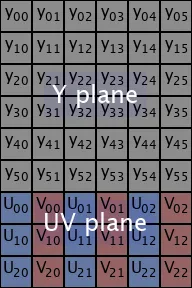
- 色度元素交错-将U、V元素排列为U、V、U、V...
通过数组索引操作实现。
以下是将RGB转换为NV12标准的Python代码示例:
import numpy as np
import matplotlib.pyplot as plt
import matplotlib.image as mpimg
import subprocess as sp
do_use_bt709 = True
rgb = mpimg.imread('rgb_input.png')*255.0
r, g, b = np.squeeze(np.split(rgb, 3, -1))
rows, cols = r.shape
if do_use_bt709:
y = 0.1826*r + 0.6142*g + 0.0620*b + 16
u = -0.1006*r - 0.3386*g + 0.4392*b + 128
v = 0.4392*r - 0.3989*g - 0.0403*b + 128
else:
y = 0.2568*r + 0.5041*g + 0.0979*b + 16
u = -0.1482*r - 0.2910*g + 0.4392*b + 128
v = 0.4392*r - 0.3678*g - 0.0714*b + 128
shrunk_u = (u[0::2, 0::2] + u[1::2, 0::2] + u[0::2, 1::2] + u[1::2, 1::2]) * 0.25
shrunk_v = (v[0::2, 0::2] + v[1::2, 0::2] + v[0::2, 1::2] + v[1::2, 1::2]) * 0.25
uv = np.zeros((rows//2, cols))
uv[:, 0::2] = shrunk_u
uv[:, 1::2] = shrunk_v
nv12 = np.vstack((y, uv))
nv12 = np.round(nv12).astype('uint8')
nv12.tofile('nv12_output.raw')
plt.figure()
plt.axis('off')
plt.imshow(nv12, cmap='gray', interpolation='nearest')
plt.show()
color_matrix = 'bt709' if do_use_bt709 else 'bt601'
sp.run(['ffmpeg', '-y', '-i', 'rgb_input.png', '-vf',
f'scale=flags=fast_bilinear:out_color_matrix={color_matrix}:out_range=tv:dst_format=nv12',
'-pix_fmt', 'nv12', '-f', 'rawvideo', 'nv12_ffmpeg.raw'])
nv12_ff = np.fromfile('nv12_ffmpeg.raw', np.uint8)
nv12_ff = nv12_ff.reshape(nv12.shape)
abs_diff = np.absolute(nv12.astype(np.int16) - nv12_ff.astype(np.int16)).astype(np.uint8)
max_abs_diff = abs_diff.max()
print(f'max_abs_diff = {max_abs_diff}')
plt.figure()
plt.axis('off')
plt.imshow(abs_diff, cmap='gray', interpolation='nearest')
plt.show()
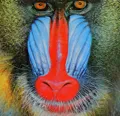
RGB输入图像示例:
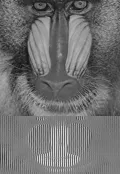
NV12结果(以灰度图像显示):
测试:
为了测试,我们使用命令行工具FFmpeg将相同的输入图像(rgb_input.png)转换为NV12格式,并计算两个转换之间的最大绝对差。
测试假定FFmpeg在执行路径中(在Windows中,我们可以将ffmpeg.exe放置在与Python脚本相同的文件夹中)。
以下shell命令将rgb_input.png转换为BT.709颜色标准的NV12格式:
ffmpeg -y -i rgb_input.png -vf "scale=flags=fast_bilinear:out_color_matrix=bt709:out_range=tv:dst_format=nv12" -pix_fmt nv12 -f rawvideo nv12_ffmpeg.raw
注意:
fast_bilinear插值可在特定输入图像下获得最佳结果-当缩小U和V时应用双线性插值。
以下Python代码将nv12_ffmpeg.raw与nv12_ffmpeg.raw进行比较:
nv12_ff = np.fromfile('nv12_ffmpeg.raw', np.uint8).reshape(nv12.shape)
abs_diff = np.absolute(nv12.astype(np.int16) - nv12_ff.astype(np.int16)).astype(np.uint8)
print(f'max_abs_diff = {abs_diff.max()}')
针对特定的输入图像,最大差异为
2或
3(几乎相同)。
对于其他输入图像,差异较大(可能是由于错误的FFmpeg参数导致)。