颜色渐变算法

17
给定两种RGB颜色和一个矩形,我可以创建一个基本的线性渐变。这篇博客文章非常好地解释了如何创建它。但我想在这个算法中再添加一个变量,即角度。我想创建一个可以指定颜色角度的线性渐变。
例如,我有一个矩形(400x100)。从红色(255, 0, 0)到绿色(0, 255, 0),角度为0度,因此我将得到以下颜色渐变。 enter image description here 给定相同的矩形,从颜色和到颜色。但这次我把角度改成45度。那么我应该得到以下颜色渐变。 enter image description here

看起来每一行都向右移动了一个像素。根据角度,必须从你的示例中添加一些常量到curr_vector的计算中。 - usr1234567
1
输入参数中缺少一个关键部分。如果您曾经使用过Photoshop/GIMP/...,您就会知道渐变是在两个点之间的。仅提供角度会使其含糊不清...应该拉伸多远? - Karoly Horvath
@KarolyHorvath 在Photoshop中,您可以创建两个以上颜色之间的渐变,并且每种颜色都有自己的位置。在上面的示例中,渐变应在矩形(400x100)内拉伸。 - Sophy
@Sophy:我说的是在画布上绘制渐变(实际使用它),而不是定义一个。 - Karoly Horvath
@KarolyHorvath 这取决于画布的大小。如果画布大小为200x300,则渐变应该在200宽度上绘制。 - Sophy
与角度无关?我想说的是:你所做的并不真正灵活。 - Karoly Horvath
5个回答

35

你的问题实际上包含两个部分:

  1. 如何在两种颜色之间生成平滑的颜色渐变。
  2. 如何以角度方式呈现渐变。

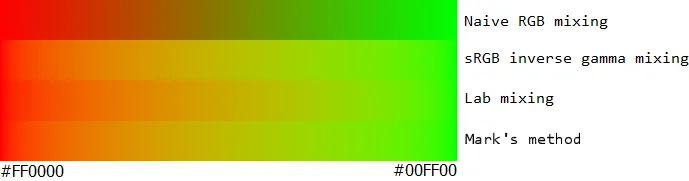
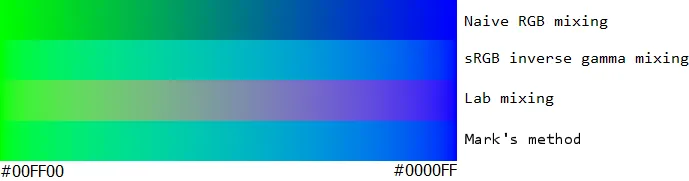
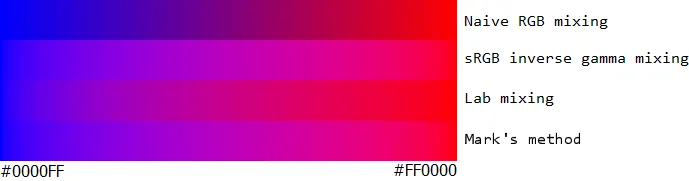
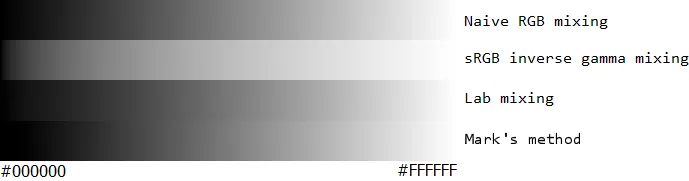
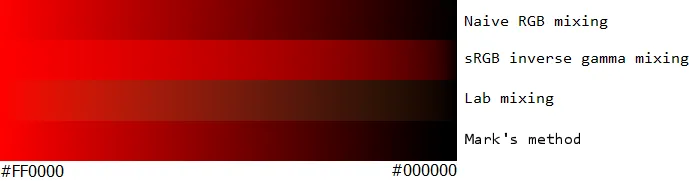
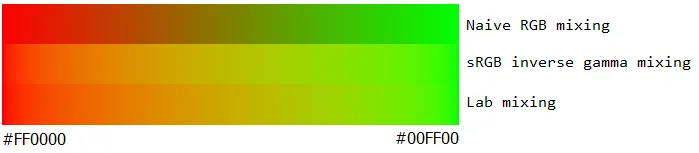
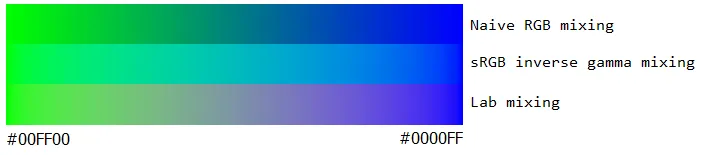
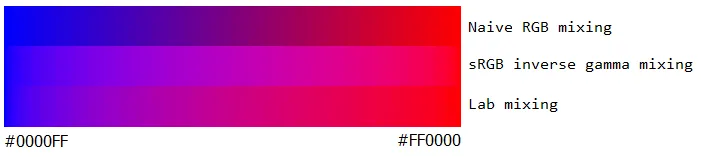
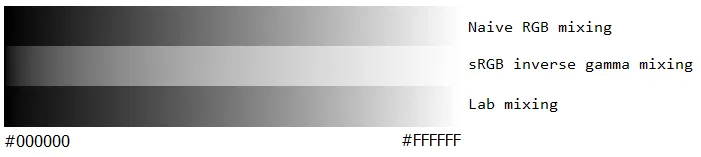
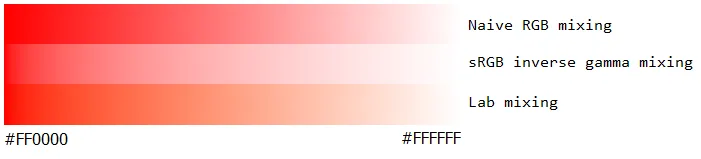
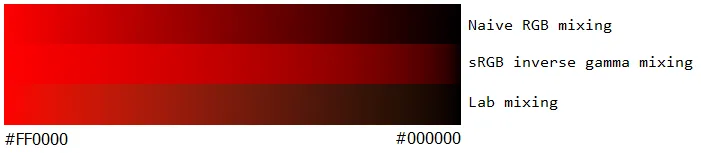
在感知色彩空间中,渐变的强度必须保持恒定,否则在渐变的某些点上看起来会异常地暗或亮。您可以在基于sRGB值的简单插值的渐变中轻松看到这一点,特别是红绿渐变在中间太暗了。使用线性值而不是伽玛校正值进行插值可以使红绿渐变更好,但代价是黑白渐变的质量下降。通过将光强度与颜色分离,您可以获得最佳效果。

通常需要感知色彩空间时,会建议使用Lab色彩空间。我认为有时候它过于严格,因为它试图适应蓝色比黄色等其他颜色具有相同强度的颜色更暗的感知。这是正确的,但我们习惯在自然环境和渐变中看到这种效果,结果你会得到一个过度补偿的渐变。

研究人员实验确定了一个0.43的幂律函数,最适合将灰色光强度与感知亮度相关联。

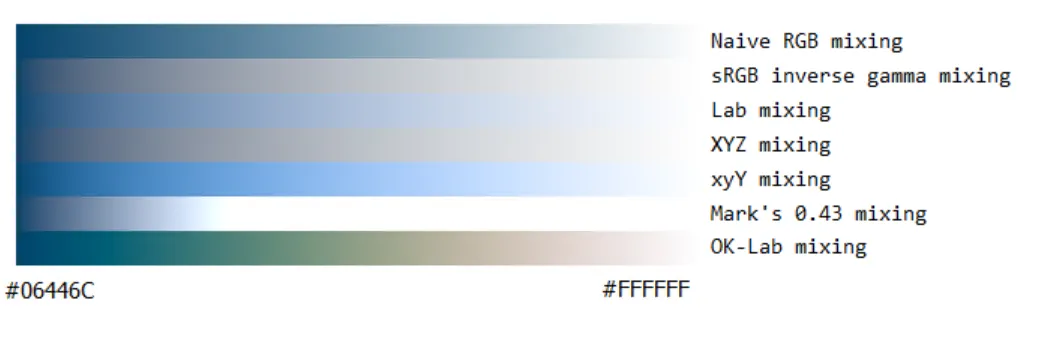
我在这里采用了Ian Boyd准备的精美样本,并在末尾添加了自己提出的方法。我希望您同意这种新方法在所有情况下都更优秀。

Algorithm MarkMix
   Input:
      color1: Color, (rgb)   The first color to mix
      color2: Color, (rgb)   The second color to mix
      mix:    Number, (0..1) The mix ratio. 0 ==> pure Color1, 1 ==> pure Color2
   Output:
      color:  Color, (rgb)   The mixed color
   
   //Convert each color component from 0..255 to 0..1
   r1, g1, b1 ← Normalize(color1)
   r2, g2, b2 ← Normalize(color1)

   //Apply inverse sRGB companding to convert each channel into linear light
   r1, g1, b1 ← sRGBInverseCompanding(r1, g1, b1)       
   r2, g2, b2 ← sRGBInverseCompanding(r2, g2, b2)

   //Linearly interpolate r, g, b values using mix (0..1)
   r ← LinearInterpolation(r1, r2, mix)
   g ← LinearInterpolation(g1, g2, mix)
   b ← LinearInterpolation(b1, b2, mix)

   //Compute a measure of brightness of the two colors using empirically determined gamma
   gamma ← 0.43
   brightness1 ← Pow(r1+g1+b1, gamma)
   brightness2 ← Pow(r2+g2+b2, gamma)

   //Interpolate a new brightness value, and convert back to linear light
   brightness ← LinearInterpolation(brightness1, brightness2, mix)
   intensity ← Pow(brightness, 1/gamma)

   //Apply adjustment factor to each rgb value based
   if ((r+g+b) != 0) then
      factor ← (intensity / (r+g+b))
      r ← r * factor
      g ← g * factor
      b ← b * factor
   end if

   //Apply sRGB companding to convert from linear to perceptual light
   r, g, b ← sRGBCompanding(r, g, b)

   //Convert color components from 0..1 to 0..255
   Result ← MakeColor(r, g, b)
End Algorithm MarkMix

这是Python代码示例:
def all_channels(func):
    def wrapper(channel, *args, **kwargs):
        try:
            return func(channel, *args, **kwargs)
        except TypeError:
            return tuple(func(c, *args, **kwargs) for c in channel)
    return wrapper

@all_channels
def to_sRGB_f(x):
    ''' Returns a sRGB value in the range [0,1]
        for linear input in [0,1].
    '''
    return 12.92*x if x <= 0.0031308 else (1.055 * (x ** (1/2.4))) - 0.055

@all_channels
def to_sRGB(x):
    ''' Returns a sRGB value in the range [0,255]
        for linear input in [0,1]
    '''
    return int(255.9999 * to_sRGB_f(x))

@all_channels
def from_sRGB(x):
    ''' Returns a linear value in the range [0,1]
        for sRGB input in [0,255].
    '''
    x /= 255.0
    if x <= 0.04045:
        y = x / 12.92
    else:
        y = ((x + 0.055) / 1.055) ** 2.4
    return y

def all_channels2(func):
    def wrapper(channel1, channel2, *args, **kwargs):
        try:
            return func(channel1, channel2, *args, **kwargs)
        except TypeError:
            return tuple(func(c1, c2, *args, **kwargs) for c1,c2 in zip(channel1, channel2))
    return wrapper

@all_channels2
def lerp(color1, color2, frac):
    return color1 * (1 - frac) + color2 * frac


def perceptual_steps(color1, color2, steps):
    gamma = .43
    color1_lin = from_sRGB(color1)
    bright1 = sum(color1_lin)**gamma
    color2_lin = from_sRGB(color2)
    bright2 = sum(color2_lin)**gamma
    for step in range(steps):
        intensity = lerp(bright1, bright2, step, steps) ** (1/gamma)
        color = lerp(color1_lin, color2_lin, step, steps)
        if sum(color) != 0:
            color = [c * intensity / sum(color) for c in color]
        color = to_sRGB(color)
        yield color

红-绿渐变

绿-蓝渐变

蓝-红渐变

黑-白渐变

红-白渐变

红-黑渐变

现在是问题的第二部分。您需要一个公式来定义表示渐变中点的线,并且与渐变端点对应的距离。将渐变的端点放在矩形的最远角落似乎是自然的,但根据您在问题中给出的示例,这不是您所做的。我选择了71像素的距离来近似示例。

生成渐变的代码需要略微更改,以使其更加灵活。不再将渐变分成固定数量的步骤,而是基于参数t(范围在0.0到1.0之间)在连续体上计算。

class Line:
    ''' Defines a line of the form ax + by + c = 0 '''
    def __init__(self, a, b, c=None):
        if c is None:
            x1,y1 = a
            x2,y2 = b
            a = y2 - y1
            b = x1 - x2
            c = x2*y1 - y2*x1
        self.a = a
        self.b = b
        self.c = c
        self.distance_multiplier = 1.0 / sqrt(a*a + b*b)

    def distance(self, x, y):
        ''' Using the equation from
            https://en.wikipedia.org/wiki/Distance_from_a_point_to_a_line#Line_defined_by_an_equation
            modified so that the distance can be positive or negative depending
            on which side of the line it's on.
        '''
        return (self.a * x + self.b * y + self.c) * self.distance_multiplier

class PerceptualGradient:
    GAMMA = .43
    def __init__(self, color1, color2):
        self.color1_lin = from_sRGB(color1)
        self.bright1 = sum(self.color1_lin)**self.GAMMA
        self.color2_lin = from_sRGB(color2)
        self.bright2 = sum(self.color2_lin)**self.GAMMA

    def color(self, t):
        ''' Return the gradient color for a parameter in the range [0.0, 1.0].
        '''
        intensity = lerp(self.bright1, self.bright2, t) ** (1/self.GAMMA)
        col = lerp(self.color1_lin, self.color2_lin, t)
        total = sum(col)
        if total != 0:
            col = [c * intensity / total for c in col]
        col = to_sRGB(col)
        return col

def fill_gradient(im, gradient_color, line_distance=None, max_distance=None):
    w, h = im.size
    if line_distance is None:
        def line_distance(x, y):
            return x - ((w-1) / 2.0) # vertical line through the middle
    ul = line_distance(0, 0)
    ur = line_distance(w-1, 0)
    ll = line_distance(0, h-1)
    lr = line_distance(w-1, h-1)
    if max_distance is None:
        low = min([ul, ur, ll, lr])
        high = max([ul, ur, ll, lr])
        max_distance = min(abs(low), abs(high))
    pix = im.load()
    for y in range(h):
        for x in range(w):
            dist = line_distance(x, y)
            ratio = 0.5 + 0.5 * dist / max_distance
            ratio = max(0.0, min(1.0, ratio))
            if ul > ur: ratio = 1.0 - ratio
            pix[x, y] = gradient_color(ratio)

>>> w, h = 406, 101
>>> im = Image.new('RGB', [w, h])
>>> line = Line([w/2 - h/2, 0], [w/2 + h/2, h-1])
>>> grad = PerceptualGradient([252, 13, 27], [41, 253, 46])
>>> fill_gradient(im, grad.color, line.distance, 71)
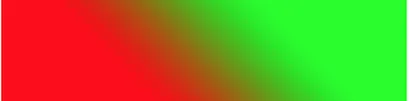
以下是翻译的结果:

下面是上述内容的结果:

45度角的红绿渐变


这个算法很不错,但我认为它可以进一步改进。与其像这样计算“亮度”:Pow(r+g+b, gamma),你应该按照每个通道的相对亮度进行加权,以获得更高的感知准确性。即 Pow((r*0.2126+g*0.7152+b*0.0722)*3, gamma) - Retr0id
@Retr0id,我不认为感知准确度是最好的选择,或者说Lab颜色会给出最佳结果。 - Mark Ransom
1
玩这个真的很有趣,谢谢@MarkRansom。我发现它压缩了黑色一点。这是我发现最好的方法:我将颜色存储在HSLuv中,为了进行lerp操作,我将其转换为RGB,使用线性混合,然后再转回HSL以得到结果。诀窍是多一步:从起始/结束颜色中lerp出L,并将其设置在结果上以恢复亮度。有了这个,这里是从黑到白。颜色的结果也稍微好了一些:MarkNate。干杯! - NateS
我多年来一直在使用你的算法,但今天我发现了一个问题,它似乎无法正常运行:https://i.stack.imgur.com/wjMZ3.png,只好重新考虑色彩渐变方案! - Ian Boyd
@IanBoyd 非常感谢您的示例!我需要仔细研究一下,找出它失败的原因。我认为xyY对于这些端点产生了最令人满意的渐变。 - Mark Ransom
显示剩余4条评论

21

我想指出在颜色混合时人们尝试平均rgb组件时经常发生的常见错误:

R = (R1 + R2) / 2;
G = (G1 + G2) / 2;
B = (B1 + B2) / 2;

您可以观看这个关于该主题的优秀的4分钟物理视频:

计算机颜色是有问题的

简而言之,试图通过对组件进行平均来混合两种颜色是错误的:

R = R1*(1-mix) + R2*mix;
G = G1*(1-mix) + G2*mix;
B = B1*(1-mix) + B2*mix;

问题在于计算机上的RGB颜色是在sRGB颜色空间中的。而这些数字值已经应用了约2.4的伽马值。为了正确地混合颜色,您必须先撤销此伽马调整:
  • 撤销伽马调整
  • 应用上面的r、g、b混合算法
  • 重新应用伽马值
如果不应用反向伽马,则混合的颜色会比预期的暗。这可以在并排颜色渐变实验中看到。
  • 顶部(错误):未考虑sRGB伽马
  • 底部(正确):考虑了sRGB伽马

enter image description here

算法

与其天真的做法:

//This is the wrong algorithm. Don't do this
Color ColorMixWrong(Color c1, Color c2, Single mix)
{
   //Mix [0..1]
   //  0   --> all c1
   //  0.5 --> equal mix of c1 and c2
   //  1   --> all c2
   Color result;

   result.r = c1.r*(1-mix) + c2.r*(mix);
   result.g = c1.g*(1-mix) + c2.g*(mix);
   result.b = c1.b*(1-mix) + c2.b*(mix);

   return result;
}

正确的表格是:

//This is the wrong algorithm. Don't do this
Color ColorMix(Color c1, Color c2, Single mix)
{
   //Mix [0..1]
   //  0   --> all c1
   //  0.5 --> equal mix of c1 and c2
   //  1   --> all c2

   //Invert sRGB gamma compression
   c1 = InverseSrgbCompanding(c1);
   c2 = InverseSrgbCompanding(c2);

   result.r = c1.r*(1-mix) + c2.r*(mix);
   result.g = c1.g*(1-mix) + c2.g*(mix);
   result.b = c1.b*(1-mix) + c2.b*(mix);

   //Reapply sRGB gamma compression
   result = SrgbCompanding(result);

   return result;
}

sRGB的伽马调整并不完全是2.4。实际上,它们在接近黑色的区域有一个线性部分 - 因此它是一个分段函数。

Color InverseSrgbCompanding(Color c)
{
    //Convert color from 0..255 to 0..1
    Single r = c.r / 255;
    Single g = c.g / 255;
    Single b = c.b / 255;

    //Inverse Red, Green, and Blue
    if (r > 0.04045) r = Power((r+0.055)/1.055, 2.4) else r = r / 12.92;
    if (g > 0.04045) g = Power((g+0.055)/1.055, 2.4) else g = g / 12.92;
    if (b > 0.04045) b = Power((b+0.055)/1.055, 2.4) else b = b / 12.92;

    //return new color. Convert 0..1 back into 0..255
    Color result;
    result.r = r*255;
    result.g = g*255;
    result.b = b*255;

    return result;
}

然后重新应用压缩,如下所示:

Color SrgbCompanding(Color c)
{
    //Convert color from 0..255 to 0..1
    Single r = c.r / 255;
    Single g = c.g / 255;
    Single b = c.b / 255;

    //Apply companding to Red, Green, and Blue
    if (r > 0.0031308) r = 1.055*Power(r, 1/2.4)-0.055 else r = r * 12.92;
    if (g > 0.0031308) g = 1.055*Power(g, 1/2.4)-0.055 else g = g * 12.92;
    if (b > 0.0031308) b = 1.055*Power(b, 1/2.4)-0.055 else b = b * 12.92;

    //return new color. Convert 0..1 back into 0..255
    Color result;
    result.r = r*255;
    result.g = g*255;
    result.b = b*255;

    return result;
}

更新:Mark是正确的

我测试了@MarkRansom的评论,发现在线性RGB空间中,当颜色的RGB总值相等时,颜色混合效果很好;但线性混合比例似乎不是线性的,特别是在黑白情况下。

所以我尝试在Lab色彩空间混合,正如我的直觉所示(以及这个摄影stackexchange答案):

enter image description here

Mark的算法有时会崩溃

enter image description here


1
这个答案太简单了。当起点和终点的R+G+B值相同时,它可以很好地工作,就像例子中一样。但是当起点和终点不同时,它并不那么好用,而且当一个端点是黑色,另一个端点是白色时,情况就更糟了——你需要考虑感知间隔和线性间隔之间的差异。我现在也在努力理解这个区别,还没有一个好的答案。 - Mark Ransom
如果有人感兴趣,我拿这段代码创建了一个类,根据目标值从一种颜色混合到另一种颜色-https://gist.github.com/Steztric/b6582d046dab754850417ca4ee2cba38 - Steztric
1
我终于抽出时间发布了自己的答案,请查看。 - Mark Ransom
sRGB 的近似伽马值为2.2,而不是2.4。查看 sRGB 伽马值、x^2.2 和 x^2.4 曲线的比较,请点击此处 - Ruslan
不确定为什么这个答案被编辑,包括两天前在另一个评论中发布的Mark算法的未经验证的“失败”。我也实现了Mark的算法,我同意Mark的结果与该图像显示的结果不同。我怀疑这个失败是实现错误导致的。 - Quantum64
显示剩余7条评论

9

这很简单。除了角度,您实际上还需要另一个参数,即渐变应该有多紧/宽。让我们只使用两个点来工作:

                                         __D
                                     __--
                                 __--
                             __--
                         __--
                        M

M为渐变(在红色和绿色之间)的中间点,D表示方向和距离。因此,渐变变为:

                  M'
                   |                     __D
                    |                __--
                     |           __--
                      |      __--
                       | __--
                        M
                   __--  |
               __--       |
           __--            |
       __--                 |
   D'--                      |
                             M"

这意味着,沿着向量D'D',你会线性地从红色变成绿色,就像你已经知道的那样。沿着向量M'M",你保持颜色不变。


以上是理论内容。现在实现取决于你如何绘制像素。假设什么都不知道,你想逐个像素地决定颜色(这样你可以以任意像素顺序进行绘制)。

这很简单!让我们拿一个点:

                  M'
                   | SA                  __D
                __--|                __--
               P--   |__ A       __--
               |  -- /| \    __--
                |   -- | |_--
                 |    --M
                  |__--  |
               __--CA     |
           __--            |
       __--                 |
   D'--                      |
                             M"

点P与由M和D定义的坐标系之间存在角度A。我们知道沿着向量M'M",颜色不会改变,因此sin(A)没有任何意义。相反,cos(A)相对地显示了像素颜色应该朝向D或D'的多远。点CA显示|PM|cos(A),这意味着P在由M和D定义的线上的映射,或者详细说,PM线段的长度乘以cos(A)。

因此,算法如下:

  • 对于每个像素
    • 计算CA
    • 如果距离D更远,则一定是绿色。如果在D'之前,则一定是红色。
    • 否则根据|D'CA|/|D'D|的比率从红色到绿色找到颜色

基于您的评论,如果想要根据画布大小确定宽度,可以根据输入的角度和画布大小轻松地计算D,尽管我个人建议使用单独的参数。


@AssadEbrahim,我一直得到这个,我的回答是不是毫无价值? ;) - Shahbaz
怀疑吧,正如你发布的链接所示——36个赞对于一个回复来说已经不错了... :) - Assad Ebrahim

3
我解决这个问题的方法首先是能够计算RGB颜色的L(明度):只计算CIE XYZ的Y(亮度),并使用它来获取L。
static private float rgbToL (float r, float g, float b) {
    float Y = 0.21263900587151f * r + 0.71516867876775f * g + 0.072192315360733f * b;
    return Y <= 0.0088564516f ? Y * 9.032962962f : 1.16f * (float)Math.pow(Y, 1 / 3f) - 0.16f;
}

这将为任何RGB值给出L作为0-1。然后对于lerp RGB:首先插值线性RGB,然后通过lerp起始/结束L并按比例缩放RGB来修复亮度:targetL / resultL。我发布了一个Rgb类来实现此功能。

同样的库还有一个Hsl类,它将颜色存储为HSLuv。它通过将其转换为线性RGB、插值、转换回HSLuv,然后通过插值L从起始/结束HSLuv颜色来修正亮度进行插值。


你能发布一下你的方法所得到的图片吗? - undefined
抱歉,我没有一个可以比较我的颜色混合与天真混合的应用程序。不过,我使用它来插值照明颜色,效果非常好。 - undefined

-1

@user2799037的评论是完全正确的:每一行相对于前一行向右移动了一些像素。

实际常数可以计算为您指定的角度的正切值。


网页内容由stack overflow 提供, 点击上面的
可以查看英文原文,
原文链接