如何在底部对话框片段中始终将按钮与屏幕底部对齐

4

我有一个自定义类,继承了BottomSheetDialogFragment,在单击按钮时会显示该类。

我的自定义BottomSheetDialogFragment布局有3个部分:

a.标题文本,

b.单选组(我会动态添加n个项目),

c.底部的确认按钮(我希望始终显示在底部)。

这是我的按钮点击后的显示效果。 enter image description here

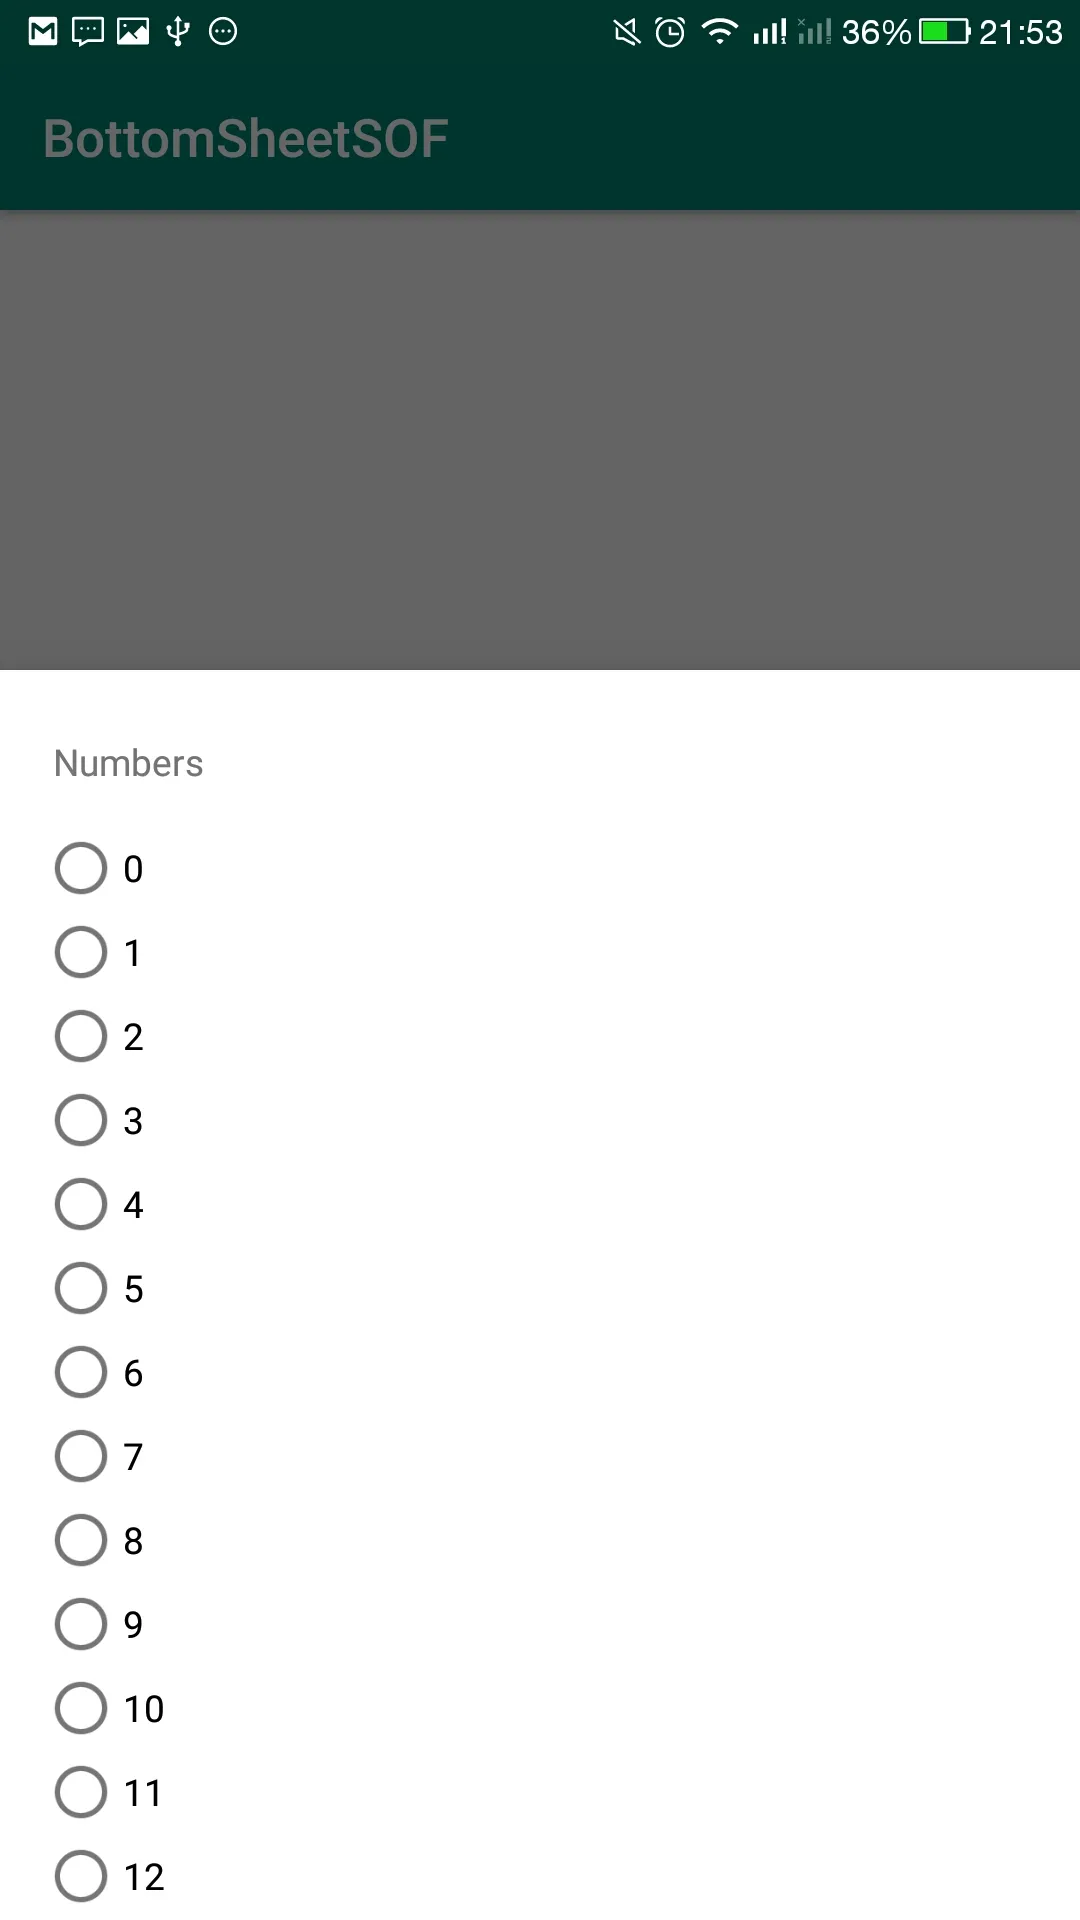
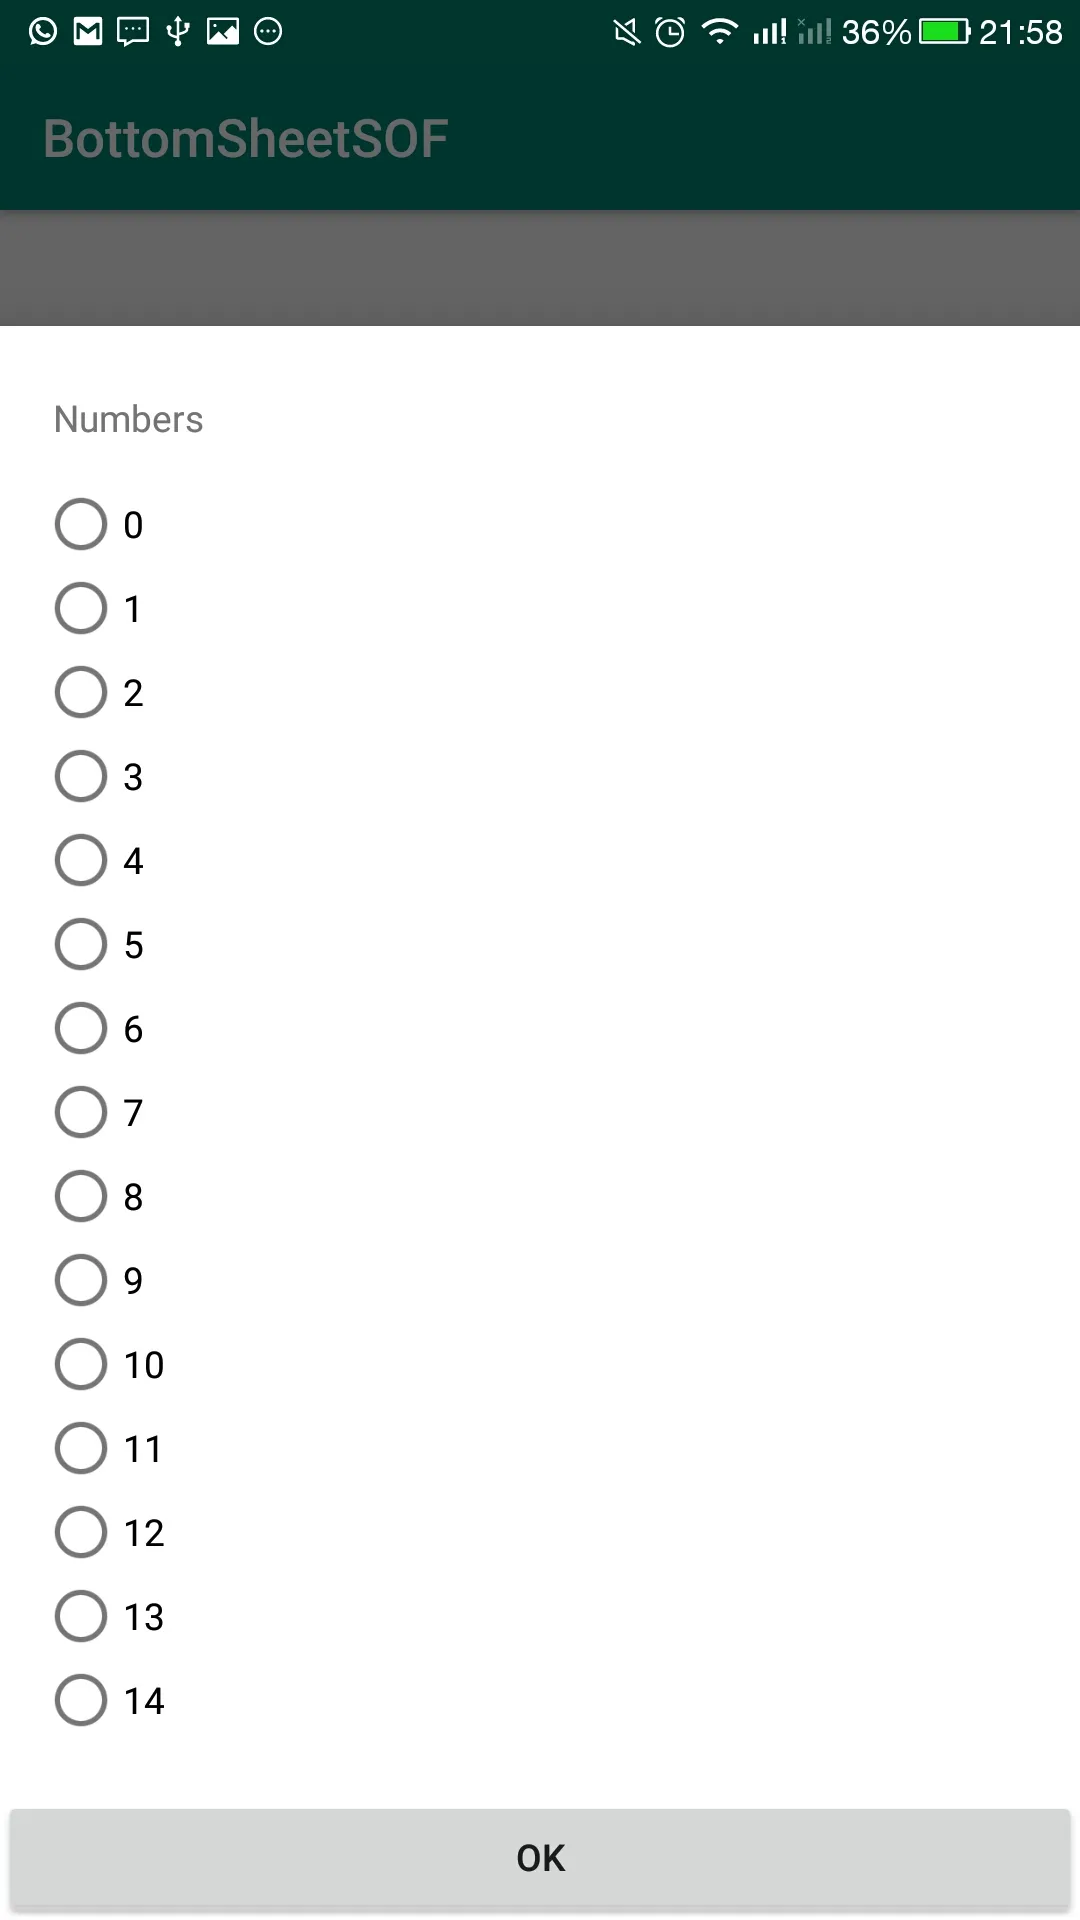
事实上,在第一次启动对话框片段时,我的确认按钮不可见。但是当我展开BottomSheet时,它看起来像下面这样,并且我的确认按钮是可见的 enter image description here

但是我需要始终显示我的底部“确认”按钮,即在启动对话框片段时,无论单选按钮的数量如何,都应该存在我的“确认”按钮,并且在扩展时,“确认”按钮也应该位于底部,我的单选按钮应该是可滚动的。

以下是我的对话框片段布局:

<?xml version="1.0" encoding="utf-8"?>
<LinearLayout
xmlns:android="http://schemas.android.com/apk/res/android"
xmlns:app="http://schemas.android.com/apk/res-auto"
android:layout_width="match_parent"
android:layout_height="wrap_content"
>

<androidx.core.widget.NestedScrollView
android:layout_width="match_parent"
android:layout_height="wrap_content"
android:id="@+id/nested_scroll_view"
app:layout_behavior="@string/appbar_scrolling_view_behavior"
>

<RelativeLayout
    android:layout_width="match_parent"
    android:layout_height="wrap_content"
    >

    <TextView
        android:id="@+id/title"
        android:layout_width="wrap_content"
        android:layout_height="wrap_content"
        android:layout_marginLeft="20dp"
        android:layout_marginTop="25dp"
        android:layout_marginRight="20dp"
        android:layout_alignParentTop="true"
        android:text=""
        />


    <RadioGroup
        android:id="@+id/radiogroup"
        android:layout_width="wrap_content"
        android:layout_height="wrap_content"
        android:layout_marginTop="15dp"
        android:layout_marginLeft="15dp"
        android:layout_below="@id/title"
        android:layout_marginBottom="10dp"
        >
    </RadioGroup>


    <android.widget.Button
        android:layout_width="match_parent"
        android:layout_height="wrap_content"
        android:id="@+id/ok"
        android:layout_below="@id/radiogroup"
        android:text="OK"
        android:layout_marginTop="10dp"
        android:layout_alignParentBottom="true"
        ></android.widget.Button>

</RelativeLayout>
</androidx.core.widget.NestedScrollView>
</LinearLayout>

这是我的自定义BottomSheetDialogFragment

public class BottomSheetExample extends BottomSheetDialogFragment {

@BindView(R.id.title)
TextView title;

@BindView(R.id.ok)
Button ok;

@BindView(R.id.nested_scroll_view)
NestedScrollView nestedScrollView;

@BindView(R.id.radiogroup)
RadioGroup radioGroup;

// TODO: Rename and change types of parameters

public BottomSheetExample() {
    // Required empty public constructor
}

@Override
public View onCreateView(LayoutInflater inflater, ViewGroup container,
                         Bundle savedInstanceState) {

    View view = inflater.inflate(R.layout.bottom_sheet, container, false);

    ButterKnife.bind(this, view);

    ArrayList<String> list = new ArrayList<>();
    for(int i=0;i<15;i++){
        list.add(""+i);
    }

    title.setText("Numbers");

    RadioGroup rg = radioGroup;

    for (int i = 0; i < list.size(); i++) {
        RadioButton rbn = new RadioButton(getContext());
        rbn.setId(View.generateViewId());
        String radioButtonText = list.get(i);
        rbn.setText(radioButtonText);
        rg.addView(rbn);
    }

    return view;
}   
}

这是我如何调用底部工作表:
BottomSheetExample bottomSheet = new BottomSheetExample();
bottomSheet.showNow(this.getSupportFragmentManager(), "tag");

任何意见都将非常有用。提前感谢!

我面临着同样的问题,你找到任何解决方案了吗? - Himanshu
@Himanshu 我已经添加了我的解决方案。 - adi
@Himanshu,如果我的回答对你有帮助,请给我点赞。 - adi
3个回答

3

最后,我找到了解决方法。

1.为了正确使用bottomsheet,我使用了coordinatorlayout,并且顶部LinearLayout具有底部表现行为

2.我已经将radiogroup放入了nestedscrollview中,我希望嵌套滚动视图的最大高度是固定的。但不幸的是,没有max height 方法可用。因此,一个LinearLayout容纳了nestedscrollview,其中我们有radiogroup。 现在,我将LinearLayout的高度设置为300dp,布局部分完成。

3.现在我们要解决bottom sheet的问题。从第1步提到的顶部LinearLayout获取BottomSheetBehaviour实例。所以现在将bottomsheet的peek高度设置为300dp。这样做是为了将底部表格固定到特定高度,以适应问题中提到的用例。

XML:

<?xml version="1.0" encoding="utf-8"?>
<androidx.coordinatorlayout.widget.CoordinatorLayout                 
xmlns:android="http://schemas.android.com/apk/res/android"
xmlns:app="http://schemas.android.com/apk/res-auto"
android:layout_width="match_parent"
android:layout_height="match_parent"
>

<LinearLayout
    android:id="@+id/bottom_sheet_layout"
    android:layout_width="match_parent"
    android:layout_height="wrap_content"
    app:layout_behavior="com.google.android.material.bottomsheet.BottomSheetBehavior">

    <RelativeLayout
        android:layout_width="match_parent"
        android:layout_height="match_parent">

        <TextView
            android:id="@+id/title"
            android:layout_width="wrap_content"
            android:layout_height="wrap_content"
            android:layout_alignParentTop="true"
            android:textStyle="bold"
            android:textSize="20sp"
            />

        <LinearLayout
            android:layout_below="@id/title"
            android:id="@+id/scroll_layout"
            android:layout_width="match_parent"
            android:layout_height="300dp">

            <androidx.core.widget.NestedScrollView
                android:id="@+id/nested_scroll_view"
                android:layout_width="match_parent"
                android:layout_height="wrap_content"
                android:fillViewport="true"
                app:layout_behavior="@string/appbar_scrolling_view_behavior">


                <RadioGroup
                    android:id="@+id/radiogroup"
                    android:layout_width="wrap_content"
                    android:layout_height="wrap_content"
                    android:layout_below="@id/title"
                    android:layout_marginBottom="10dp" />

            </androidx.core.widget.NestedScrollView>

        </LinearLayout>

        <androidx.appcompat.widget.AppCompatButton
            android:layout_width="match_parent"
            android:layout_height="wrap_content"
            android:text="OK"
            android:id="@+id/click_btn"
            android:layout_below="@id/scroll_layout"/>

    </RelativeLayout>

</LinearLayout>

JAVA:

public class BottomSheetExample extends BottomSheetDialogFragment {

@BindView(R.id.title)
TextView title;

@BindView(R.id.click_btn)
Button ok;

@BindView(R.id.nested_scroll_view)
NestedScrollView nestedScrollView;

@BindView(R.id.radiogroup)
RadioGroup radioGroup;

@BindView(R.id.bottom_sheet_layout)
LinearLayout bottomSheetLayout;

private BottomSheetBehavior sheetBehavior;

@Override
public View onCreateView(LayoutInflater inflater, ViewGroup container,
                         Bundle savedInstanceState) {
    View view = inflater.inflate(R.layout.bottom_sheet, container, false);
    ButterKnife.bind(this, view);
    sheetBehavior = BottomSheetBehavior.from(bottomSheetLayout);
    sheetBehavior.setPeekHeight(R.dimen.peek_height);//put this ub dimens.xml (300dp)
    ArrayList<String> list = new ArrayList<>();
    for (int i = 0; i < 15; i++) {
        list.add("" + i);
    }
    title.setText("Numbers");
    RadioGroup rg = radioGroup;
    for (int i = 0; i < list.size(); i++) {
        RadioButton rbn = new RadioButton(getContext());
        rbn.setId(View.generateViewId());
        String radioButtonText = list.get(i);
        rbn.setText(radioButtonText);
        rg.addView(rbn);
    }
    return view;
}

这个解决方案对我来说实际上很有效!欢迎任何改进建议!!


我说了同样的话,但它没有起作用。你能否请查看一下这个主题?:https://stackoverflow.com/questions/66230902/how-can-i-do-stickybutton-on-the-bottomsheet?noredirect=1#comment117125545_66230902 - theoyuncu8

0

0

你可以试试这个,将包裹在相对布局中的按钮放在嵌套滚动视图之外可能会起作用。

<?xml version="1.0" encoding="utf-8"?>
<LinearLayout xmlns:android="http://schemas.android.com/apk/res/android"
    xmlns:app="http://schemas.android.com/apk/res-auto"
    android:layout_width="match_parent"
    android:layout_height="wrap_content"
    android:orientation="vertical">

    <androidx.core.widget.NestedScrollView
        android:id="@+id/nested_scroll_view"
        android:layout_width="match_parent"
        android:layout_height="wrap_content"
        app:layout_behavior="@string/appbar_scrolling_view_behavior">

        <RelativeLayout
            android:layout_width="match_parent"
            android:layout_height="wrap_content">

            <TextView
                android:id="@+id/title"
                android:layout_width="wrap_content"
                android:layout_height="wrap_content"
                android:layout_alignParentTop="true"
                android:layout_marginLeft="20dp"
                android:layout_marginTop="25dp"
                android:layout_marginRight="20dp"
                android:text="" />


            <RadioGroup
                android:id="@+id/radiogroup"
                android:layout_width="wrap_content"
                android:layout_height="wrap_content"
                android:layout_below="@id/title"
                android:layout_marginLeft="15dp"
                android:layout_marginTop="15dp"
                android:layout_marginBottom="10dp"/>

        </RelativeLayout>

    </androidx.core.widget.NestedScrollView>

    <RelativeLayout
        android:layout_width="match_parent"
        android:layout_height="wrap_content">

        <android.widget.Button
            android:id="@+id/ok"
            android:layout_width="match_parent"
            android:layout_height="wrap_content"
            android:layout_alignParentBottom="true"
            android:layout_gravity="bottom"
            android:layout_marginTop="10dp"
            android:gravity="bottom"
            android:text="OK" />

    </RelativeLayout>

</LinearLayout>

谢谢你的输入,但是它没有模拟我的预期行为...它展示了相同的结果。 - adi

网页内容由stack overflow 提供, 点击上面的
可以查看英文原文,
原文链接