我一直在使用Flutter旋转功能,
new Matrix4.identity()
           ..rotateX(degrees * 3.1415927 / 180),
但问题是,我希望它与下面的示意图类似。 我能否通过Flutter在x轴上实现类似于3D的旋转?
即使有从3D到2D的映射或有其他可以获得相同结果的替代方法。 提前致谢。
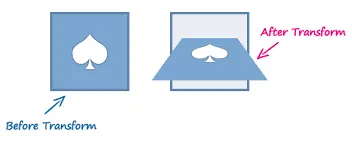
OpenCV中的示例图像:如何从旋转角度为OpenCV计算透视变换?
我一直在使用Flutter旋转功能,
new Matrix4.identity()
..rotateX(degrees * 3.1415927 / 180),
但问题是,我希望它与下面的示意图类似。 我能否通过Flutter在x轴上实现类似于3D的旋转?
即使有从3D到2D的映射或有其他可以获得相同结果的替代方法。 提前致谢。
OpenCV中的示例图像:如何从旋转角度为OpenCV计算透视变换?
static Matrix4 _pmat(num pv) {
    return new Matrix4(
      1.0, 0.0, 0.0, 0.0, //
      0.0, 1.0, 0.0, 0.0, //
      0.0, 0.0, 1.0, pv * 0.001, //
      0.0, 0.0, 0.0, 1.0,
    );
}

Matrix4 perspective = _pmat(1.0);


// then use it

new Center(
      child: new Transform(
        child: new FittedBox(
          fit: BoxFit.fill,
          child: LogoWidget(),
        ),
        alignment: FractionalOffset.center,
        transform: perspective.scaled(1.0, 1.0, 1.0)
          ..rotateX(math.pi - degrees * math.pi / 180)
          ..rotateY(0.0)
          ..rotateZ(0.0)
      ),
    );
这里是结果图片

请阅读关于这个主题的一些理论。
Transform 小部件将矩阵应用于其子元素。Transform 以在 X、Y 和 Z 方向上旋转。

import 'dart:math' as math;
import 'package:flutter/material.dart';

void main() {
  runApp(
    new MaterialApp(
      home: new Home(),
    ),
  );
}

class Home extends StatefulWidget {
  @override
  _HomeState createState() => new _HomeState();
}

class _HomeState extends State<Home> with SingleTickerProviderStateMixin {
  AnimationController animationController;
  Animation<double> rotateX;
  Animation<double> rotateY;
  Animation<double> rotateZ;

  @override
  initState() {
    super.initState();
    animationController = new AnimationController(
      duration: const Duration(seconds: 2),
      vsync: this,
    )..repeat();
    print('bar');
    rotateX = new Tween<double>(
      begin: .0,
      end: 1.0,
    ).animate(new CurvedAnimation(
      parent: animationController,
      curve: new Interval(.0, 1 / 3),
    ));
    rotateY = new Tween<double>(
      begin: .0,
      end: 1.0,
    ).animate(new CurvedAnimation(
      parent: animationController,
      curve: new Interval(1 / 3, 2 / 3),
    ));
    rotateZ = new Tween<double>(
      begin: .0,
      end: .5,
    ).animate(new CurvedAnimation(
      parent: animationController,
      curve: new Interval(2 / 3, 1.0),
    ));
  }

  @override
  Widget build(BuildContext context) {
    return new Scaffold(
      body: new Center(
        child: new AnimatedBuilder(
          animation: animationController,
          builder: (context, child) {
            final card = new SizedBox(
              width: 42.0,
              height: 42.0,
              child: new Card(
                color:
                    animationController.value >= 1 / 6 && animationController.value <= 3 / 6 ? Colors.blue : Colors.red,
              ),
            );

            return new Transform(
              transform: new Matrix4.rotationX(rotateX.value * math.pi)
                ..multiply(new Matrix4.rotationY(rotateY.value * math.pi))
                ..multiply(new Matrix4.rotationZ(rotateZ.value * math.pi)),
              alignment: Alignment.center,
              child: card,
            );
          },
        ),
      ),
    );
  }
}
class MyTransform extends StatefulWidget {
  const MyTransform({Key? key}) : super(key: key);

  @override
  _MyTransformState createState() => _MyTransformState();
}

class _MyTransformState extends State<MyTransform> {
  double x = 0;

  @override
  Widget build(BuildContext context) {
    return Scaffold(
      body: Center(
        child: Transform(
          transform: Matrix4.identity()
                ..setEntry(3, 2, 0.003) // col = 2, row = 3 & 0.003 = depth perception in the Z direction
                ..rotateX(x), // (Both are equal because both are 4D identity matrix)
          // transform: Matrix4(
          //   1, 0, 0, 0,
          //   0, 1, 0, 0,
          //   0, 0, 1, 0.003,
          //   0, 0, 0, 1,
          // )..rotateX(x),
          alignment: FractionalOffset.center,
          child: GestureDetector(
            onPanUpdate: (details) {
              setState(() {
                x = x + details.delta.dy / 100;
              });
            },
            child: Container(
              color: Colors.red,
              height: 200.0,
              width: 200.0,
            ),
          ),
        ),
      ),
    );
  }
}
import 'dart:math';- AbdulMomen عبدالمؤمن