

import SwiftUI

struct SomeView: View {
    var body: some View {
        StrokeText(text: "Sample Text", width: 0.5, color: .red)
            .foregroundColor(.black)
            .font(.system(size: 12, weight: .bold))

    }
}

struct StrokeText: View {
    let text: String
    let width: CGFloat
    let color: Color

    var body: some View {
        ZStack{
            ZStack{
                Text(text).offset(x:  width, y:  width)
                Text(text).offset(x: -width, y: -width)
                Text(text).offset(x: -width, y:  width)
                Text(text).offset(x:  width, y: -width)
            }
            .foregroundColor(color)
            Text(text)
        }
    }
}
我建议使用加粗字重。它在适度大小的字体和笔画宽度下效果更好。对于较大的字号,您可能需要在更多角度上添加文本偏移来覆盖该区域。
2
我发现了另一个创建描边的技巧,但只有在所需描边宽度不超过1时才有效。
Text("Hello World")
   .shadow(color: .black, radius: 1)
我使用了shadow,但是请确保半径只有1,以获得相同的效果。
4
.shadow(),使效果更加强烈。尝试使用半径为0.4的十个阴影。 - Bryce我认为目前没有现成的方法来做到那一点。
到目前为止(beta 5),我们只能对形状应用笔画。
例如:
struct SomeView: View {
    var body: some View {
        Circle().stroke(Color.red)
    }
}
但是这种方法对于Text不可用。
UIViewRepresentable
另一种方法是通过UIViewRepresentable,使用经典的UIKit \ NSAttributedString来与SwiftUI配合使用。
操作如下:
import SwiftUI
import UIKit

struct SomeView: View {
    var body: some View {
        StrokeTextLabel()
    }
}

struct StrokeTextLabel: UIViewRepresentable {
    func makeUIView(context: Context) -> UILabel {
        let attributedStringParagraphStyle = NSMutableParagraphStyle()
        attributedStringParagraphStyle.alignment = NSTextAlignment.center
        let attributedString = NSAttributedString(
            string: "Classic",
            attributes:[
                NSAttributedString.Key.paragraphStyle: attributedStringParagraphStyle,
                NSAttributedString.Key.strokeWidth: 3.0,
                NSAttributedString.Key.foregroundColor: UIColor.black,
                NSAttributedString.Key.strokeColor: UIColor.black,
                NSAttributedString.Key.font: UIFont(name:"Helvetica", size:30.0)!
            ]
        )

        let strokeLabel = UILabel(frame: CGRect.zero)
        strokeLabel.attributedText = attributedString
        strokeLabel.backgroundColor = UIColor.clear
        strokeLabel.sizeToFit()
        strokeLabel.center = CGPoint.init(x: 0.0, y: 0.0)
        return strokeLabel
    }

    func updateUIView(_ uiView: UILabel, context: Context) {}
}

#if DEBUG
struct SomeView_Previews: PreviewProvider {
    static var previews: some View {
        SomeView()
    }
}
#endif
结果
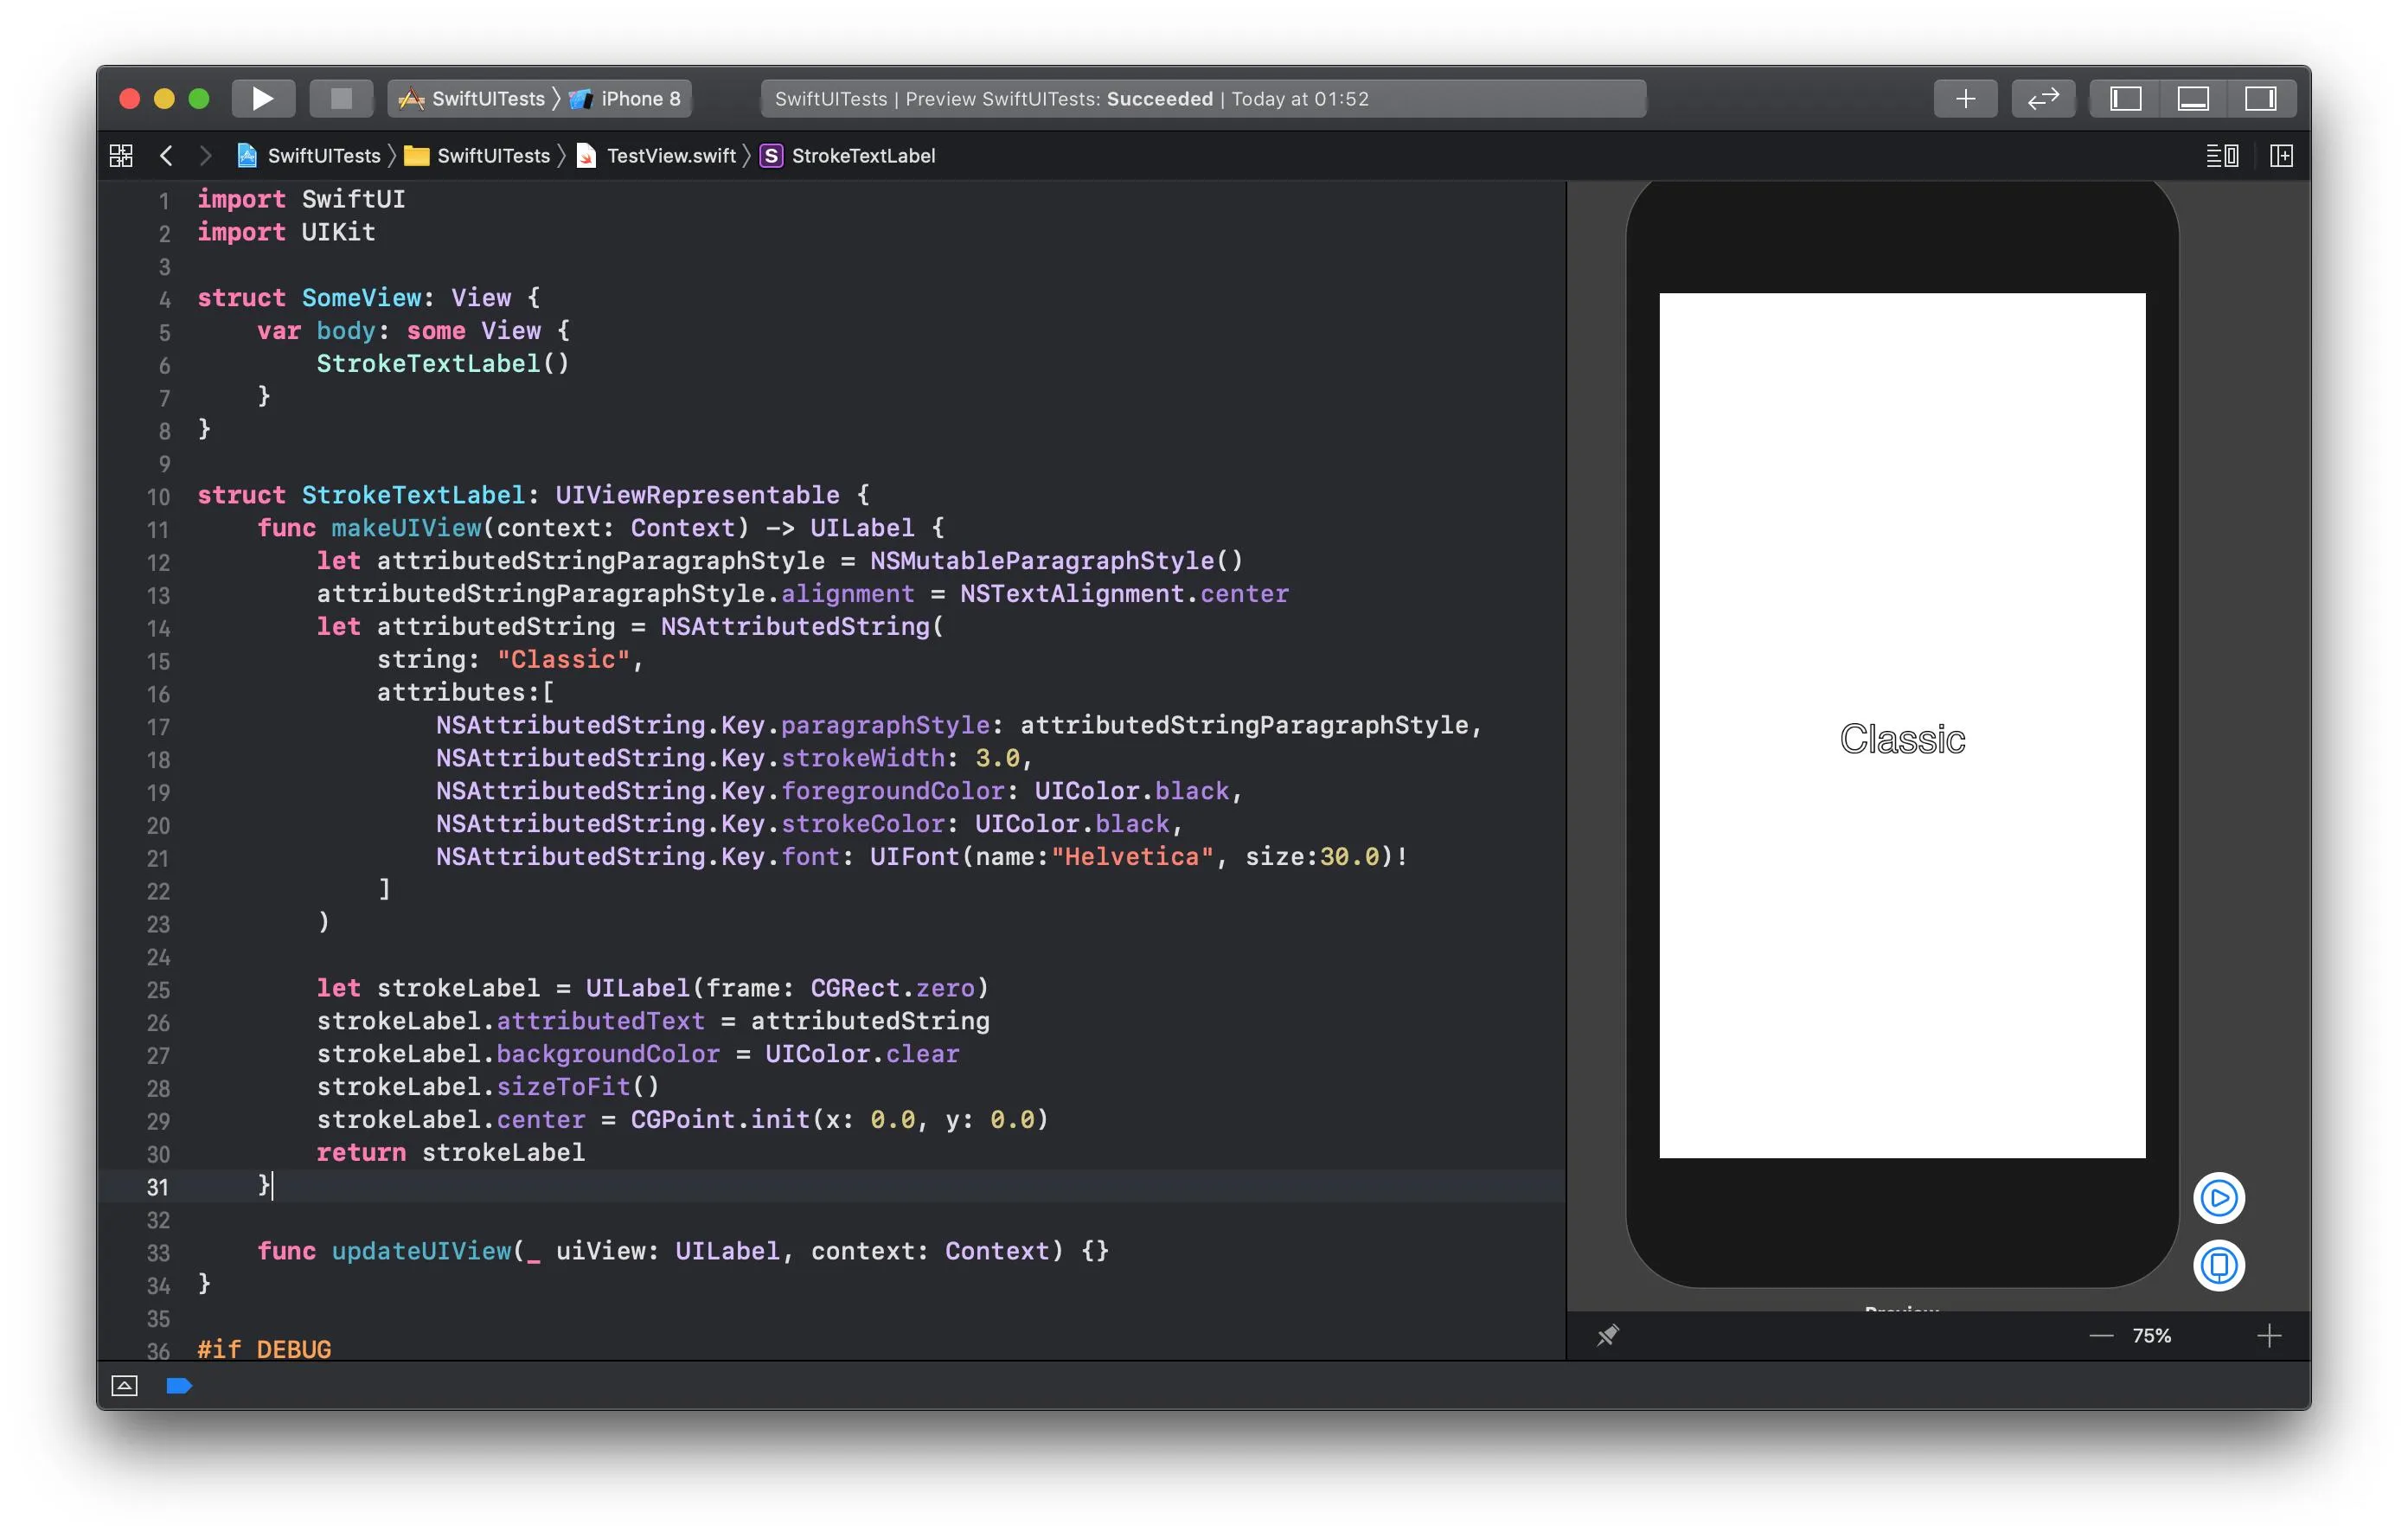
当然,您需要调整NSAttributedString的属性(大小、字体、颜色等)以生成所需的输出。为此,我建议使用Visual Attributed String macOS 应用程序。
2
extension View {
    func stroke(color: Color, width: CGFloat = 1) -> some View {
        modifier(StrokeModifer(strokeSize: width, strokeColor: color))
    }
}

struct StrokeModifer: ViewModifier {
    private let id = UUID()
    var strokeSize: CGFloat = 1
    var strokeColor: Color = .blue

    func body(content: Content) -> some View {
        if strokeSize > 0 {
            appliedStrokeBackground(content: content)
        } else {
            content
        }
    }

    private func appliedStrokeBackground(content: Content) -> some View {
        content
            .padding(strokeSize*2)
            .background(
                Rectangle()
                    .foregroundColor(strokeColor)
                    .mask(alignment: .center) {
                        mask(content: content)
                    }
            )
    }

    func mask(content: Content) -> some View {
        Canvas { context, size in
            context.addFilter(.alphaThreshold(min: 0.01))
            context.drawLayer { ctx in
                if let resolvedView = context.resolveSymbol(id: id) {
                    ctx.draw(resolvedView, at: .init(x: size.width/2, y: size.height/2))
                }
            }
        } symbols: {
            content
                .tag(id)
                .blur(radius: strokeSize)
        }
    }
}
4
if let resolvedView =语句的开头添加了一个strokeSize > 0检查,这样就可以去除所有描边了。 - CMash

7
.fxEdge(strength: .constant(1), distance: .constant(100))(故意极端)并得到了5个文本标签 :/
很抱歉,由于Metal libs设置要求,我不会使用您的解决方案。 - Rémi B.它的工作原理是通过堆叠.shadow并保持半径较低来创建对象周围的实线。如果您需要更厚的边框,则需要向扩展添加更多的.shadow修饰符,但对于我所有的文本需求,这个方法都处理得很好。此外,它也适用于图片。
它并不完美,但我喜欢简单的解决方案,这些解决方案可以留在SwifUI领域中,并且可以轻松实现。
最后,outline Bool参数应用了反向掩码(SwiftUI缺少的东西),我也提供了该扩展。
extension View {
@ViewBuilder
func viewBorder(color: Color = .black, radius: CGFloat = 0.4, outline: Bool = false) -> some View {
    if outline {
        self
            .shadow(color: color, radius: radius)
            .shadow(color: color, radius: radius)
            .shadow(color: color, radius: radius)
            .shadow(color: color, radius: radius)
            .shadow(color: color, radius: radius)
            .shadow(color: color, radius: radius)
            .shadow(color: color, radius: radius)
            .shadow(color: color, radius: radius)
            .invertedMask(
                self
            )
    } else {
        self
            .shadow(color: color, radius: radius)
            .shadow(color: color, radius: radius)
            .shadow(color: color, radius: radius)
            .shadow(color: color, radius: radius)
            .shadow(color: color, radius: radius)
            .shadow(color: color, radius: radius)
            .shadow(color: color, radius: radius)
            .shadow(color: color, radius: radius)
    }

}
}
extension View {
func invertedMask<Content : View>(_ content: Content) -> some View {
    self
        .mask(
            ZStack {
                self
                    .brightness(1)
                content
                    .brightness(-1)
            }.compositingGroup()
            .luminanceToAlpha()
        )
}
再次强调,这并不是一种“完美”的解决方案,但它是简单而有效的。
2
. shadow(..., x: [0,0,1,-1], y:[1,-1,0,0])来优化它,获得相同的结果和更好的性能(?)。 - thisIsTheFoxe⚠️ 修改:清理了Xcode缓存后...它不再起作用,我找不到修复它的方法。
其他答案很好,但它们都有缺点(就我尝试过的):
- 要么创建多个图层,需要复杂的计算(堆叠阴影)。
- 要么使用覆盖技术,在四个版本的文本下面使用
+或x形状以获得更好的外观。当我尝试使用较大的描边时,标签变得可见,看起来非常糟糕。
在大多数情况下,无障碍性也没有得到适当处理。
我的原生SwiftUI解决方案
这就是我试图提出一个原生SwiftUI,非常简单但有效的解决方案的原因。
我的主要想法是使用.blur(radius: radius, opaque: true)来获得完美的描边。
经过几个小时的尝试,我找到了一个8行代码的解决方案,我相信你会喜欢。 由于模糊是不透明的,所以它也是像素化的,我找不到避免这种情况的方法。另外,第二个drawingGroup添加了一个奇怪的圆形方框形状,我不知道为什么。
特点
| 特征 | 工作? |
|---|---|
| 原生SwiftUI | ✅ |
| 自定义大小描边 | ✅ |
| 像素大小描边 | ❌(我不明白单位) |
| 有颜色的描边 | ✅ |
| 非不透明描边颜色 | ✅ |
| 圆形描边 | ❌ |
| 没有描边裁剪 | ✅ |
| 完美的填充 | ✅ |
| 原始文本颜色保留 | ✅ |
| 无障碍性 | ✅ |
| 没有像素化 | ❌ |
适用于任何View |
✅ |
| 可读性强,有注释... | ✅ |
代码
extension View {

    /// Adds a stroke around the text. This method uses an opaque blur, hence the `radius` parameter.
    ///
    /// - Parameters:
    ///   - color: The stroke color. Can be non-opaque.
    ///   - radius: The blur radius. The value is not in pixels or points.
    ///             You need to try values by hand.
    /// - Warning:
    ///   - The opaque blur is pixelated, I couldn't find a way to avoid this.
    ///   - The second `drawingGroup` allows stroke opacity, but adds a
    ///     strange rounded square shape.
    ///
    /// # Example
    ///
    /// ```
    /// Text("Lorem ipsum")
    ///     .foregroundColor(.red)
    ///     .font(.system(size: 20, weight: .bold, design: .rounded))
    ///     .stroked(color: Color.blue.opacity(0.5), radius: 0.5)
    /// ```
    ///
    /// # Copyright
    ///
    /// CC BY-SA 4.0 [Rémi BARDON](https://github.com/RemiBardon)
    /// (posted on [Stack Overflow](https://dev59.com/5FMH5IYBdhLWcg3w_Wd_#67348676))
    @ViewBuilder
    public func stroked(color: Color, radius: CGFloat) -> some View {
        ZStack {
            self
                // Add padding to avoid clipping
                // (3 is a a number I found when trying values… it comes from nowhere)
                .padding(3*radius)
                // Apply padding
                .drawingGroup()
                // Remove any color from the text
                .colorMultiply(.black)
                // Add an opaque blur around the text
                .blur(radius: radius, opaque: true)
                // Remove black background and allow color with opacity
                .drawingGroup()
                // Invert the black blur to get a white blur
                .colorInvert()
                // Multiply white by whatever color
                .colorMultiply(color)
                // Disable accessibility for background text
                .accessibility(hidden: true)
            self
        }
    }

}
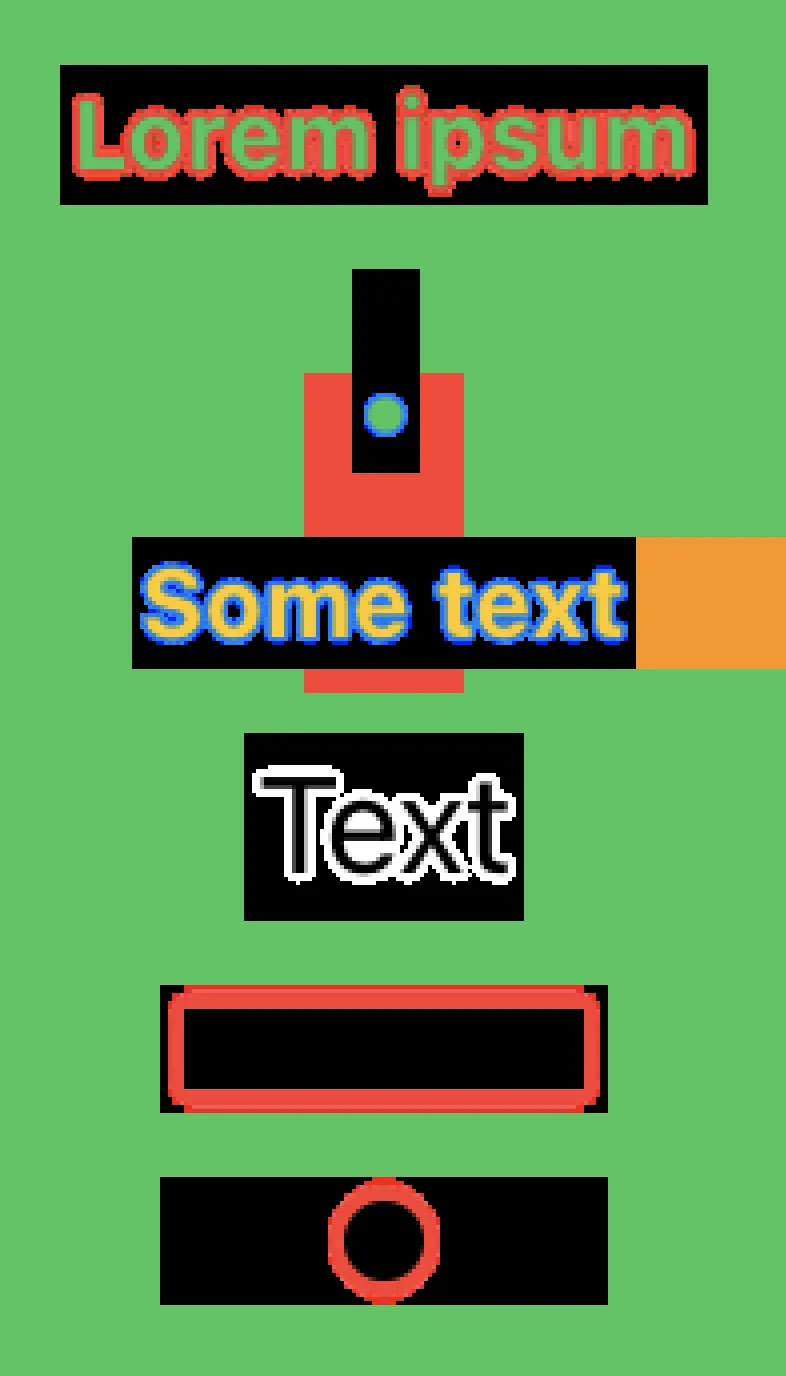
截图
在正常工作时,stroke的界面如下:
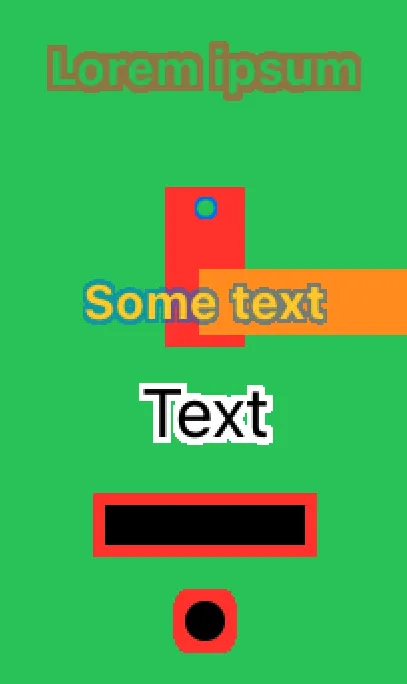
现在出现了故障,stroke的界面背景变成了黑色:
struct OutlinedText: View {
    var text: String
    var width: CGFloat
    var color: Color

    var body: some View {
        let diagonal: CGFloat = 1/sqrt(2) * width
        ZStack{
            ZStack{
                // bottom right
                Text(text).offset(x:  diagonal, y:  diagonal)
                // top left
                Text(text).offset(x: -diagonal, y: -diagonal)
                // bottom left
                Text(text).offset(x: -diagonal, y:  diagonal)
                // top right
                Text(text).offset(x:  diagonal, y: -diagonal)
                // left
                Text(text).offset(x:  -width, y: 0)
                // right
                Text(text).offset(x:  width, y: 0)
                // top
                Text(text).offset(x:  0, y: -width)
                // bottom
                Text(text).offset(x:  0, y: width)
            }
            .foregroundColor(color)
            Text(text)
        }.padding()
    }
}
.shadow()修饰符可以迭代调用,从而创建描边效果。只需创建此修饰符并将其添加到您的视图中即可。
import SwiftUI

struct StrokeStyle: ViewModifier {

    var color: Color
    var lineWidth: Int

    func body(content: Content) -> some View {
        applyShadow(
            content: AnyView(content),
            lineWidth: lineWidth
        )
    }

    func applyShadow(content: AnyView, lineWidth: Int) -> AnyView {
        if lineWidth == 0 {
            return content
        } else {
            return applyShadow(
                content: AnyView(
                    content.shadow(
                        color: color,
                        radius: 1
                    )
                ),
                lineWidth: lineWidth - 1
            )
        }
    }
}

extension View {
    func strokeBorder(color: Color, lineWidth: Int) -> some View {
        self.modifier(LHSStrokeStyle(color: color, lineWidth: lineWidth))
    }
}
1
原文链接