我正在尝试制作一个透明图像并在其上绘制,之后我会在基础图像上添加addWeighted。如何在openCV python中初始化完全透明的宽度和高度图像?编辑:我想制作一种像Photoshop中那样的效果,具有图层堆栈,所有堆叠的图层最初都是透明的,并且在完全透明的图层上执行绘制。最后,我将合并所有图层以获得最终图像。
使用OpenCV Python创建透明图像。
9
- Michael Presečan
2
1这是非常广泛的。只需使用新图像(例如白色),在其上绘制并以某种方式标记您正在绘制的位置(如果您不绘制白色,则不需要检查所有像素!=白色)。然后,当您组合这两个图像时,所有未绘制的权重都为零。(我不是opencv用户,并且对addWeighted的工作原理做出了一些假设)。 - sascha
1OpenCV支持alpha通道,但不支持渲染它们。 - Micka
3个回答
21
要创建一个透明图像,需要一个4通道矩阵,其中3个通道代表RGB颜色,第4个通道代表Alpha通道。要创建一个透明图像,您可以忽略RGB值并直接将Alpha通道设置为0。在Python OpenCV中,使用numpy来操作矩阵,因此可以创建透明图像如下:
import numpy as np
import cv2

img_height, img_width = 300, 300
n_channels = 4
transparent_img = np.zeros((img_height, img_width, n_channels), dtype=np.uint8)

# Save the image for visualization
cv2.imwrite("./transparent_img.png", transparent_img)
- ZdaR
4
谢谢,我已经尝试在您提供的图像上绘制一些东西,但是它不起作用。图像确实被创建了,但我无法在其上绘制一个简单的矩形。操作已完成,但保存图像后,矩形无法看到。 - Michael Presečan
4实际上,当我添加了一个四通道的带有alpha值为255的矩形时,它起作用了...谢谢。 - Michael Presečan
2@MichaelPresečan,您能否编辑答案并添加矩形,以便示例更加广泛。 - titusfx
@MichaelPresečan请编辑答案,并添加矩形,以供其他人参考。 - KansaiRobot
13
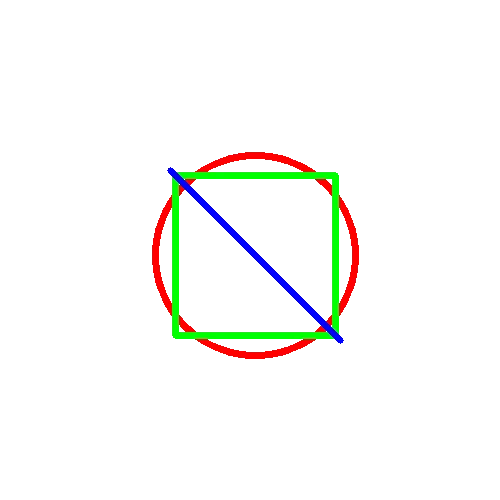
如果您希望在多个“图层”上绘制,然后将这些图形堆叠在一起,那么可以采用以下方法:
import cv2
import numpy as np

#create 3 separate BGRA images as our "layers"
layer1 = np.zeros((500, 500, 4))
layer2 = np.zeros((500, 500, 4))
layer3 = np.zeros((500, 500, 4))

#draw a red circle on the first "layer",
#a green rectangle on the second "layer",
#a blue line on the third "layer"
red_color = (0, 0, 255, 255)
green_color = (0, 255, 0, 255)
blue_color = (255, 0, 0, 255)
cv2.circle(layer1, (255, 255), 100, red_color, 5)
cv2.rectangle(layer2, (175, 175), (335, 335), green_color, 5)
cv2.line(layer3, (170, 170), (340, 340), blue_color, 5)

res = layer1[:] #copy the first layer into the resulting image

#copy only the pixels we were drawing on from the 2nd and 3rd layers
#(if you don't do this, the black background will also be copied)
cnd = layer2[:, :, 3] > 0
res[cnd] = layer2[cnd]
cnd = layer3[:, :, 3] > 0
res[cnd] = layer3[cnd]

cv2.imwrite("out.png", res)
- Headcrab
5
将图片中的白色部分转换为透明:
import cv2
import numpy as np

img = cv2.imread("image.png", cv2.IMREAD_UNCHANGED)
img[np.where(np.all(img[..., :3] == 255, -1))] = 0
cv2.imwrite("transparent.png", img)
- Ann Zen
网页内容由stack overflow 提供, 点击上面的可以查看英文原文,
原文链接
原文链接