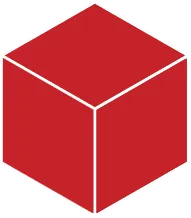
如何只使用HTML和CSS创建立方体?

33

CSS cube

我有这个,想要用HTML和CSS创造一个像上面图片中的方块。我尝试了最好的方法

.mainDiv{
  position: relative;
  width: 206px;
  height: 190px;
  margin: 0px auto;
  margin-top:100px;
}
.square{
  width:100px;
  height:100px;
  background:#c52329;
  border:solid 2px #FFF;
  float:left;
  transform: skew(180deg,210deg);
  position: absolute;
  top: 43px;
}
.square2{
  width:100px;
  height:100px;
  background:#c52329;
  border:solid 2px #FFF;
  float:left;
  transform: skew(180deg,150deg);
  position: absolute;
  left:102px;
  top: 43px;
}
.square3{
  width:100px;
  height:100px;
  background:#c52329;
  border:solid 2px #FFF;
  float:left;
  transform: skew(180deg,180deg);
  position: absolute;
  left: 51px;
  top: -61px;
}
<div class="mainDiv">
  <div class="square"></div>
  <div class="square2"></div>
  <div class="square3"></div>
</div>

http://css3gen.com/css-3d-transform/ - Lalji Tadhani
2
你是否知道可以使用Stack Snippets来提供演示而不是使用第三方应用程序?只需要在手工制作的“HTML”标题中添加两个注释即可在此处获得演示(如果您想,仍然可以添加外部源的链接)。 - Bakuriu
1
您可以使用 transform 来实现此功能。请参见 http://tt-cc.cc/web-app/css3-3d-shape-generator/。 - TTCC
9个回答

24
根据你的HTML,我得到了this JSFiddle。我刚刚尝试了一下transform

.mainDiv{
  position: relative;
  width: 206px;
  height: 190px;
  margin: 0px auto;
  margin-top:100px;
}
.square{
  width:100px;
  height:100px;
  background:#c52329;
  border:solid 2px #FFF;
  transform: skew(180deg,210deg);
  position: absolute;
  top: 43px;
}
.square2{
  width:100px;
  height:100px;
  background:#c52329;
  border:solid 2px #FFF;
  transform: skew(180deg,150deg);
  position: absolute;
  left:102px;
  top: 43px;
}
.square3{
  width:114px;
  height:100px;
  background:#c52329;
  border:solid 2px #FFF;
 

transform: rotate(150deg) translate(-40px, -16px) skew(30deg, 0deg);
  position: absolute;
  left: 0px;
  top: -32px;
}
<div class="mainDiv">
  <div class="square"></div>
  <div class="square2"></div>
  <div class="square3"></div>
</div>

更新后的CSS

.square3{
  width:114px;
  height:100px;
  background:#c52329;
  border:solid 2px #FFF;
  transform: rotate(150deg) translate(-40px, -16px) skew(30deg, 0deg);
  position: absolute;
  left: 0px;
  top: -32px;
}

我用这个改变了transform CSS。

额外信息: David Walsh制作了一个很酷的动画版本,用立方体展示。除了看起来很酷之外,通过调整设置,你可以学到很多相关知识。


1
@Niet the Dark Absol:当元素被动画化时,旋转或倾斜超过360度是有意义的,因为用户可以观察到元素进行多次旋转。但如果没有被动画化,这样做就很愚蠢了。 - BoltClock
1
我已经在答案中添加了David Walsh的示例。这个示例提供了一个很好的学习机会,可以了解其工作原理。 - Martijn
1
真言实语。今天早上我向我的前辈展示了这个例子,希望我也能做出像他那样的东西,并阅读了他的整篇博客,甚至玩了David Walsh的游戏。感谢您的添加。 :) - Leo the lion
2
甚至我更新了我的Skype状态为David的话:“用户可能很蠢,但如果开发者没有做到足够简单,那仍然是开发者的错。” - Leo the lion
@Leothelion,您的浮动对绝对定位的元素没有任何影响。这就是为什么您要使用left:Xpx的原因。https://dev59.com/82gu5IYBdhLWcg3wbGel - nihiser
显示剩余5条评论

21

使用3D变换,您也可以实现一个立方体。这将赋予您的立方体更逼真的透视效果,就像立方体是一个真正的三维形状一样,如下图所示:

3d cube with 3d transforms

在下面的例子中,我使用了一个带有2个伪元素的div:

body {
  perspective: 900px;
  padding-bottom:50%;
}
div {
  position: relative;
  width: 20%;
  padding-bottom: 20%;
  margin: 0 auto;
  transform-style: preserve-3d;
  background: #C52329;
  transform: rotateX(60deg) rotatez(45deg);
}
div:before, div:after {
  content: '';
  position: absolute;
  width: 100%;
  height: 100%;
  transform-origin: -2% -2%;
  background: inherit;
}
div:before {
  top: 104%; left: 0;
  transform: rotateX(-90deg);
}
div:after {
  top: 0; left: 104%;
  transform: rotateY(90deg);
}
<div></div>

使用CSS 3D制作具有6个面的立方体

这种技术允许您制作一个由6个面组成的“真实立方体”:

6个面的旋转3D立方体

body{
  perspective-origin:50% -100%;
  perspective: 900px;
  overflow:hidden;
}
h1{position:absolute;font-family:sans-serif;}
.cube {
  position:relative;
  padding-bottom:20%;
  transform-style: preserve-3d;
  transform-origin: 50% 100%;
  transform:rotateY(45deg) rotateX(0);
  transition:transform 3s;
}
.cubeFace {
  position: absolute;
  left:40%;top:0;
  width: 20%;height:100%;
  margin: 0 auto;
  transform-style: inherit;
  background: #C52329;
  box-shadow:inset 0 0 0 5px #fff; 
  transform-origin:50% 50%;
  transform: rotateX(90deg);
  backface-visibility:hidden;
}
.face2{
  transform-origin:50% 50%;
  transform: rotatez(90deg) translateX(100%) rotateY(90deg);
}
.cubeFace:before, .cubeFace:after {
  content: '';
  position: absolute;
  width: 100%;
  height: 100%;
  transform-origin:0 0;
  background: inherit;
  box-shadow:inherit;
  backface-visibility:inherit;
}
.cubeFace:before {
  top: 100%; left: 0;
  transform: rotateX(-90deg);
}
.cubeFace:after {
  top: 0; left: 100%;
  transform: rotateY(90deg);
}

body:hover .cube{
  transform:rotateY(405deg) rotateX(360deg);
}
<h1>Hover me:</h1>
<div class="cube">
  <div class="cubeFace"></div>
  <div class="cubeFace face2"></div>
</div>

请注意,我在示例中没有添加供应商前缀。有关浏览器支持和根据您的目标受众需要哪些供应商前缀的更多信息,请参见canIuse 3D 变换


15

基本上,你想要进行2个转换:

  1. 旋转矩形
  2. 挤压它(倾斜它)

因此,基本上,你需要进行一个transform: rotate(x) skew(y, y)的转换,并在大小和位置上做一些调整。

这是我创建的一个小演示,基于你自己的演示:

(我去掉了边框,因为我觉得不需要)

.mainDiv{
  position: relative;
  width: 206px;
  height: 190px;
  margin: 0px auto;
  margin-top:100px;
}
.square{
  width:100px;
  height:100px;
  background:#c52329;
  float:left;
  transform: skew(180deg,210deg);
  position: absolute;
  top: 43px;
}
.square2{
  width:100px;
  height:100px;
  background:#c52329;
  float:left;
  transform: skew(180deg,150deg);
  position: absolute;
  left:102px;
  top: 43px;
}
.square3{
  width:110px;
  height:110px;
  background:#c52329;
  float:left;
  transform: rotate(45deg) skew(-15deg, -15deg);
  position: absolute;
  left: 46px;
  top: -42px;
}
<div class="mainDiv">
  <div class="square"></div>
  <div class="square2"></div>
  <div class="square3"></div>
</div>


9

首先,我要指出一个skew角度应该在-90deg90deg之间,但不包括这两个值。你所有的倾斜都远超过了这个范围。

如果限制在合理的倾斜角度内,这其实很简单:

.mainDiv{
  position: relative;
  width: 206px;
  height: 190px;
  margin: 0px auto;
  margin-top:100px;
}
.tile {
  width:100px;
  height:100px;
  background:#c52329;
  border:solid 2px #FFF;
  position: absolute;
}
.square{
  transform: skewY(30deg);
  top: 43px;
}
.square2{
  transform: skewY(-30deg);
  left:102px;
  top: 43px;
}
.square3{
  height: 58px;
  left: 50px;
  top: -18px;
  transform: skew(60deg, -30deg);
}
<div class="mainDiv">
  <div class="tile square"></div>
  <div class="tile square2"></div>
  <div class="tile square3"></div>
</div>

任务完成。我还为您整理了大量重复的样式,并将其转换为通用类。


6
更改.square3的CSS应该可以解决问题:
height: 58px;
left: 50px;
position: absolute;
top: -18px;
transform: skew(240deg, 150deg);
width: 100px;

https://jsfiddle.net/8vuj7peb/26/


这看起来与原帖的尝试没有太大区别。顶部的正方形只是被压缩了。 - Carcigenicate

6
请使用以下的css代码来设置.square3的样式:
.square3{
  width:110px;
  height:110px;
  background:#c52329;
  float:left;
  transform: rotate(45deg) skew(-15deg, -15deg);
  position: absolute;
  left: 46px;
  top: -42px;
}

6
一个单独的盒子和两个伪元素也可以实现这个效果。 http://codepen.io/gc-nomade/pen/vGeajp

#square {

  display: flex;
  align-items: center;
  justify-content: center;
  border-radius: 5px;
  background: #C52329;
  /*box-shadow: 0 0 5px;*/
  width: 90px;
  height: 150px;
  margin: 5em;
  position: relative;
  transform: skew(30deg) rotate(30deg);
}

#square:before,
#square:after {
  display: inherit;
  align-items: center;
  justify-content: center;
  content: 'before';
  position: absolute;
  top: 0;
  left: 2px;
  right: -2px;
  bottom: 0;
  background: inherit;
  border-radius: inherit;
  box-shadow: inherit;
  transform: translate(100%, -31%) skew(0, -45deg) rotate(0deg);
}
#square:after {
  content: 'after';
  top: -2px;
  left: 0%;
  height: 60%;
  right: 0;
  bottom: 2px;
  transform: translate(50%, -100%) rotate(0deg)skew(-45deg)
}
<div id="square">
  boxe
</div>


2

我看到这个并想着我可以添加一些在尝试制作老式ABC积木时想出的东西。将它们制成3D,我只需使用另一个类来标记主容器以改变位置并节省代码。我在代码中注释了教程。希望这能帮助某人。 :)

          
/*-------------------------------------------------------------   
First we need to create our container for later reference
    -I put this to show in the center of the screen if you wanted to 
    copy and paste the code into a document for play. 
    -The width is just to give the margin auto something to center on. 
    -You really on need the element itself to reference later, but this is prettier
-------------------------------------------------------------*/
.box{
    width: 100px;
    margin: 200px auto;
    text-align: center;
    line-height: 5;
}

/*---------------------------------------------------------------------------
The box-wrapper is our real hero container here. This is where we nail our box together. 
    -set this to relative position for child elements to reference to.
    -transform-style is set to preserve-3d because I wanted to keep the look as the text turns with the box. You can also set this to flat, but its not near as cool. 
---------------------------------------------------------------------------*/


.box-wrapper{
    position: relative;
    transform-style: preserve-3d;
    -webkit-transform-style: preserve-3d;    
}
/*-------------------------------------------------------------------------
Here I am just giving the box its needed dimesions and setting them to absolute so nothing gets any ideas of wandering off.
    -PLEASE NOTE: the border has 2px and our w:98 h:98 making it a total of 100px. (this is important when we translate later)
-------------------------------------------------------------------------*/
.box-wrapper div{
    width: 98px;
    height: 98px;
    position: absolute;    
    border: 2px solid black;
    border-radius: 5px;
}

/*----------------------------------------------------------------------
Since our sides are 100px we only need to move our box sides 50px to get the edges to match up without gaps.
    -Meaning "translate" moves to the position relative to your .box-wrapper. (You can play with this code to see it in action, try to take a visible section of the box and take it down 10). 
    -Also I use "rotate" y and x to turn our box sheets (.box-wrapper div's)
-----------------------------------------------------------------------*/
.front{
    transform: translateZ(50px) rotateY(0deg);
}
.back{
    transform: translateZ(-50px) rotateY(180deg);
}
.top{
    transform: translateY(-50px) rotateX(90deg);
}
.bottom{
    transform: translateY(50px) rotateX(-90deg);
}

.right{
    transform: translateX(50px) rotateY(90deg);
}
.left{
    transform: translateX(-50px) rotateY(270deg);
}

/*-----------------------------------------------------------------------
Then after all of this we can use our cool box-wrapper to turn this baby
Hope this is helpful! :) Enjoy!
-------------------------------------------------------------------------*/

.box .box-wrapper{
    transform: rotateX(-30deg) rotateY(-40deg);
}
.box .box-wrapper div{
    background-color: yellow;
}
<!DOCTYPE html>
<html>
    <head>
        <meta charset="utf-8">
        <title>Bob the box builder</title>
        <link rel="stylesheet" type="text/css" href="boxstyle.css">
        <style>
            

        </style>
    </head>
    <body>
<!--Create our box that holds our stuff -->
           <div class="box">
<!--Create our real container that keeps our box sides nailed together-->
                    <div class="box-wrapper">
<!--Make our box sheets that we will nail together with css-->
                        <div class="front">Front</div>
                        <div class="back">Back</div>
                        <div class="left">Left</div>
                        <div class="right">Right</div>
                        <div class="top">Top</div>
                        <div class="bottom">Bottom</div>
                    </div>
                </div>
    </body>
</html>


1
      y         
      |          
      |____ x 
     ╱        
    z 

想象一下一个正方体的前面。你能看到什么?一个从屏幕上伸出来的正方形。因此,对于前面,我们有:

.front {
  transform : translateZ(50px);
}

对于“右侧”,我们有一个正方形,它在Y轴上旋转了90度并移动到自己的新Z轴上:
.right {
  transform : rotateY(90deg) translateZ(50px);
}

对于左侧,我们有一个正方形,在Y轴上旋转了-90度,并移动到自己的新Z轴上:
.right {
  transform : rotateY(-90deg) translateZ(50px);
}

对于顶部,我们有一个正方形,它在X轴上旋转90度并移动到自己的新Z轴上:
.right {
  transform : rotateX(90deg) translateZ(50px);
}

对于“背面”,我们有一个正方形,它在Y轴上旋转了-180度,并移动到自己的新Z轴上:
.right {
  transform : rotateY(-180deg) translateZ(50px);
}

然后,只需将它们打包到一个形状容器类中,并使用transform-style: preserve-3d属性:
.cube {
  transform-style: preserve-3d;
}

最终,您可以旋转您的立方体并观看 CSS-3D 魔法。
.cube {
  transform-style: preserve-3d;
  transform: rotateX(-40deg) rotateY(45deg);
}

.cube {
  transform-style: preserve-3d;
  transform: rotateX(-40deg) rotateY(45deg);
}

.side {
  position: absolute;
  width: 100px;
  height: 100px;
  background: #c52329;
  border: solid 3px white;
}

.front {
  transform: translateZ(53px);
}

.top {
  transform: rotateX(90deg) translateZ(53px);
}

.right {
  transform: rotateY(90deg) translateZ(53px);
}

.left {
  transform: rotateY(-90deg) translateZ(53px);
}

.bottom {
  transform: rotateX(-90deg) translateZ(53px);
}

.back {
  transform: rotateY(-180deg) translateZ(53px);
}
<div class="cube">
  <div class="side front"></div>
  <div class="side back"></div>
  <div class="side right"></div>
  <div class="side left"></div>
  <div class="side top"></div>
  <div class="side bottom"></div>
</div>

It is a full cube. For your approach, you can ignore the back, right, and bottom sides.

感谢css-tricks.com

网页内容由stack overflow 提供, 点击上面的
可以查看英文原文,
原文链接