iOS:frame.size.width/2在每个设备上都不能产生一个圆形

15

我知道公式frame.size.width/2应该会生成一个圆形边框,但是在XCode中我目前遇到了一些差异。

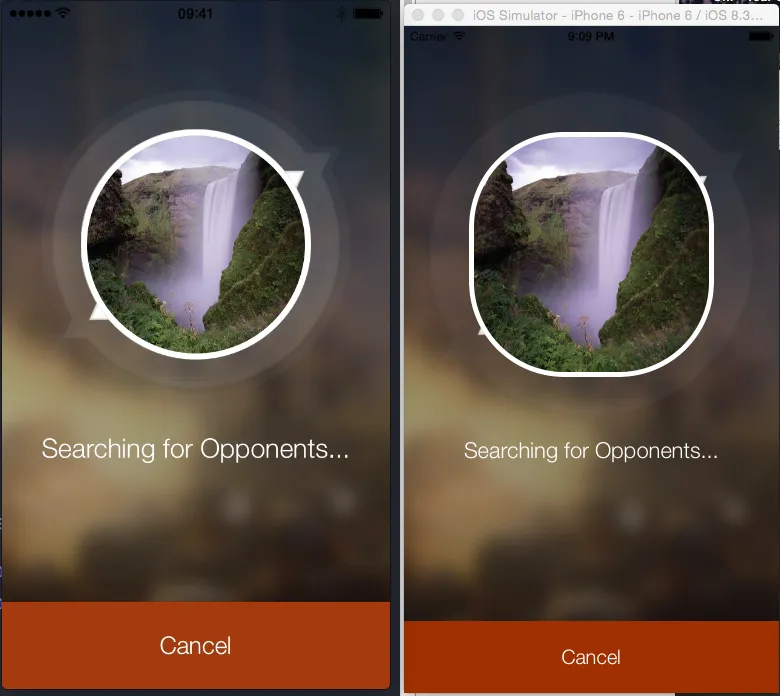
我有两个测试设备(iPhone6和第五代iPod touch),同时我也有模拟器运行。我的两个设备都正确显示,但模拟器将我的圆绘制为圆角矩形:

enter image description here

我用来实现这个效果的代码(虽然非常简单)是:

imgAvatar.layer.masksToBounds = true
imgAvatar.clipsToBounds = true
imgAvatar.layer.cornerRadius = imgAvatar.frame.size.width/2
imgAvatar.layer.borderWidth = 5
imgAvatar.layer.borderColor = UIColor.whiteColor().CGColor

这是发生的任何原因吗?它让我发疯了!

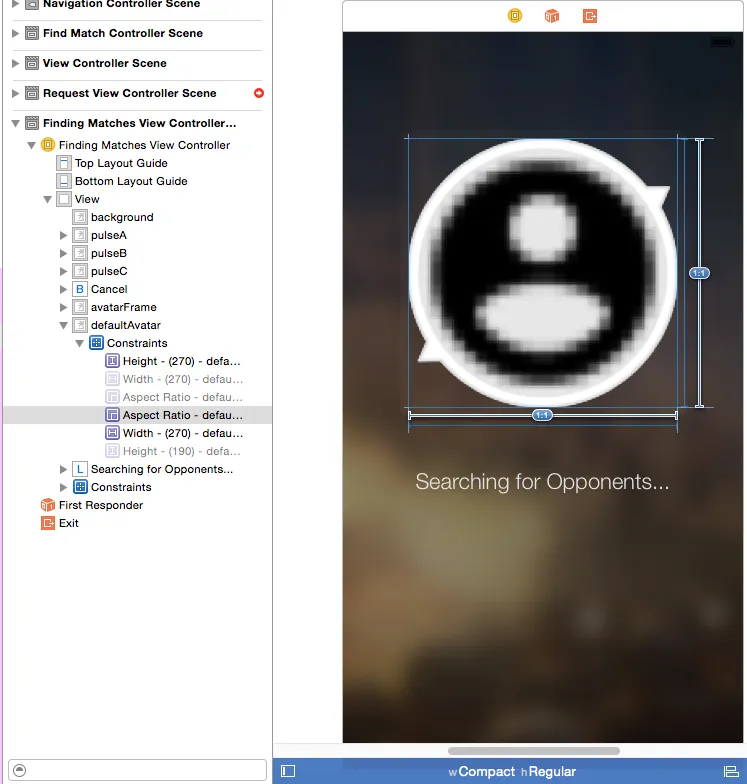
更新 为了消除混淆,UIImageView在我的Storyboard中声明为190x190,并且还应用了一个1:1的纵横比约束,以确保它保持等比例的宽度和高度。

更新2 为了消除关于我的自动布局约束的任何怀疑,我已经附上了下面的图片,显示了imgAvatar设定的约束。如您所见,宽度和高度相匹配,并且AR设置可以确保它保持那个1:1的比率。我希望这能解决任何进一步的疑虑。

enter image description here

答案 Leo指出了一个极其实用和可重复使用的解决方案来解决这个问题。使用Swift扩展,我们可以确保给定的UIImage始终是正方形的,从而始终生成一个圆形。我已经张贴了Leo的方案如下:

extension UIImage {
    var circleMask: UIImage? {
        let square = CGSize(width: min(size.width, size.height), height: min(size.width, size.height))
        let imageView = UIImageView(frame: .init(origin: .init(x: 0, y: 0), size: square))
        imageView.contentMode = .scaleAspectFill
        imageView.image = self
        imageView.layer.cornerRadius = square.width/2
        imageView.layer.borderColor = UIColor.white.cgColor
        imageView.layer.borderWidth = 5
        imageView.layer.masksToBounds = true
        UIGraphicsBeginImageContextWithOptions(imageView.bounds.size, false, scale)
        defer { UIGraphicsEndImageContext() }
        guard let context = UIGraphicsGetCurrentContext() else { return nil }
        imageView.layer.render(in: context)
        return UIGraphicsGetImageFromCurrentImageContext()
    }
}

imgAvatar.image = yourImage.circleMask

2
你能尝试记录imgFrame以及生成的cornerRadius属性吗?(注意,NSStringFromCGRect()在这里可能会有帮助。) - Craig Otis
1
这就是问题所在。 viewDidLoad 太早了。视图控制器的视图尚未调整大小。尝试使用 viewWillAppear: - rmaddy
已移至 viewWillAppear,看到相同的结果。 - Halfpint
仅限于模拟器中,不适用于iPhone或iPod。 - Halfpint
应该在 viewDidLayoutSubviews 中。 - Fogmeister
显示剩余6条评论
6个回答

17

您可以创建一个扩展,将遮罩和边框直接应用于图像,以便无论屏幕大小/比例如何都能正常工作:

编辑/更新:

Xcode 11 • Swift 5或更高版本

extension UIImage {
    var circleMask: UIImage? {
        let square = CGSize(width: min(size.width, size.height), height: min(size.width, size.height))
        let imageView = UIImageView(frame: .init(origin: .init(x: 0, y: 0), size: square))
        imageView.contentMode = .scaleAspectFill
        imageView.image = self
        imageView.layer.cornerRadius = square.width/2
        imageView.layer.borderColor = UIColor.white.cgColor
        imageView.layer.borderWidth = 5
        imageView.layer.masksToBounds = true
        UIGraphicsBeginImageContextWithOptions(imageView.bounds.size, false, scale)
        defer { UIGraphicsEndImageContext() }
        guard let context = UIGraphicsGetCurrentContext() else { return nil }
        imageView.layer.render(in: context)
        return UIGraphicsGetImageFromCurrentImageContext()
    }
}

imgAvatar.image = yourImage.circleMask

1
哇,我喜欢这个解决方案,这是我第一次接触扩展,非常完美。非常感谢你,Leonardo! - Halfpint
1
是的,这就是我所说的子类化 : )。无论如何,回答得很好! - Burhanuddin Sunelwala
我正在使用一个包含近30个项目的集合视图。我的集合视图在这种解决方案下表现得很卡顿。你能想到更有效的解决方案吗? - Awais Fayyaz

8
Autolayout应该是问题所在。可以看到右侧的imgAvatar的高度大于左侧的imgAvatar
右侧的imgAvatar尺寸为190 x 190,而左侧的尺寸为200 x 200,但是在左侧,您设置的圆角半径是190/295px,而应该是100px
如果不想让imgAvatar按1:1进行调整,请在nib文件中设置高度宽度约束条件。
  1. 在nib中选择imgAvatar。
  2. Editor > Pin > Height
  3. 在nib中选择imgAvatar。
  4. Editor > Pin > Width

或者

尝试将代码移到viewDidLayoutSubviews中。

或者

子类化您的UIImageView并在其中的awakeFromNib方法中设置其圆角半径。

请告诉我们是否有效。谢谢!

是的,你已经提到过你的1:1比例了。所以要么保持固定大小,不要调整大小,要么将你的代码移动到viewDidLayoutSubviews中。因为情况是你设置了95像素的圆角,但是自适应布局根据1:1比例调整了图像的大小,并且你是在视图被调整大小之前设置它的。 - Burhanuddin Sunelwala
我明白了,这完全有道理——当我将代码移动到viewDidLayoutSubviews时,这个解决方案也对我起作用。- 我点了赞,但接受Leonardo的答案,因为它是一个很好的备用方案。 - Halfpint
2
我喜欢你的回答,因为你解释了问题出现的原因 - Craig Otis
viewDidLayoutSubviews 是答案。谢谢。 - NOlivNeto

3
如果你在iOS8.3上进行测试,需要在获取UI对象的frame之前调用layoutIfNeed。请阅读iOS8.3发行说明
例如:
UIButton *button = [UIButton buttonWithType:UIButtonTypeSystem];
// code that sets up the button, but doesn’t yet add it to a window
CGRect titleFrame = button.titleLabel.frame;
// code that relies on the correct value for titleFrame

您现在需要:

UIButton *button = [UIButton buttonWithType:UIButtonTypeSystem];
// code that sets up the button, but doesn’t yet add it to a window
[button layoutIfNeeded]; // This is also safe pre-iOS 8.3
CGRect titleFrame = button.titleLabel.frame;
// code that relies on the correct value for titleFrame

据说对于UIButton及其子类,您可以尝试使用您的UI对象进行操作。
引用:
当链接至iOS 8.3时,任何依赖于UIButton子视图布局信息(例如frame)的代码,当按钮不在窗口层次结构中时,需要向按钮发送layoutIfNeeded,然后检索布局信息(例如button.titleLabel.frame),以确保布局值是最新的。
此外,由于imgAvatar的cornerRadius设置为imgFrame大小的1/2,只有当cornerRadius值= imgAvatar宽度(和高度)的1/2时,才会得到一个圆形。
因此,在调用之后:
imgAvatar.layer.cornerRadius = imgFrame.frame.size.width/2

验证:

  • imgAvatar的框架大小和其cornerRadius
  • 确保图像是正方形的

即使调用layoutIfNeeded()也无法解决这个问题...非常奇怪 - 不过还是谢谢你的建议! :) - Halfpint
imgFrame的frame值是多少?看起来你的imgAvatar比imgView大,所以当你使用imgView大小的1/2时,具有该圆角半径值的imgAvatar不会呈现为一个圆形。 - Duyen-Hoa
它的(起点 = (x = 205, y = 106), 尺寸 = (宽度 = 190, 高度 = 190)) - Halfpint
它的大小是一样的,我在故事板中也进行了检查。如果大小不同,那么它就不会在一个环境中产生圆形,在另一个环境中产生矩形了吧? - Halfpint

2
问题在于,当圆形应用时,视图的边界仍然被认为是默认的(320x480),因此,如果您设置了与屏幕相关的约束条件,则例如在 iPhone 6/6+ 上,图像将会更大。
有各种解决方案,但如果您想要快速解决问题,只需将代码放入以下位置:
imgAvatar.layer.cornerRadius = imgFrame.frame.size.width/2

在您的视图控制器中的 -viewDidLayoutSubviews 或者在您的视图中的 -layoutSubviews 中,在检查图片的宽度/2是否与cornerRadius不同之前进行检查。像这样:

if (imgAvatar.layer.cornerRadius != imgFrame.frame.size.width/2) {
    imgAvatar.layer.cornerRadius = imgFrame.frame.size.width/2
}

0

你使用的公式仅适用于正方形图像。您是否使用了自动布局?也许它可以被拉伸到您使用的设备上。如果是这种情况,那么高度将高于宽度,或者相反。也就是说,该图像将呈某种矩形,而不会产生完美的圆形。


我将公式应用于UIImageView而不是UIImage,UIImageView是一个190x190的正方形,我应用了1:1的纵横比约束和宽度/高度=190。 - Halfpint

0
感谢 @leo Dabus 的原始解决方案 以下是适用于 swift 4.2 的更新
import UIKit
extension UIImage {
    var circleMask: UIImage {
        let square = size.width < size.height ? CGSize(width: size.width, height: size.width) : CGSize(width: size.height, height: size.height)
        let imageView = UIImageView(frame: CGRect(origin: CGPoint(x: 0, y: 0), size: square))
        imageView.contentMode = UIView.ContentMode.scaleAspectFill
        imageView.image = self
        imageView.layer.cornerRadius = square.width/2
        imageView.layer.borderColor = UIColor.white.cgColor
        imageView.layer.borderWidth = 5
        imageView.layer.masksToBounds = true
        UIGraphicsBeginImageContext(imageView.bounds.size)
        imageView.layer.render(in: UIGraphicsGetCurrentContext()!)
        let result = UIGraphicsGetImageFromCurrentImageContext()
        UIGraphicsEndImageContext()
        return result!
    }
}

网页内容由stack overflow 提供, 点击上面的
可以查看英文原文,
原文链接