我想在skimage中绘制一个椭圆形遮罩,颜色从内部开始逐渐变化,直到外部椭圆形结束。如何使用skimage或open-cv绘制它?
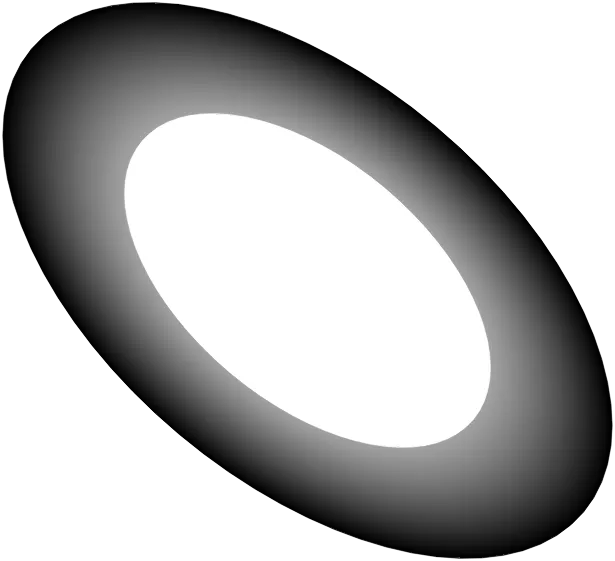
像下面的图片: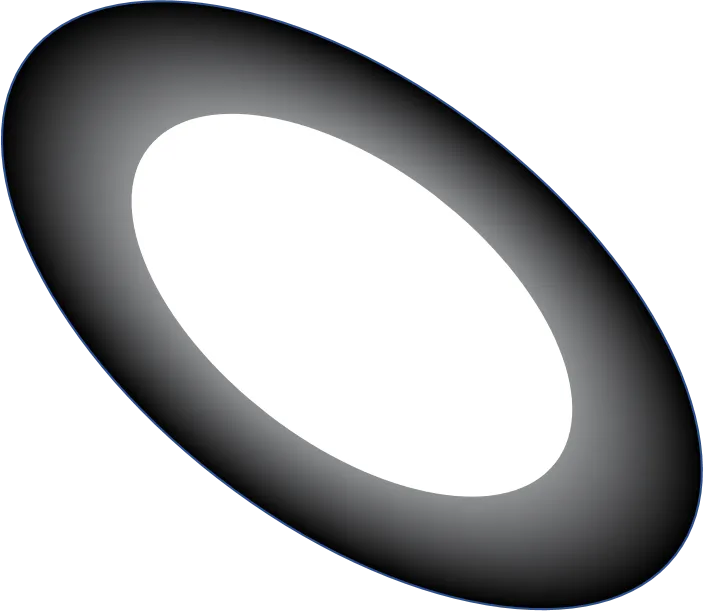
像下面的图片:
让我们开始详细描述示例图像。
此外,设:
a和b为椭圆的半长轴和半短轴theta为椭圆绕其中心旋转的旋import cv2
import numpy as np
import math
设置定义我们绘图的参数(我们将计算h和k)为:
a, b = (360.0, 200.0) # Semi-major and semi-minor axis
theta = math.radians(40.0) # Ellipse rotation (radians)
inner_scale = 0.6 # Scale of the inner full-white ellipse
生成这样的图像需要我们采取的第一步是计算所需的“画布”(我们将绘制图像的区域)大小。为此,我们可以计算旋转外椭圆的边界框并在其周围添加一些小间距。
我不知道是否存在现有的OpenCV函数可以有效地完成此操作,但StackOverflow拯救了我们——已经有一个相关的问题,其中包含一个答案,链接到一个有用的文章来讨论这个问题。我们可以使用这些资源来得出以下Python实现:
def ellipse_bbox(h, k, a, b, theta):
ux = a * math.cos(theta)
uy = a * math.sin(theta)
vx = b * math.cos(theta + math.pi / 2)
vy = b * math.sin(theta + math.pi / 2)
box_halfwidth = np.ceil(math.sqrt(ux**2 + vx**2))
box_halfheight = np.ceil(math.sqrt(uy**2 + vy**2))
return ((int(h - box_halfwidth), int(k - box_halfheight))
, (int(h + box_halfwidth), int(k + box_halfheight)))
NB: 我将浮点数大小四舍五入,因为我们必须覆盖整个像素,并将左上角和右下角作为整数(x,y)对返回。
然后我们可以按以下方式使用该函数:
# Calculate the image size needed to draw this and center the ellipse
_, (h, k) = ellipse_bbox(0, 0, a, b, theta) # Ellipse center
h += 2 # Add small margin
k += 2 # Add small margin
width, height = (h*2+1, k*2+1) # Canvas size
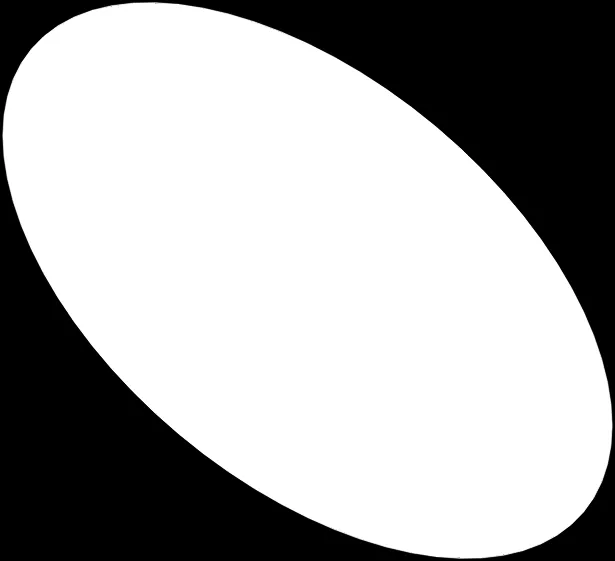
第二步是生成透明图层。这是一个单通道的8位图像,其中黑色(0)表示完全透明,白色(255)表示完全不透明的像素。这个任务相当简单,因为我们可以使用 cv2.ellipse。
我们可以用 RotatedRect 结构(一个紧密拟合椭圆的旋转矩形)来定义我们的外部椭圆。在Python中,它被表示为一个包含以下元组的元组:
以下是代码:
ellipse_outer = ((h,k), (a*2, b*2), math.degrees(theta))
transparency = np.zeros((height, width), np.uint8)
cv2.ellipse(transparency, ellipse_outer, 255, -1, cv2.LINE_AA)
...以及它生成的图像:
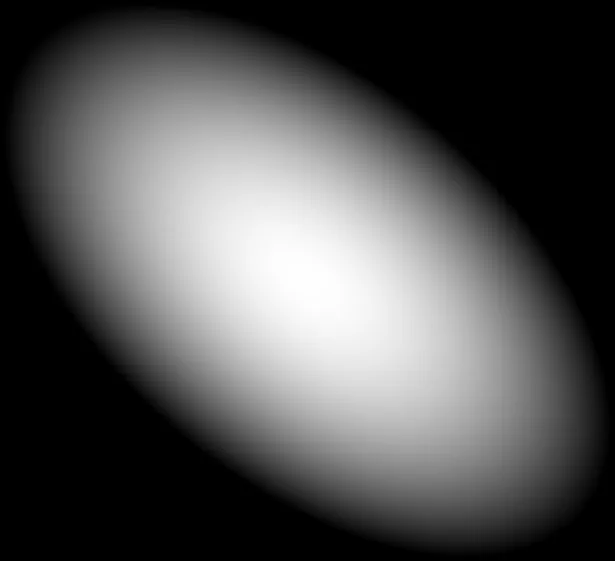
第三步,我们创建一个包含所需 旋转椭圆渐变 的单通道(灰度或亮度)图像。但首先,我们如何在图像的笛卡尔坐标系(x, y)中使用我们的(a, b)、theta (θ)和(h, k)参数数学地定义旋转的椭圆呢?
这次 Mathematics StackExchange 挽救了我们的局面:有一个问题与我们的问题完全匹配,以及一个答案提供了这个有用的公式:

注意,对于我们从椭圆中心取的任何方向,左边的式子都会在椭圆周上求值为1。它在中心时为0,向外线性增加到周长处的1,然后继续增加。
我们将右边称为weight以表示权重(没有更好的术语)。由于它从中心向外缩放得如此好,我们可以用它来计算所需的渐变。公式给出了白色(对于浮点图像是1.0)在外部,在中心是黑色(0.0)。我们想要反过来,因此我们只需从1.0中减去weight并将结果裁剪到范围[0.0, 1.0]。
让我们从一个简单的Python-only实现开始(即手动迭代表示我们图像的numpy.array中的各个元素),以计算权重。但是,由于我们是懒惰的程序员,我们将使用Numpy将计算的weight转换为渐变图像,使用向量化减法,以及numpy.clip。
下面是代码:
def make_gradient_v1(width, height, h, k, a, b, theta):
# Precalculate constants
st, ct = math.sin(theta), math.cos(theta)
aa, bb = a**2, b**2
weights = np.zeros((height, width), np.float64)
for y in range(height):
for x in range(width):
weights[y,x] = ((((x-h) * ct + (y-k) * st) ** 2) / aa
+ (((x-h) * st - (y-k) * ct) ** 2) / bb)
return np.clip(1.0 - weights, 0, 1)
...以及它生成的图像:
这很不错,但由于我们要迭代每个像素并在Python解释器中进行计算,所以速度非常慢......可能需要一秒钟,但我们正在使用Numpy,因此如果利用它,肯定可以做得更好。这意味着对我们能够矢量化的任何东西进行矢量化。
首先,让我们注意到唯一变化的输入是每个给定像素的坐标。这意味着为了矢量化我们的算法,我们需要两个数组作为输入(与图像大小相同),分别保存每个像素的x和y坐标。幸运的是,Numpy提供了一种工具来生成这样的数组--numpy.mgrid。我们可以这样写:
y,x = np.mgrid[:height,:width]
为了生成我们需要的输入数组,然而让我们观察一下我们从未直接使用 x 和 y -- 相反,我们总是通过一个常量偏移它们。让我们通过生成 x-h 和 y-k 来避免这个偏移操作...
y,x = np.mgrid[-k:height-k,-h:width-h]
我们可以再次预先计算4个常数,除此之外,其余的都是使用Numpy提供的矢量化操作(即更快速):加法、减法、乘法、除法和指数运算。
def make_gradient_v2(width, height, h, k, a, b, theta):
# Precalculate constants
st, ct = math.sin(theta), math.cos(theta)
aa, bb = a**2, b**2
# Generate (x,y) coordinate arrays
y,x = np.mgrid[-k:height-k,-h:width-h]
# Calculate the weight for each pixel
weights = (((x * ct + y * st) ** 2) / aa) + (((x * st - y * ct) ** 2) / bb)
return np.clip(1.0 - weights, 0, 1)
使用这个版本的脚本,所需时间比仅使用 Python 的要少约30%。虽然不算惊人,但却能够产生相同的结果。此任务似乎不需要频繁执行,对我来说已经足够好了。
如果您[读者]知道更快的方法,请发布回答。
现在我们有一个浮点图像,其中强度范围在0.0和1.0之间。为了生成我们的结果,我们希望得到一个8位图像,其值介于0和255之间。
intensity = np.uint8(make_gradient_v2(width, height, h, k, a, b, theta) * 255)
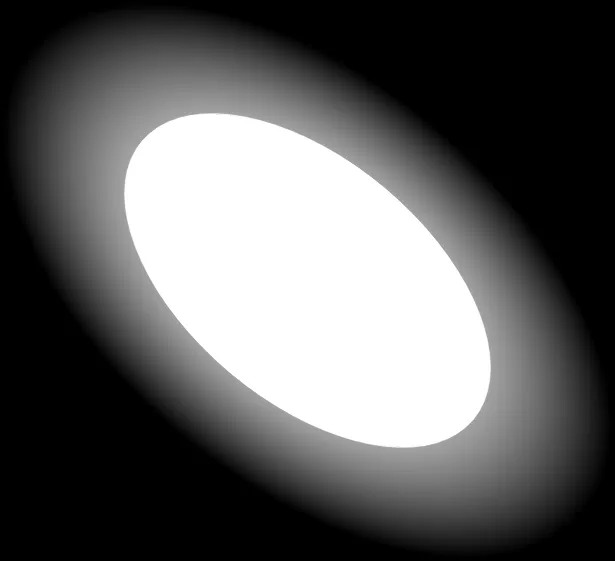
第四步--画出内椭圆。这很简单,我们以前已经做过了。我们只需适当缩放轴即可。
ellipse_inner = ((h,k), (a*2*inner_scale, b*2*inner_scale), math.degrees(theta))
cv2.ellipse(intensity, ellipse_inner, 255, -1, cv2.LINE_AA)
接下来我们得到了以下强度图像:
第五步-- 我们快完成了。我们需要将强度和透明度层合并成BGRA图像,然后保存为PNG格式。
result = cv2.merge([intensity, intensity, intensity, transparency])
NB: 使用相同强度的红、绿、蓝颜色值只能得到不同灰度的阴影。
当我们保存这个结果时,会得到以下图片:
鉴于我猜测了您用于生成样例图像的参数,我可以说我的脚本的结果非常接近。它运行速度也很快——如果要更好的结果,你可能无法避免接近底层语言(C,C++等)。或许更聪明的方法,或者使用GPU可以得到更好的效果。值得尝试...
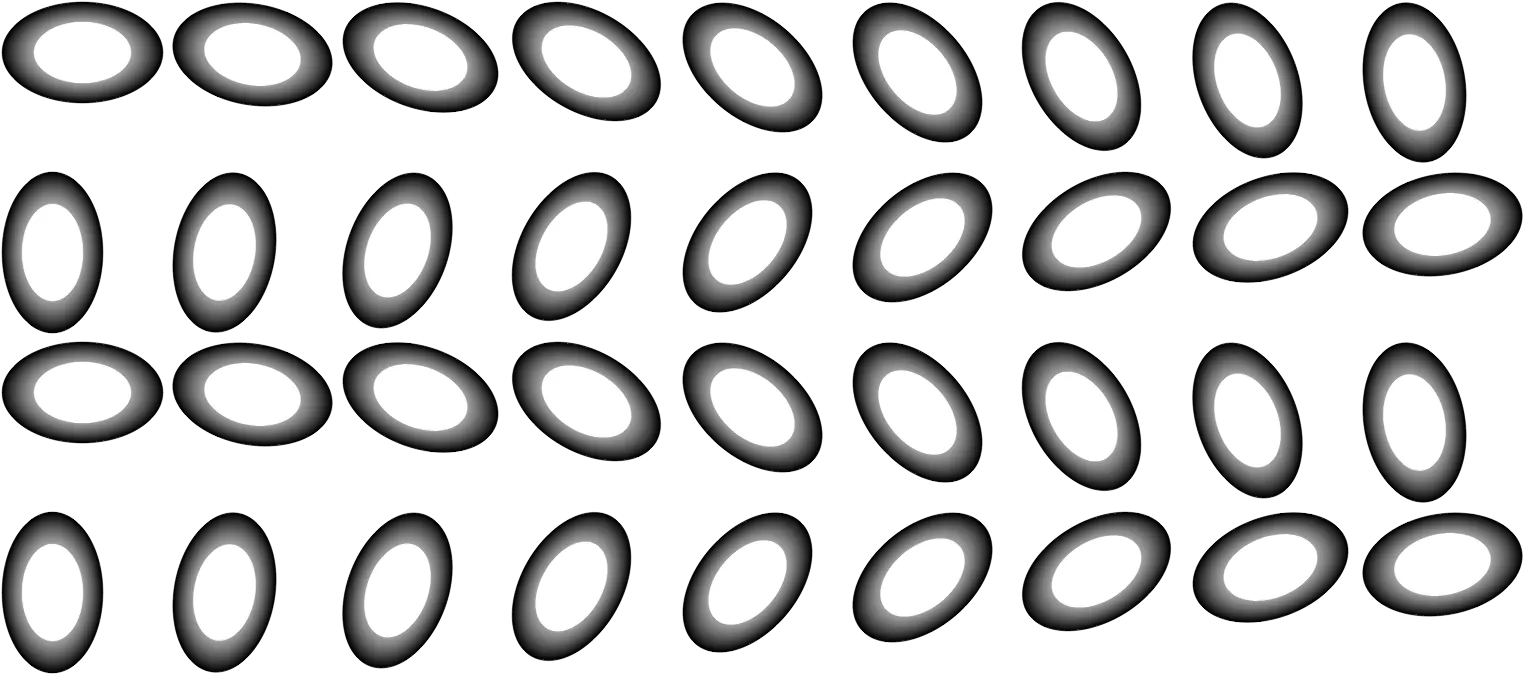
为了总结,这里有一个小演示,证明这段代码也适用于其他旋转:
下面是我用来编写这段文字的完整脚本:
import cv2
import numpy as np
import math
# ============================================================================
def ellipse_bbox(h, k, a, b, theta):
ux = a * math.cos(theta)
uy = a * math.sin(theta)
vx = b * math.cos(theta + math.pi / 2)
vy = b * math.sin(theta + math.pi / 2)
box_halfwidth = np.ceil(math.sqrt(ux**2 + vx**2))
box_halfheight = np.ceil(math.sqrt(uy**2 + vy**2))
return ((int(h - box_halfwidth), int(k - box_halfheight))
, (int(h + box_halfwidth), int(k + box_halfheight)))
# ----------------------------------------------------------------------------
# Rotated elliptical gradient - slow, Python-only approach
def make_gradient_v1(width, height, h, k, a, b, theta):
# Precalculate constants
st, ct = math.sin(theta), math.cos(theta)
aa, bb = a**2, b**2
weights = np.zeros((height, width), np.float64)
for y in range(height):
for x in range(width):
weights[y,x] = ((((x-h) * ct + (y-k) * st) ** 2) / aa
+ (((x-h) * st - (y-k) * ct) ** 2) / bb)
return np.clip(1.0 - weights, 0, 1)
# ----------------------------------------------------------------------------
# Rotated elliptical gradient - faster, vectorized numpy approach
def make_gradient_v2(width, height, h, k, a, b, theta):
# Precalculate constants
st, ct = math.sin(theta), math.cos(theta)
aa, bb = a**2, b**2
# Generate (x,y) coordinate arrays
y,x = np.mgrid[-k:height-k,-h:width-h]
# Calculate the weight for each pixel
weights = (((x * ct + y * st) ** 2) / aa) + (((x * st - y * ct) ** 2) / bb)
return np.clip(1.0 - weights, 0, 1)
# ============================================================================
def draw_image(a, b, theta, inner_scale, save_intermediate=False):
# Calculate the image size needed to draw this and center the ellipse
_, (h, k) = ellipse_bbox(0,0,a,b,theta) # Ellipse center
h += 2 # Add small margin
k += 2 # Add small margin
width, height = (h*2+1, k*2+1) # Canvas size
# Parameters defining the two ellipses for OpenCV (a RotatedRect structure)
ellipse_outer = ((h,k), (a*2, b*2), math.degrees(theta))
ellipse_inner = ((h,k), (a*2*inner_scale, b*2*inner_scale), math.degrees(theta))
# Generate the transparency layer -- the outer ellipse filled and anti-aliased
transparency = np.zeros((height, width), np.uint8)
cv2.ellipse(transparency, ellipse_outer, 255, -1, cv2.LINE_AA)
if save_intermediate:
cv2.imwrite("eligrad-t.png", transparency) # Save intermediate for demo
# Generate the gradient and scale it to 8bit grayscale range
intensity = np.uint8(make_gradient_v1(width, height, h, k, a, b, theta) * 255)
if save_intermediate:
cv2.imwrite("eligrad-i1.png", intensity) # Save intermediate for demo
# Draw the inter ellipse filled and anti-aliased
cv2.ellipse(intensity, ellipse_inner, 255, -1, cv2.LINE_AA)
if save_intermediate:
cv2.imwrite("eligrad-i2.png", intensity) # Save intermediate for demo
# Turn it into a BGRA image
result = cv2.merge([intensity, intensity, intensity, transparency])
return result
# ============================================================================
a, b = (360.0, 200.0) # Semi-major and semi-minor axis
theta = math.radians(40.0) # Ellipse rotation (radians)
inner_scale = 0.6 # Scale of the inner full-white ellipse
cv2.imwrite("eligrad.png", draw_image(a, b, theta, inner_scale, True))
# ============================================================================
rows = []
for j in range(0, 4, 1):
cols = []
for i in range(0, 90, 10):
tile = np.zeros((170, 170, 4), np.uint8)
image = draw_image(80.0, 50.0, math.radians(i + j * 90), 0.6)
tile[:image.shape[0],:image.shape[1]] = image
cols.append(tile)
rows.append(np.hstack(cols))
cv2.imwrite("eligrad-m.png", np.vstack(rows))