如何在Flutter应用程序中为底部应用栏设置边框半径?

17

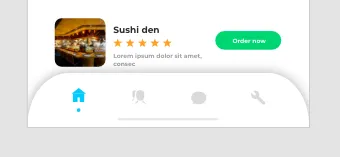
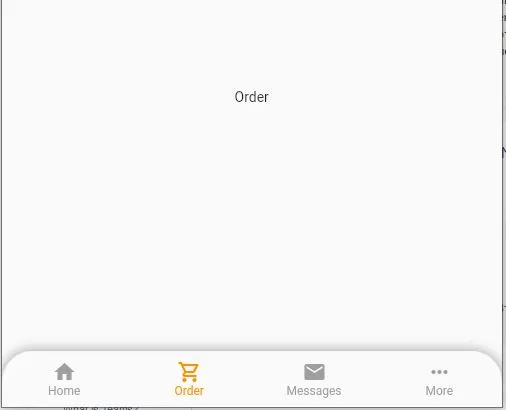
我想将 borderRadius 应用于 Bottom Navigation App Bar,如图所示。我尝试将 Bottom Navigation App Bar 放入 ClipRRectborderRadiusContainer 装饰中,但没有成功。请问我如何应用 topLeft 和 topRight 边框半径到我的底部导航栏?请帮助我解决这个问题。

enter image description here

main.dart

    void main() => runApp(MyApp());

class MyApp extends StatelessWidget {
  @override
  Widget build(BuildContext context) {
    return MaterialApp(
      title: 'Food Ordering',
      theme: ThemeData(primarySwatch: Colors.blue, primaryColor: Colors.white),
      home: MyStatefulWidget(),
      routes: <String, WidgetBuilder>{
        '/detail-page': (BuildContext context) => MyDetailPage(),
      },
    );
  }
}

class MyStatefulWidget extends StatefulWidget {
  MyStatefulWidget({Key key}) : super(key: key);

  @override
  _MyStatefulWidgetState createState() => _MyStatefulWidgetState();
}

class _MyStatefulWidgetState extends State<MyStatefulWidget> {
  int _selectedIndex = 0;
  static const TextStyle optionStyle =
      TextStyle(fontSize: 30, fontWeight: FontWeight.bold);
  static List<Widget> _widgetOptions = <Widget>[
    HomePage(),
    HomePage(),
    HomePage(),
    HomePage(),
  ];

  void _onItemTapped(int index) {
    setState(() {
      _selectedIndex = index;
    });
  }

  @override
  Widget build(BuildContext context) {
    return Scaffold(
      body: Container(
        child: _widgetOptions.elementAt(_selectedIndex),
      ),
      bottomNavigationBar: BottomNavigationBar(
          items: <BottomNavigationBarItem>[
            BottomNavigationBarItem(
              icon: Image.asset('assets/icon-home.png'),
              title: Text('Home'),
            ),
            BottomNavigationBarItem(
              icon: Image.asset('assets/icon-mentors.png'),
              title: Text('Mentors'),
            ),
            BottomNavigationBarItem(
              icon: Image.asset('assets/icon-messages.png'),
              title: Text('Messages'),
            ),
            BottomNavigationBarItem(
              icon: Image.asset('assets/icon-settings.png'),
              title: Text('Settings'),
            ),
          ],
          currentIndex: _selectedIndex,
          selectedItemColor: Colors.blue,
          onTap: _onItemTapped),
    );
  }
}

看起来不是一项简单的任务。但可能您需要将 BottomNavigationBar 包装到 Material 小部件中。 至少 Material 的 API 文档表明它正在处理剪辑和成形。虽然我不确定它们是否有您需要的准备好的形状。 - Alexander Arendar
它已经包含在MaterialApp中了,请查看更新后的代码。 - Tushar Rai
4个回答

37

编辑

Scaffold现在有一个叫做extendBody的属性,可以用来将底部导航栏下方的body扩展。从文档中得知:

如果为true,并且指定了bottomNavigationBar或persistentFooterButtons,则body会延伸到Scaffold的底部,而不是仅延伸到bottomNavigationBar或persistentFooterButtons的顶部。

这意味着你所需做的就是:

class HomePage extends StatelessWidget {
  @override
  Widget build(BuildContext context) {
    return Scaffold(
      appBar: AppBar(
        title: const Text('Some Text'),
      ),
      body: bodyContent,
      extendBody: true,
      bottomNavigationBar: bottomNavigationBar,
    );
  }

  Widget get bodyContent {
    return Container(color: Colors.red);
  }

  Widget get bottomNavigationBar {
    return ClipRRect(
      borderRadius: const BorderRadius.only(
        topRight: Radius.circular(40),
        topLeft: Radius.circular(40),
      ),
      child: BottomNavigationBar(
        items: const [
          BottomNavigationBarItem(icon: Icon(Icons.home), label: '1'),
          BottomNavigationBarItem(icon: Icon(Icons.usb), label: '2'),
          BottomNavigationBarItem(
              icon: Icon(Icons.assignment_ind), label: '3'),
          BottomNavigationBarItem(
              icon: Icon(Icons.multiline_chart), label: '4'),
        ],
        unselectedItemColor: Colors.grey,
        selectedItemColor: Colors.black,
        showUnselectedLabels: true,
      ),
    );
  }
}

已过时

将其放入堆栈中。不要直接将底部导航栏添加到脚手架中。

class HomePage extends StatelessWidget {
  @override
  Widget build(BuildContext context) {
    return Scaffold(
      appBar: AppBar(
        title: Text('Some Text'),
      ),
      body: Stack(
        children: <Widget>[
          bodyContent,
          Positioned(
            left: 0,
            right: 0,
            bottom: 0,
            child: bottomNavigationBar,
          ),
        ],
      ),
    );
  }

  Widget get bodyContent {
    return Container(color: Colors.red);
  }

  Widget get bottomNavigationBar {
    return ClipRRect(
      borderRadius: BorderRadius.only(
        topRight: Radius.circular(40),
        topLeft: Radius.circular(40),
      ),
      child: BottomNavigationBar(
        items: [
          BottomNavigationBarItem(icon: Icon(Icons.home), title: Text('1')),
          BottomNavigationBarItem(icon: Icon(Icons.usb), title: Text('2')),
          BottomNavigationBarItem(
              icon: Icon(Icons.assignment_ind), title: Text('3')),
          BottomNavigationBarItem(
              icon: Icon(Icons.multiline_chart), title: Text('4')),
        ],
        unselectedItemColor: Colors.grey,
        selectedItemColor: Colors.black,
        showUnselectedLabels: true,
      ),
    );
  }
}

8

如果您的目标仅是添加borderRadius,您可以使用ClipRRect并将所需的borderRadius应用于其上。以下是我的解决方案实现:


  ClipRRect _getBtmNavBar() {
    return ClipRRect(
      borderRadius: BorderRadius.only(
        topLeft: Radius.circular(25),
        topRight: Radius.circular(25),
      ),
      child: BottomNavigationBar(
        currentIndex: _selectedIndex,
        onTap: _onTabTapped,
        selectedLabelStyle: TextStyle(
          color: Colors.black87,
          fontSize: 16,
        ),
        iconSize: 35,
        selectedItemColor: Colors.white,
        unselectedItemColor: Colors.black54,
        items: <BottomNavigationBarItem>[
          BottomNavigationBarItem(
            backgroundColor: kBottomNavBarBgColor,
            icon: Icon(Icons.home),
            title: Text('Home'),
          ),
// more BottomNavigationBarItem() goes here.

然后直接将其插入到底部导航栏中

代码示例:

return Scaffold(
// more Scaffold code goes here

//bottom navigationBar
      bottomNavigationBar: _getBtmNavBar(),
);

7

您可以像下面这样使用。

  1. 我的bottomNavigationBar图像如下所示: enter image description here

2. 这是代码:

        import 'package:flutter/material.dart';

    class BottomTab extends StatefulWidget {
      @override
      State<StatefulWidget> createState() {
        return _BottomTab();
      }
    }

    class _BottomTab extends State<BottomTab> {
      int _selectedTabIndex = 0;

      List _pages = [
        Text("Home"),
        Text("Order"),
        Text("Notfication"),
        Text("More"),
      ];

      _changeIndex(int index) {
        setState(() {
          _selectedTabIndex = index;
          print("index..." + index.toString());
        });
      }

      @override
      Widget build(BuildContext context) {
        return Scaffold(
          appBar: AppBar(
            title: Text('bottom nav bar'),
          ),
          body: Center(child: _pages[_selectedTabIndex]),
          bottomNavigationBar: bottomNavigationBar,
        );
      }

      Widget get bottomNavigationBar {
        return Container(
            decoration: BoxDecoration(
              borderRadius: BorderRadius.only(
                  topRight: Radius.circular(30), topLeft: Radius.circular(30)),
              boxShadow: [
                BoxShadow(color: Colors.black38, spreadRadius: 0, blurRadius: 10),
              ],
            ),
            child: ClipRRect(
              borderRadius: BorderRadius.only(
                topLeft: Radius.circular(30.0),
                topRight: Radius.circular(30.0),
              ),
              child: BottomNavigationBar(
                currentIndex: _selectedTabIndex,
                onTap: _changeIndex,
                type: BottomNavigationBarType.fixed,
                selectedFontSize: 12,
                unselectedFontSize: 12,
                selectedItemColor: Colors.amber[800],
                unselectedItemColor: Colors.grey[500],
                showUnselectedLabels: true,
                items: <BottomNavigationBarItem>[
                  BottomNavigationBarItem(
                    icon: new Icon(Icons.home),
                    title: new Text('Home'),
                  ),
                  BottomNavigationBarItem(
                    icon: new Icon(Icons.shopping_cart_outlined),
                    title: new Text('Order'),
                  ),
                  BottomNavigationBarItem(
                    icon: new Icon(Icons.mail),
                    title: new Text('Messages'),
                  ),
                  BottomNavigationBarItem(
                      icon: Icon(Icons.more_horiz_rounded), title: Text('More')),
                ],
              ),
            ));
      }
    }

2
只需将BottomNavigationBar放在圆形边框容器内的body中。 像这样(请参见附图!)
    Widget build(BuildContext context) {
    return MaterialApp(
        home: Scaffold(
      body: Container(
          decoration: BoxDecoration(
              image: DecorationImage(
                  image: new AssetImage("assets/images/background.jpg"),
                  fit: BoxFit.cover)),
          child: Stack(
            alignment: Alignment.bottomCenter,
            children: <Widget>[
              Expanded(
                child: Column(
                  children: <Widget>[
                    Expanded(child: _children[_currentIndex]),
                  ],
                ),
              ),
              Container(
                decoration: BoxDecoration(
                  color: Colors.white,
                  borderRadius: BorderRadius.only(
                      topLeft: Radius.circular(20),
                      topRight: Radius.circular(20),
                      bottomLeft: Radius.circular(0),
                      bottomRight: Radius.circular(0)),
                  boxShadow: [
                    BoxShadow(
                        offset: Offset(0.0, 1.00), //(x,y)
                        blurRadius: 4.00,
                        color: Colors.grey,
                        spreadRadius: 1.00),
                  ],
                ),
                height: 70,
                child: ClipRRect(
                    clipBehavior: Clip.hardEdge,
                    borderRadius: BorderRadius.only(
                        topLeft: Radius.circular(25),
                        topRight: Radius.circular(25),
                        bottomLeft: Radius.circular(0),
                        bottomRight: Radius.circular(0)),
                    child: Container(
                      child: BottomNavigationBar(
                        backgroundColor: Color.fromRGBO(255, 255, 255, 50),
                        showSelectedLabels: false,
                        showUnselectedLabels: false,
                        onTap: onTabTapped,
                        // new
                        currentIndex: _currentIndex,
                        // new
                        items: [
                          new BottomNavigationBarItem(
                            icon: Icon(
                              Icons.phone,
                              size: 30,
                            ),
                            title: Text('Calls'),
                          ),
                          new BottomNavigationBarItem(
                            icon: Icon(
                              Icons.mail,
                              size: 30,
                            ),
                            title: Text('Messages'),
                          ),
                          new BottomNavigationBarItem(
                              icon: Icon(
                                Icons.person,
                                size: 30,
                              ),
                              title: Text('Profile'))
                        ],
                      ),
                    )),
              )
            ],
          )),
    ));
  }

你实际上不需要单独包含底部导航栏,但是在主体中也要包含在一个圆形容器内。我已经实现了这一点,请查看附加的照片。 - Salman

网页内容由stack overflow 提供, 点击上面的
可以查看英文原文,
原文链接