我在TextStyle中搜索了阴影选项,但没有找到。所以我想问:在Flutter中如何为文本添加阴影?是否可能?
new Text(
"asd"
style: new TextStyle(
//add shadow?
));
从此提交开始,文本阴影现在是TextStyle的属性。
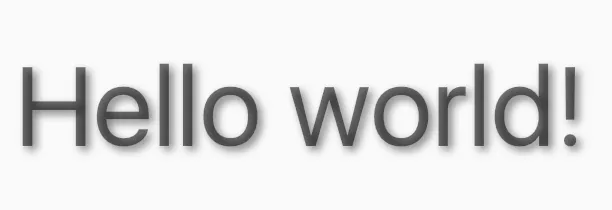
若要启用文本阴影,请确保您使用最新版本的Flutter($ flutter upgrade)并向TextStyle.shadows提供List<Shadow>:
import 'dart:ui';

...

Text(
  'Hello, world!',
  style: TextStyle(
    shadows: <Shadow>[
      Shadow(
        offset: Offset(10.0, 10.0),
        blurRadius: 3.0,
        color: Color.fromARGB(255, 0, 0, 0),
      ),
      Shadow(
        offset: Offset(10.0, 10.0),
        blurRadius: 8.0,
        color: Color.fromARGB(125, 0, 0, 255),
      ),
    ],
  ),
),

...
请记住,阴影将按照提供的顺序绘制。
Flutter现在提供了一种方法来避免任何解决方法的方式,如问题3402和下面Gary Qian的答案所述。
虽然这将进入更稳定的渠道,但可以使用BackdropFilter来模拟阴影效果。
import 'dart:ui' as ui;
import 'package:flutter/material.dart';

void main() {
  runApp(new MaterialApp(
    home: new MyApp(),
  ));
}

class ShadowText extends StatelessWidget {
  ShadowText(this.data, { this.style }) : assert(data != null);

  final String data;
  final TextStyle style;

  Widget build(BuildContext context) {
    return new ClipRect(
      child: new Stack(
        children: [
          new Positioned(
            top: 2.0,
            left: 2.0,
            child: new Text(
              data,
              style: style.copyWith(color: Colors.black.withOpacity(0.5)),
            ),
          ),
          new BackdropFilter(
            filter: new ui.ImageFilter.blur(sigmaX: 2.0, sigmaY: 2.0),
            child: new Text(data, style: style),
          ),
        ],
      ),
    );
  }
}

class MyApp extends StatelessWidget {
  @override
  Widget build(BuildContext context) {
    return new Scaffold(
      body: new Container(
        child: new Center(
          child: new ShadowText(
            'Hello world!',
            style: Theme.of(context).textTheme.display3,
          ),
        ),
      ),
    );
  }
}
或者如果你不关心模糊的效果,可以使用一些半透明的堆叠在一起,用一个Stack来实现。就像这样:
import 'package:flutter/material.dart';

class ShadowText extends StatelessWidget {

  final String data;
  final TextStyle style;
  final TextAlign textAlign;
  final TextDirection textDirection;
  final bool softWrap;
  final TextOverflow overflow;
  final double textScaleFactor;
  final int maxLines;

  const ShadowText(this.data, {
    Key key,
    this.style,
    this.textAlign,
    this.textDirection,
    this.softWrap,
    this.overflow,
    this.textScaleFactor,
    this.maxLines,
  }) : assert(data != null);

  Widget build(BuildContext context) {
    return new ClipRect(
      child: new Stack(
        children: [
          new Positioned(
            top: 2.0,
            left: 2.0,
            child: new Text(
              data,
              style: style.copyWith(color: Colors.black.withOpacity(0.5)),
              textAlign: textAlign,
              textDirection: textDirection,
              softWrap: softWrap,
              overflow: overflow,
              textScaleFactor: textScaleFactor,
              maxLines: maxLines,
            ),
          ),
          new Text(
            data,
            style: style,
            textAlign: textAlign,
            textDirection: textDirection,
            softWrap: softWrap,
            overflow: overflow,
            textScaleFactor: textScaleFactor,
            maxLines: maxLines,
          ),
        ],
      ),
    );
  }
}
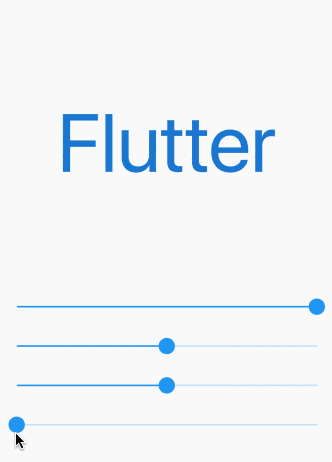
这里展示了一些对不透明度、偏移和阴影半径的调整:
完整代码请参考此处。欢迎亲自尝试。
import 'package:flutter/material.dart';

void main() => runApp(MyApp());

class MyApp extends StatelessWidget {
  @override
  Widget build(BuildContext context) {
    return MaterialApp(
      home: Scaffold(
        body: ShadowDemo(),
      ),
    );
  }
}

class ShadowDemo extends StatefulWidget {
  @override
  _ShadowDemoState createState() => _ShadowDemoState();
}

class _ShadowDemoState extends State<ShadowDemo> {
  var _opacity = 1.0;
  var _xOffset = 0.0;
  var _yOffset = 0.0;
  var _blurRadius = 0.0;

  @override
  Widget build(BuildContext context) {
    return Stack(
      children: <Widget>[
        Center(
            child: Text(
          'Flutter',
          style: TextStyle(
            fontSize: 100,
            color: Colors.blue.shade700,
            shadows: [
              Shadow(
                color: Colors.blue.shade900.withOpacity(_opacity),
                offset: Offset(_xOffset, _yOffset),
                blurRadius: _blurRadius,
              ),
            ],
          ),
        )),
        Align(
          alignment: Alignment.bottomCenter,
          child: Padding(
            padding: const EdgeInsets.only(bottom: 80.0),
            child: Column(
              children: <Widget>[
                Spacer(),
                Slider(
                  value: _opacity,
                  min: 0.0,
                  max: 1.0,
                  onChanged: (newValue) =>
                      {setState(() => _opacity = newValue)},
                ),
                Slider(
                  value: _xOffset,
                  min: -100,
                  max: 100,
                  onChanged: (newValue) =>
                      {setState(() => _xOffset = newValue)},
                ),
                Slider(
                  value: _yOffset,
                  min: -100,
                  max: 100,
                  onChanged: (newValue) =>
                      {setState(() => _yOffset = newValue)},
                ),
                Slider(
                  value: _blurRadius,
                  min: 0,
                  max: 100,
                  onChanged: (newValue) =>
                      {setState(() => _blurRadius = newValue)},
                ),
              ],
            ),
          ),
        )
      ],
    );
  }
}
import 'package:flutter/material.dart';

class ShadowText extends StatelessWidget {
  final String data;
  final TextStyle style;
  final TextAlign textAlign;
  final TextDirection textDirection;
  final bool softWrap;
  final TextOverflow overflow;
  final double textScaleFactor;
  final int maxLines;

  const ShadowText(
    this.data, {
    Key key,
    this.style,
    this.textAlign,
    this.textDirection,
    this.softWrap,
    this.overflow,
    this.textScaleFactor,
    this.maxLines,
  }) : assert(data != null);

  Widget build(BuildContext context) {
    AlignmentDirectional _align;
    switch (textAlign) {
      case TextAlign.justify:
      case TextAlign.center:
        _align = AlignmentDirectional.center;
        break;
      case TextAlign.end:
      case TextAlign.right:
        _align = AlignmentDirectional.centerEnd;
        break;
      case TextAlign.start:
      case TextAlign.left:
        _align = AlignmentDirectional.centerStart;
        break;
      default:
        _align = AlignmentDirectional.center;
    }
    return new ClipRect(
      child: new Stack(
        alignment: _align,
        children: [
          Text(data,
              style: style.copyWith(color: Colors.black.withOpacity(0.5)),
              textAlign: textAlign,
              textDirection: textDirection,
              softWrap: softWrap,
              overflow: overflow,
              textScaleFactor: textScaleFactor + 0.03,
              maxLines: maxLines),
          new Text(
            data,
            style: style,
            textAlign: textAlign,
            textDirection: textDirection,
            softWrap: softWrap,
            overflow: overflow,
            textScaleFactor: textScaleFactor,
            maxLines: maxLines,
          ),
        ],
      ),
    );
  }
}
然后,每当您想要使用此功能时,只需在顶部导入此文件,并将 Text() 替换为 ShadowText() 小部件。
shadows参数导出到Icon中: https://github.com/flutter/flutter/issues/83637 - Mateus Felipe