你好,我想在我的应用程序中像这样打开摄像头
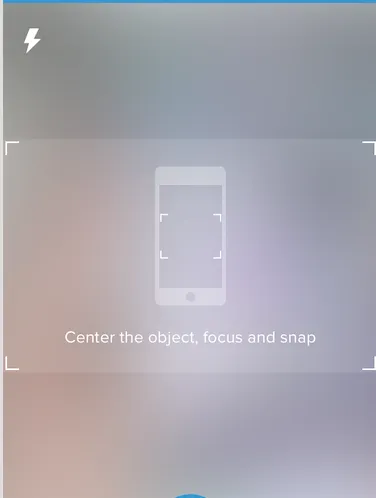
我只想在该部分的中间位置打开相机,以便用户只能在矩形区域拍摄快照
我正在使用的代码是这个
import UIKit
import AVFoundation

class TakeProductPhotoController: UIViewController {

    let captureSession = AVCaptureSession()
    var previewLayer : AVCaptureVideoPreviewLayer?

    // If we find a device we'll store it here for later use
    var captureDevice : AVCaptureDevice?

    override func viewDidLoad() {
        super.viewDidLoad()

        // Do any additional setup after loading the view, typically from a nib.
        captureSession.sessionPreset = AVCaptureSessionPresetHigh

        let devices = AVCaptureDevice.devices()

        // Loop through all the capture devices on this phone
        for device in devices {
            // Make sure this particular device supports video
            if (device.hasMediaType(AVMediaTypeVideo)) {
                // Finally check the position and confirm we've got the back camera
                if(device.position == AVCaptureDevicePosition.Back) {
                    captureDevice = device as? AVCaptureDevice
                    if captureDevice != nil {
                        print("Capture device found")
                        beginSession()
                    }
                }
            }
        }

    }
    func updateDeviceSettings(focusValue : Float, isoValue : Float) {
        let error: NSErrorPointer = nil

        if let device = captureDevice {
            do {
                try captureDevice!.lockForConfiguration()

            } catch let error1 as NSError {
                error.memory = error1
            }

                device.setFocusModeLockedWithLensPosition(focusValue, completionHandler: { (time) -> Void in
                    //
                })

                // Adjust the iso to clamp between minIso and maxIso based on the active format
                let minISO = device.activeFormat.minISO
                let maxISO = device.activeFormat.maxISO
                let clampedISO = isoValue * (maxISO - minISO) + minISO

                device.setExposureModeCustomWithDuration(AVCaptureExposureDurationCurrent, ISO: clampedISO, completionHandler: { (time) -> Void in
                    //
                })

                device.unlockForConfiguration()

        }
    }

    func touchPercent(touch : UITouch) -> CGPoint {
        // Get the dimensions of the screen in points
        let screenSize = UIScreen.mainScreen().bounds.size

        // Create an empty CGPoint object set to 0, 0
        var touchPer = CGPointZero

        // Set the x and y values to be the value of the tapped position, divided by the width/height of the screen
        touchPer.x = touch.locationInView(self.view).x / screenSize.width
        touchPer.y = touch.locationInView(self.view).y / screenSize.height

        // Return the populated CGPoint
        return touchPer
    }

    func focusTo(value : Float) {
        let error: NSErrorPointer = nil


        if let device = captureDevice {
            do {
                try captureDevice!.lockForConfiguration()

            } catch let error1 as NSError {
                error.memory = error1
            }

                device.setFocusModeLockedWithLensPosition(value, completionHandler: { (time) -> Void in
                    //
                })
                device.unlockForConfiguration()

        }
    }

    let screenWidth = UIScreen.mainScreen().bounds.size.width

    override func touchesBegan(touches: Set<UITouch>, withEvent event: UIEvent?) {
        //if let touchPer = touches.first {
            let touchPer = touchPercent( touches.first! as UITouch )
         updateDeviceSettings(Float(touchPer.x), isoValue: Float(touchPer.y))


        super.touchesBegan(touches, withEvent:event)
    }

   override func touchesMoved(touches: Set<UITouch>, withEvent event: UIEvent?) {
      // if let anyTouch = touches.first {
           let touchPer = touchPercent( touches.first! as UITouch )
       // let touchPercent = anyTouch.locationInView(self.view).x / screenWidth
  //      focusTo(Float(touchPercent))
    updateDeviceSettings(Float(touchPer.x), isoValue: Float(touchPer.y))

    }

    func configureDevice() {
          let error: NSErrorPointer = nil
        if let device = captureDevice {
            //device.lockForConfiguration(nil)

            do {
                try captureDevice!.lockForConfiguration()

            } catch let error1 as NSError {
                error.memory = error1
            }

            device.focusMode = .Locked
            device.unlockForConfiguration()
        }

    }

    func beginSession() {
        configureDevice()
        var err : NSError? = nil

        var deviceInput: AVCaptureDeviceInput!
        do {
            deviceInput = try AVCaptureDeviceInput(device: captureDevice)

        } catch let error as NSError {
            err = error
            deviceInput = nil
        };


        captureSession.addInput(deviceInput)

        if err != nil {
            print("error: \(err?.localizedDescription)")
        }

        previewLayer = AVCaptureVideoPreviewLayer(session: captureSession)

        self.view.layer.addSublayer(previewLayer!)
        previewLayer?.frame = self.view.layer.frame
        captureSession.startRunning()
    }
}
在这段代码中,相机占据整个屏幕。