我有兴趣使用自定义叠加层来控制整个屏幕的相机控件,非常类似于默认的相机应用程序在切换到视频功能时所做的操作。
我参考了这个问题以及苹果关于如何为UIImagePickerController使用自定义叠加层的示例等几个SO问题,但它们都无法在iOS 7中产生成功的全屏结果。
到目前为止,摄像头UI看起来是这样的(没有任何按钮):
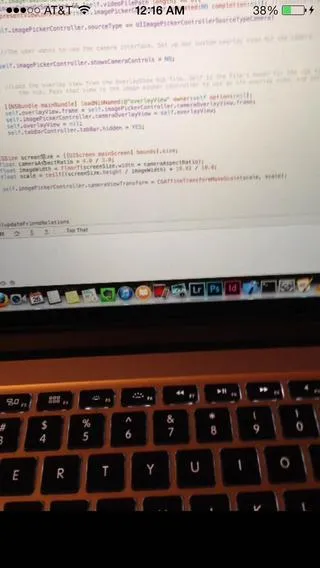
请注意,屏幕底部有一条黑色条。我注意到如果将cameraAspectRatio更改为1,可以去掉黑色条,但这会扭曲相机缩放,因为它然后具有非常缩小的视图。是否有一种方式可以完全全屏,既不会过度扭曲缩放(我知道需要留下一点),也可以删除黑条?
这是配置自定义叠加层的代码:
{
        self.imagePickerController.showsCameraControls = NO;

        [[NSBundle mainBundle] loadNibNamed:@"overlayView" owner:self options:nil];
        self.overlayView.frame = self.imagePickerController.cameraOverlayView.frame;
        self.imagePickerController.cameraOverlayView = self.overlayView;
        self.overlayView = nil;

        // Device's screen size (ignoring rotation intentionally):
        CGSize screenSize = [[UIScreen mainScreen] bounds].size;


        float cameraAspectRatio = 4.0 / 3.0; //! Note: 4.0 and 4.0 works
        float imageWidth = floorf(screenSize.width * cameraAspectRatio);
        float scale = ceilf((screenSize.height / imageWidth) * 10.0) / 10.0;

        self.imagePickerController.cameraViewTransform = CGAffineTransformMakeScale(scale, scale);

    }
更新:
我发现另一个问题是,在相机预览中显示的图片总是比使用方法[self.imagePickerController takePicture]拍摄保存的图片更小,细节也较少。举个例子:
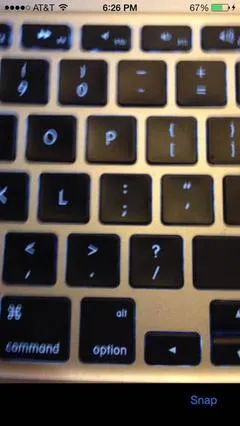
这是相机预览中键盘的样子,下面有一条黑色的条纹(抱歉,有些模糊):
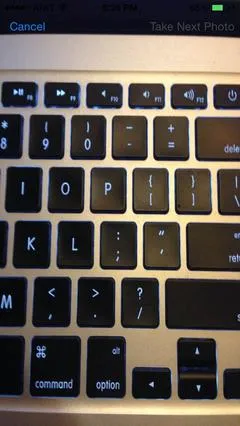
然而,请注意实际捕获的图像在预览面板中具有更多的细节,正如这里所示,尤其是向上以及左右两侧:
我的问题是,如何能够设置相机预览,使用户在预览中看到的正是它将要捕获并可以在之后向他们呈现的图像?谢谢!
更新2:
以下是viewDidLoad中设置相机控件的整个代码。
- (void)viewDidLoad
{
    [super viewDidLoad];

    //Appearance configuration
    self.navigationItem.hidesBackButton = YES;

    //UIImagePickerController initialization and setup
    self.imagePickerController = [[UIImagePickerController alloc] init];
    self.imagePickerController.delegate = self;
    self.imagePickerController.allowsEditing = NO;
    if ([UIImagePickerController isSourceTypeAvailable:UIImagePickerControllerSourceTypeCamera]){
        self.imagePickerController.sourceType = UIImagePickerControllerSourceTypeCamera; //if there is a camera avaliable
    } else {
        self.imagePickerController.sourceType = UIImagePickerControllerSourceTypePhotoLibrary;//otherwise go to the folder
    }
    self.imagePickerController.mediaTypes = [[NSArray alloc] initWithObjects: (NSString *) kUTTypeImage, nil];
    if (self.imagePickerController.sourceType == UIImagePickerControllerSourceTypeCamera)
    {
        self.imagePickerController.showsCameraControls = NO;

        [[NSBundle mainBundle] loadNibNamed:@"overlayView" owner:self options:nil];
        self.overlayView.frame = self.imagePickerController.cameraOverlayView.frame;
        self.imagePickerController.cameraOverlayView = self.overlayView;
        self.overlayView = nil;

        // Device's screen size (ignoring rotation intentionally):
        CGSize screenSize = [[UIScreen mainScreen] bounds].size;

        int heightOffset = 0;

        if(SYSTEM_VERSION_GREATER_THAN_OR_EQUAL_TO(@"7.0"))
        {
            heightOffset = 120; //whole screen :)
        }

        float cameraAspectRatio = 4.0 / 3.0; //! Note: 4.0 and 4.0 works
        float imageWidth = floorf(screenSize.width * cameraAspectRatio);
        float scale = ceilf(((screenSize.height + heightOffset) / imageWidth) * 10.0) / 10.0;

        self.imagePickerController.cameraViewTransform = CGAffineTransformMakeScale(scale, scale);

    }
}
在viewWillAppear方法中,我调用了图片选择器视图:
BOOL modalPresent = (BOOL)(self.presentedViewController);
    //Present the Camera UIImagePicker if no image is taken
    if (!appDelegate.imageStorageDictionary[@"picture1"]){
        if (modalPresent == NO){ //checks if the UIImagePickerController is modally active
            [self presentViewController:self.imagePickerController animated:NO completion:nil];
        }
    }