在JavaFX上对三角形网格中的单个三角形进行着色

7
我在JAVAFX中有一个三角网格对象,希望能够实现以下两种情况之一:
1. 对于三角网格的每个三角形进行单独着色。
2. 对于每个三角形的各个顶点进行单独着色,并根据每个顶点的颜色进行插值,使整个三角形呈现出高洛德着色(Gouraud shading)的效果。
由于这个三角网格对象是一个拥有数百万个面的球体(因此我需要快速处理),我没有使用纹理坐标。同时,我也没有找到关于在JAVAFX中使用纹理坐标的清晰说明,因此我希望有一个更简单的方法来实现我的需求。
2个回答

13

JavaFX 3D网格的着色方式是通过分配给它们的材料来实现的。一个网格有一个材质,不可能为同一网格的不同三角形分配不同的材质。

因此,如果您想避免使用纹理,恐怕唯一的方法是将具有相同颜色的三角形分组到同一网格中,并创建许多颜色的网格。

相反,使用纹理相对容易... 因为你只需要一个网格、一个材质和一张包含所有着色的图像。

我做了一个二十面体的例子,为其构建了一个三角形网格,并添加了一个单一的纹理来着色所有的面。

为此,我们需要:

  • 12个顶点的3D坐标
  • 用于纹理映射的2D归一化坐标
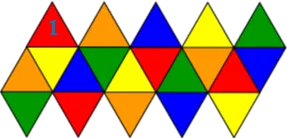
  • 20个面。每个面由6个索引p0、t0、p1、t1、p3、t3定义,其中p0、p1、p2和p3是指向点数组的索引,t0、t1、t2和t3是指向texCoords数组的索引。

    public class IcosahedronMesh extends MeshView {

    public IcosahedronMesh(){
        setMesh(createCube());
    }
    private TriangleMesh createCube() {
        TriangleMesh m = new TriangleMesh();
    
        // POINTS
        m.getPoints().addAll(
            0f, 0f, -0.951057f, 
            0f, 0f, 0.951057f, 
            -0.850651f, 0f, -0.425325f, 
            0.850651f, 0f, 0.425325f, 
            0.688191f, -0.5f, -0.425325f, 
            0.688191f, 0.5f, -0.425325f, 
            -0.688191f, -0.5f, 0.425325f, 
            -0.688191f, 0.5f, 0.425325f, 
            -0.262866f, -0.809017f, -0.425325f, 
            -0.262866f, 0.809017f, -0.425325f, 
            0.262866f, -0.809017f, 0.425325f, 
            0.262866f, 0.809017f, 0.425325f
        );
    
        // TEXTURES
        m.getTexCoords().addAll(
                0.181818f, 0f, 
                0.363636f, 0f, 
                0.545455f, 0f, 
                0.727273f, 0f, 
                0.909091f, 0f,
                0.0909091f, 0.333333f,
                0.272727f, 0.333333f, 
                0.454545f, 0.333333f, 
                0.636364f, 0.333333f, 
                0.818182f, 0.333333f, 
                1f, 0.333333f, 
                0f, 0.666667f, 
                0.181818f, 0.666667f, 
                0.363636f, 0.666667f, 
                0.545455f, 0.666667f, 
                0.727273f, 0.666667f, 
                0.909091f, 0.666667f, 
                0.0909091f, 1f, 
                0.272727f, 1f, 
                0.454545f, 1f, 
                0.636364f, 1f, 
                0.818182f, 1f
        );
    
        // FACES
        m.getFaces().addAll(
                1, 6, 11, 5, 7, 0, 
                1, 12, 7, 11, 6, 5, 
                1, 7, 6, 6, 10, 1, 
                1, 13, 10, 12, 3, 6, 
                1, 8, 3, 7, 11, 2,
                4, 14, 8, 13, 0, 7, 
                5, 9, 4, 8, 0, 3, 
                9, 15, 5, 14, 0, 8, 
                2, 10, 9, 9, 0, 4, 
                8, 16, 2, 15, 0, 9,
                11, 5, 9, 6, 7, 12,
                7, 11, 2, 12, 6, 17, 
                6, 6, 8, 7, 10, 13, 
                10, 12, 4, 13, 3, 18, 
                3, 7, 5, 8, 11, 14,
                4, 13, 10, 14, 8, 19, 
                5, 8, 3, 9, 4, 15, 
                9, 14, 11, 15, 5, 20, 
                2, 9, 7, 10, 9, 16, 
                8, 15, 6, 16, 2, 21
        );
        return m;
    }
    

    }

现在我们需要一个基于正二十面体的展开图,每个面都有相应的颜色,就像这样:

正二十面体的展开图

(图片来源在这里)

请注意,映射是从(0,0)到(1,1)标准化坐标到图像(left,top)到(right, bottom)像素的。

最后让我们创建场景,加载网格并将纹理添加到其材质中:

@Override
public void start(Stage primaryStage) throws Exception {
    Group sceneRoot = new Group();
    Scene scene = new Scene(sceneRoot, 600, 600, true, SceneAntialiasing.BALANCED);
    scene.setFill(Color.BLACK);
    PerspectiveCamera camera = new PerspectiveCamera(true);
    camera.setNearClip(0.1);
    camera.setFarClip(10000.0);
    camera.setTranslateZ(-4);
    scene.setCamera(camera);

    IcosahedronMesh mesh = new IcosahedronMesh();
    mesh.setCullFace(CullFace.FRONT);
    PhongMaterial mat = new PhongMaterial();
    mat.setDiffuseMap(new Image(getClass().getResourceAsStream("icosah_net.png")));
    mesh.setMaterial(mat);
    Rotate rotateY = new Rotate(0, 0, 0, 0, Rotate.Y_AXIS);
    mesh.getTransforms().addAll(new Rotate(30,Rotate.X_AXIS),rotateY);

    sceneRoot.getChildren().addAll(mesh, new AmbientLight(Color.WHITE));

    primaryStage.setTitle("JavaFX 3D - Icosahedron");
    primaryStage.setScene(scene);
    primaryStage.show();        
}
这就是它的外观: Icosahedron 编辑 现在,如果你考虑纹理是如何应用的,你可以使用所需颜色的调色板将图像简化为几个正方形: Palette of colors 而纹理坐标也可以被大大简化:
m.getTexCoords().addAll(
        0.1f, 0.5f, // 0 red
        0.3f, 0.5f, // 1 green
        0.5f, 0.5f, // 2 blue
        0.7f, 0.5f, // 3 yellow
        0.9f, 0.5f  // 4 orange
);

最后,我们需要在脸上映射这些点。按照与网络图像相同的模式进行:

m.getFaces().addAll(
        1, 0, 11, 0, 7, 0, 
        1, 4, 7, 4, 6, 4, 
        1, 4, 6, 4, 10, 4, 
        1, 2, 10, 2, 3, 2, 
        1, 2, 3, 2, 11, 2,                
        4, 3, 8, 3, 0, 3, 
        5, 3, 4, 3, 0, 3, 
        9, 1, 5, 1, 0, 1, 
        2, 1, 9, 1, 0, 1, 
        8, 0, 2, 0, 0, 0, 

        11, 3, 9, 3, 7, 3,
        7, 1, 2, 1, 6, 1, 
        6, 1, 8, 1, 10, 1, 
        10, 0, 4, 0, 3, 0, 
        3, 0, 5, 0, 11, 0,

        4, 4, 10, 4, 8, 4, 
        5, 4, 3, 4, 4, 4, 
        9, 2, 11, 2, 5, 2, 
        2, 2, 7, 2, 9, 2, 
        8, 3, 6, 3, 2, 3
);

现在我们将拥有一个非常整洁的二十面体,因为我们去掉了图像的边框和低分辨率:

改进的二十面体

这可以扩展到任何三角网格,或者使用任何算法来细化三角形。


这个最后的编辑(使用彩色方块板)真的很有帮助,因为我已经为我的球面图分配了一个颜色映射函数。一旦我做出更改,我会发布我的完成代码。谢谢! - Alvaro Alvarez Parrilla
当然可以,因为提供完整的图像可能会非常困难。使用颜色映射函数,您仍需要创建一个小图像,但是您可以在运行时使用“快照”!顺便说一下,我还为[icosphere](https://twitter.com/JPeredaDnr/status/531912722225831936)编写了算法... - José Pereda
有没有办法可以避免必须将图像文件写入磁盘(或外部设备)以使用纹理?换句话说:我能否在不使用Image的情况下使用特定的纹理?由于我的颜色映射将在运行时更改,因此我不想每次运行时都必须写入磁盘。此外,对于使用我的应用程序的某些人来说,这可能是一个安全问题(写入磁盘)。@Jose - Alvaro Alvarez Parrilla
我已经发布了创建一个icosphere和一组颜色的所有代码在这里,在F(X)yz库中。 - José Pereda
@AlvaroAlvarezParrilla 同时,你找到了不写入磁盘的解决方案吗? - Simon Marynissen
@SimonMarynissen,请查看FXyz3D中Palette的实现,它可以根据一些颜色生成纹理图像。正如您在这里所看到的,您可以选择不将图像保存到文件中。 - José Pereda

0
感谢José提供这个非常有帮助的介绍,并提示他基于多种颜色实现的方法。
为了更好地理解如何在没有从磁盘读取图片的情况下创建彩色材料,我修改了José在此处提供的示例。
应用程序主类:
public class IcosahedronApp extends Application {
    @Override
    public void start(Stage primaryStage) throws Exception {
        Group sceneRoot = new Group();
        Scene scene = new Scene(sceneRoot, 600, 600, true, SceneAntialiasing.BALANCED);
        scene.setFill(Color.BLACK);
        PerspectiveCamera camera = new PerspectiveCamera(true);
        camera.setNearClip(0.1);
        camera.setFarClip(10000.0);
        camera.setTranslateZ(-4);
        scene.setCamera(camera);
        IcosahedronMesh mesh = new IcosahedronMesh();
        mesh.setCullFace(CullFace.FRONT);
        Rotate rotateY = new Rotate(0, 0, 0, 0, Rotate.Y_AXIS);
        mesh.getTransforms().addAll(new Rotate(30,Rotate.X_AXIS),rotateY);
        sceneRoot.getChildren().addAll(mesh, new AmbientLight(Color.WHITE));
        primaryStage.setTitle("JavaFX 3D - Icosahedron");
        primaryStage.setScene(scene);
        primaryStage.show();        
    }
    
    public static void main(String[] args) {
        launch(args);
    }
}

和正二十面体网格

public class IcosahedronMesh extends MeshView {
    private final static Color[] COLORS = {
        Color.RED,
        Color.GREEN,
        Color.BLUE,
        Color.YELLOW,
        Color.ORANGE,
    };

    public IcosahedronMesh() {
        setMesh(createCube());
    }

    private TriangleMesh createCube() {
        TriangleMesh m = new TriangleMesh();
        // coloring
        PhongMaterial mat = new PhongMaterial();
        WritableImage image = new WritableImage(COLORS.length, 1);
        PixelWriter writer = image.getPixelWriter();
        for (int i = 0; i < COLORS.length; i++)
            writer.setColor(i, 0, COLORS[i]);
        mat.setDiffuseMap(image);
        setMaterial(mat);
        // POINTS
        m.getPoints().addAll(
                // Point 1
                0f, 0f, -0.951057f,
                // Point 2
                0f, 0f, 0.951057f,
                // Point 3
                -0.850651f, 0f, -0.425325f,
                // Point 4
                0.850651f, 0f, 0.425325f,
                // Point 5
                0.688191f, -0.5f, -0.425325f,
                // Point 6
                0.688191f, 0.5f, -0.425325f,
                // Point 7
                -0.688191f, -0.5f, 0.425325f,
                // Point 8
                -0.688191f, 0.5f, 0.425325f,
                // Point 9
                -0.262866f, -0.809017f, -0.425325f,
                // Point 10
                -0.262866f, 0.809017f, -0.425325f,
                // Point 11
                0.262866f, -0.809017f, 0.425325f,
                // Point 12
                0.262866f, 0.809017f, 0.425325f);
        // TEXTURES
        m.getTexCoords().addAll(
                // 0 red
                0.1f, 0.5f,
                // 1 green
                0.3f, 0.5f,
                // 2 blue
                0.5f, 0.5f,
                // 3 yellow
                0.7f, 0.5f,
                // 4 orange
                0.9f, 0.5f);
        // FACES
        m.getFaces().addAll(
                // Face 1
                1, 0, 11, 0, 7, 0,
                // Face 2
                1, 4, 7, 4, 6, 4,
                // Face 3
                1, 4, 6, 4, 10, 4,
                // Face 4
                1, 2, 10, 2, 3, 2,
                // Face 5
                1, 2, 3, 2, 11, 2,
                // Face 6
                4, 3, 8, 3, 0, 3,
                // Face 7
                5, 3, 4, 3, 0, 3,
                // Face 8
                9, 1, 5, 1, 0, 1,
                // Face 9
                2, 1, 9, 1, 0, 1,
                // Face 10
                8, 0, 2, 0, 0, 0,
                // Face 11
                11, 3, 9, 3, 7, 3,
                // Face 12
                7, 1, 2, 1, 6, 1,
                // Face 13
                6, 1, 8, 1, 10, 1,
                // Face 14
                10, 0, 4, 0, 3, 0,
                // Face 15
                3, 0, 5, 0, 11, 0,
                // Face 16
                4, 4, 10, 4, 8, 4,
                // Face 17
                5, 4, 3, 4, 4, 4,
                // Face 18
                9, 2, 11, 2, 5, 2,
                // Face 19
                2, 2, 7, 2, 9, 2,
                // Face 20
                8, 3, 6, 3, 2, 3);
        return m;
    }
}

这大概是来自José的最后一个例子了。我只是用WritableImage替换了漫反射贴图。

看起来运行良好...


网页内容由stack overflow 提供, 点击上面的
可以查看英文原文,
原文链接