我该如何在React Native中添加一个不透明的圆形覆盖层到一张图片上?类似于Instagram的图片选择器:
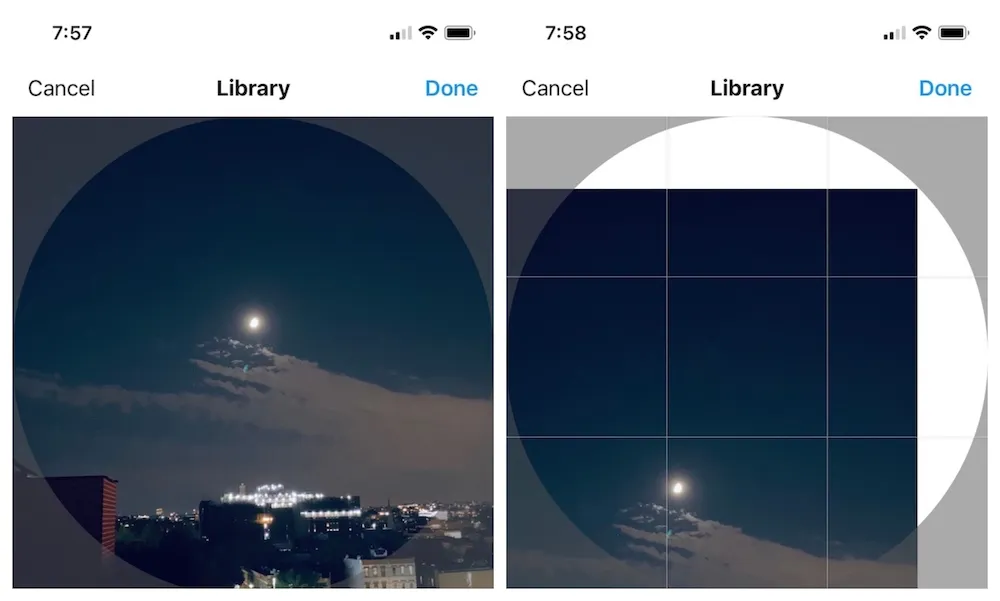
尽管这看起来是一个微不足道的任务,但我在复制这个过程中遇到了很多麻烦。 有什么建议吗?
我该如何在React Native中添加一个不透明的圆形覆盖层到一张图片上?类似于Instagram的图片选择器:
尽管这看起来是一个微不足道的任务,但我在复制这个过程中遇到了很多麻烦。 有什么建议吗?
就像评论中有人提到的那样,实现此功能的方法是使用React Native Masked View。
运行以下命令在你的项目中安装它:
npm install -S @react-native-community/masked-view
yarn add @react-native-community/masked-view
接下来您可以按如下方式使用它。我已经为您适配了他们README中的示例:
import MaskedView from '@react-native-community/masked-view';
import React from 'react';
import { View } from 'react-native';

export default class App extends React.Component {
  render() {
    return (
      <View
        style={{
          flex: 1,
          backgroundColor: '#000000', // "Edge" background
          maxHeight: 400,
        }}
      >
        <MaskedView
          style={{ flex: 1 }}
          maskElement={
            <View
              style={{
                // Transparent background mask
                backgroundColor: '#00000077', // The '77' here sets the alpha
                flex: 1,
              }}
            >
              <View
                style={{
                  // Solid background as the aperture of the lens-eye.
                  backgroundColor: '#ff00ff',
                  // If you have a set height or width, set this to half
                  borderRadius: 200,
                  flex: 1,
                }}
              />
            </View>
          }
        >
          {/* Shows behind the mask, you can put anything here, such as an image */}
          <View style={{ flex: 1, height: '100%', backgroundColor: '#324376' }} />
          <View style={{ flex: 1, height: '100%', backgroundColor: '#F5DD90' }} />
          <View style={{ flex: 1, height: '100%', backgroundColor: '#F76C5E' }} />
          <View style={{ flex: 1, height: '100%', backgroundColor: '#2E6D3E' }} />
        </MaskedView>
      </View>
    );
  }
}
import React from 'react';
import {
  SafeAreaView,
  StyleSheet,
  View,
  Image,
  Text
} from 'react-native';

const Test = () => {
  return (
    <SafeAreaView style={{flex: 1}}>
      <View style={styles.container}>
        <Image
          source={{
            uri: 'https://raw.githubusercontent.com/AboutReact/sampleresource/master/old_logo.png'
          }}
          //borderRadius will help to make Round Shape
          style={{
            width: 200,
            height: 200,
            borderRadius: 200 / 2
          }}
        />
        <Text style={styles.textHeadingStyle}>
          About React
        </Text>
      </View>
    </SafeAreaView>
  );
};

const styles = StyleSheet.create({
  container: {
    flex: 1,
    justifyContent: 'center',
    alignItems: 'center',
    backgroundColor: '#e0dcdc',
  },
  textHeadingStyle: {
    marginTop: 30,
    fontSize: 40,
    color: '#0250a3',
    fontWeight: 'bold',
  },
});

export default Test;
import React, { Component } from 'react';
import {
  View,
  StyleSheet,
  Text,
  ScrollView,
  TouchableOpacity,
} from 'react-native';
import styles from './styles';
import { Circle, CustomHeader, CustomImage, CTNexaBold } from '../../components';
import translate from '../../translations/translate';
import { images, icons } from '../../assets'
import { widthPercentageToDP as wp, heightPercentageToDP as hp } from 'react-native-responsive-screen';
import utils from '../../utils';
import { Colors } from '../../common';
import ImagePicker from 'react-native-image-crop-picker';

class UploadProfilePicture extends Component {
  constructor(props) {
    super(props);
    this.state = {
      profileImage: '',
      isProfileImage: false,
    };
  }

  componentDidMount() {

  };

  changeProfilePhoto() {
    ImagePicker.openPicker({
      width: 300,
      height: 400,
      cropping: true
    }).then(image => {
      this.setState({
        profileImage: image.path,
        isProfileImage: true,
      })
    });
  }

  render() {
    const { profileImage, isProfileImage } = this.state
    return (
      <View style={styles.container}>
        {utils.statusBar('dark-content', Colors.white)}
        <CustomHeader
          title={<CTNexaBold customStyle={styles.customStyle} >{translate("Upload Profile Picture")}</CTNexaBold>}
          {...this.props}
        />
        <View style={{ flex: 0.8, alignItems: 'center', justifyContent: 'center', marginBottom: 200 }} >
          <View>
            <Circle
              width={wp('44%')}
              height={wp('44%')}
              borderRadius={wp('44%')}
              borderColor={'#A28A3D'}
              marginVertical={40}
              marginHorizontal={70}
            >
              <CustomImage
                style={styles.userAvatar}
                // source={images.iconProfile}
                source={ isProfileImage ?  { uri: profileImage } : images.iconProfile }
              />
            </Circle>
          </View>
          <View style={{ marginHorizontal: wp('10%') }} >
            <TouchableOpacity onPress={()=>this.changeProfilePhoto()} >
              <View style={{ flexDirection: 'row', justifyContent: 'space-between' }} >
                <CTNexaBold customStyle={styles.profileText} >Change Profile Photo</CTNexaBold>
              <CustomImage
                style={styles.containerCustomImage}
                source={icons.arrowRight}
                />
              </View>
            </TouchableOpacity>
          </View>
        </View>
        <View style={{ flex: 0.2, alignItems: 'center', justifyContent: 'center', marginBottom: 20 }} >
          <TouchableOpacity style={styles.saveButton} >
            <CTNexaBold customStyle={styles.saveButtonText} >SAVE</CTNexaBold>
          </TouchableOpacity>
        </View>
      </View>
    );
  }
}


export default UploadProfilePicture;
react-native-image-crop是否支持透明背景部分。 - 5ebMediaLibrary库从头开始实现了自己的图像选择器模态框。当然,如果我知道如何使用遮罩视图来解决这个问题,那肯定足够了。 - John Jackson