React Native中如何在图片上叠加按钮

11
我正在尝试在React Native中实现以下效果:

image with an icon in the corner

这张图片的角落有一个按钮。无论图片的大小或长宽比如何,该按钮始终在图片的角落内,并且图片的任何部分都不会被裁剪(它总是缩小以完全适应框内)。
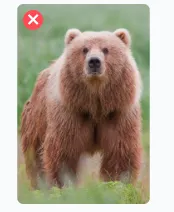
我在React Native中遇到的问题是Image组件的大小并不总是与图像的缩小大小匹配。如果我将图像的高度固定为300,并设置flex 1使图像的宽度扩展以填充其内容,并且图像是肖像,则Image组件将成为容器的全宽度,但组件内的图像宽度要小得多。因此,常规方法来使视图覆盖另一个视图不起作用-我的覆盖还覆盖了图片周围的填充,并且位于角落的按钮出现在图片外面。
以下是在React Native中的示例:

portrait image with button overlay in React Native

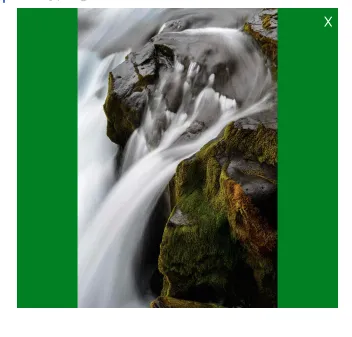
X是按钮的占位符。它被设置为锚定到与图像相同的View的子View的左上角。图像的背景颜色设置为绿色,以演示Image组件的宽度与组件中的图片的宽度不同。

目标是,X无论其纵横比如何,都应在图像内部。我认为我可以基于获取图像的尺寸并缩放Image组件的高度和宽度来做一些事情,但这听起来很复杂且易碎。是否可以使用样式以响应方式实现此目标?

演示代码:

   <View
      style={{
        marginLeft: 7,
        marginRight: 7,
        backgroundColor: 'blue',
      }}
    >
      <View
        style={{
          height: 300,
          flex: 1,
        }}
      >
        <Image
          source={imageSource}
          style={{
            flex: 1,
            height: undefined,
            width: undefined,
            backgroundColor: 'green',
          }}
          resizeMode="contain"
        />
      </View>
      <View
        style={{
          position: 'absolute',
          right: 5,
          top: 5,
          backgroundColor: 'transparent',
        }}
      >
        <Text style={{ color: 'white' }}>X</Text>
      </View>
    </View>
4个回答

21

从React Native v0.50.0开始,不再支持嵌套内容的<Image>。请使用<ImageBackground>替代。

<ImageBackground
  source={imageSource}
>
    <View>
        <Text>×</Text>
    </View>
</ImageBackground>

7

这是我完成的方法:

import React, { Component } from "react";
import { View, Image, StyleSheet } from "react-native";
import { Ionicons } from "@expo/vector-icons";

class MyCard extends Component {
  render() {
    return (
      <View style={styles.container}>
        <Image
          resizeMode="cover"
          style={styles.cover}
          source={{ uri: "https://picsum.photos/700" }}
        />
        <Ionicons style={styles.close} name="ios-close-circle" size={25} />
      </View>
    );
  }
}

export default MyCard;

const styles = StyleSheet.create({
  container: {
    margin: 5,
    width: 160,
    height: 200
  },
  cover: {
    flex: 1,
    borderRadius: 5
  },
  close: {
    margin: 5,
    position: "absolute",
    top: 0,
    left: 0,
    width: 25,
    height: 25,
    color: "tomato"
  }
});

这是它的外观:

在这里输入图像描述


3

更新于2019年6月29日

现在(react-native@0.60-RC),有一个特定的组件来包装元素作为图像背景,ImageBackground。请查看官方文档。

以下代码片段已更改。


原始答案

我们可以使用<Image/>显示图像,并将其用作background-image的hack方法。

请尝试此方法:

<Image
  source={imageSource}
>
  <View>
    <Text>×</Text>
  </View>
</Image>

这个代码片段 是你所需的完整演示。

或者你可以在 Expo 上实时查看它:

<div data-snack-id="B1SsJ7m2b" data-snack-platform="ios" data-snack-preview="true" data-snack-theme="light" style="overflow:hidden;background:#fafafa;border:1px solid rgba(0,0,0,.16);border-radius:4px;height:505px;width:100%"></div>
<script async src="https://snack.expo.io/embed.js"></script>


谢谢,我很感激这个详细的例子。不幸的是,这将限制图像为固定的宽高比。如果图像是3x2的肖像模式,它看起来完美,但如果是2x3或4x3或其他什么比例,图像就会被裁剪。我真的希望能找到一些可以根据图像的宽高比进行调整而无需确定图像尺寸并基于它们计算自定义宽度和高度的方法(或者至少找出除了这样做之外是否不可能)。 - Keith Kurak
1
你好,你的意思是想要这样的布局并根据图像缩放宽度和高度吗?这不是问题。Image组件有一个静态方法叫做Image.getSize,你可以获取图像的宽度和高度,然后设置一个固定的宽度,计算组件的高度,然后你就可以制作出像Pinterest一样的流式图像布局。如果需要详细的示例,请随时回复。说到无需重新计算即可调整大小,这是不可能的。 - Oboo Cheng
异常:错误: <Image> 组件不能包含子元素。如果您想在图像上方呈现内容,请考虑使用绝对定位。在react-native中:"0.51.0" - Stanislau Buzunko
@StanislauBuzunko 是的,团队在发布0.50版本时进行了更改,发布说明在这里,请使用ImageBackground组件。参考文献在这里 - Oboo Cheng
@ObooChin,你说的Image.getSize()是正确的。我会发布更详细的示例。感谢你的提示! - Keith Kurak

0

所以,正如@ObooChin所提到的那样,您可以使用Image.getSize()获取图像的实际大小,然后根据a)您希望图像占用的最大空间和b)实际图像尺寸的宽高比生成高度和宽度。

import React, { Component } from 'react';
import {
  StyleSheet,
  Image,
  View,
  Dimensions,
} from 'react-native';

export default class FlexibleThumbnail extends Component {

    constructor(props) {
        super(props)

        this.state = {
            imageWidth: 0,
            imageHeight: 0,
            source: null,
        }
    }

    componentWillMount() {
        this._updateState(this.props)
    }

    componentWillReceiveProps(nextProps) {
        this._updateState(nextProps)
    }

    _updateState(props) {
        const {source} = props;
        const height = props.maxHeight;
        const width = props.maxWidth || Dimensions.get('window').width;

        const imageUri = source.uri;

        Image.getSize(imageUri, (iw, ih) => {
            const {imageWidth, imageHeight} = /* some function that takes max height, width and image height, width and outputs actual dimensions image should be */

            this.setState({
                imageWidth,
                imageHeight,
                source,
            });
        });
    }

    render() {
        const {source, height, width, imageWidth, imageHeight} = this.state;

        const overlay = (/* JSX for your overlay here */);

        // only display once the source is set in response to getSize() finishing
        if (source) {
            return (
                <View style={{width: imageWidth, height: imageHeight}} >
                    <Image
                        style={[ imageStyle, {width: imageWidth, height: imageHeight} ]}
                        resizeMode="contain"
                        source={source}
                    />
                        <View style={{
                            position: 'absolute',
                            top: 0,
                            bottom: 0,
                            left: 0,
                            right: 0,
                            backgroundColor: 'transparent',
                        }}>
                            {overlay}
                        </View>
                </View>
            );
        }

        return (
            <View />
        )
    }
}

这个尝试还有点粗糙,但我正在努力将其转化为一个库,您可以在其中指定最大高度、宽度和要使用的覆盖层,它会处理剩下的部分:https://github.com/nudgeyourself/react-native-flexible-thumbnail


网页内容由stack overflow 提供, 点击上面的
可以查看英文原文,
原文链接