Swift SceneKit光照和影响发射纹理

5
我正在开发一个关于太阳系的应用程序。 
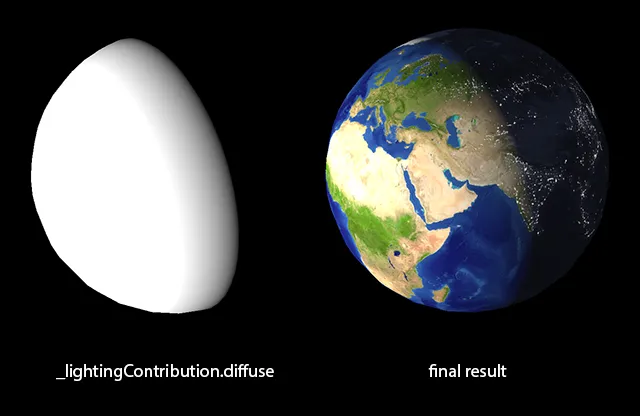
我试图关闭发射纹理,即当光线照射行星表面时显示的发射点。但问题是,默认情况下,发射纹理始终显示发射点,无论光线是否存在。 我的要求简而言之:(我想隐藏发射点,在光线照射表面的地方)enter image description here
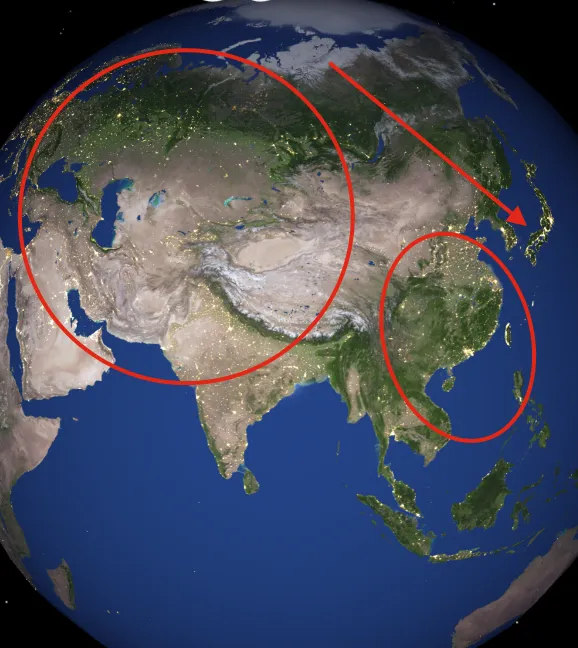
override func viewDidLoad() {
    super.viewDidLoad()

    let scene = SCNScene()

    let earth = SCNSphere(radius: 1)
    let earthNode = SCNNode()
    let earthMaterial = SCNMaterial()
    earthMaterial.diffuse.contents = UIImage(named: "earth.jpg")
    earthMaterial.emission.contents = UIImage(named: "earthEmission.jpg")
    earth.materials = [earthMaterial]
    earthNode.geometry = earth
    scene.rootNode.addChildNode(earthNode)

    let lightNode = SCNNode()
    lightNode.light = SCNLight()
    lightNode.light?.type = .omni
    lightNode.position = SCNVector3(x: 0, y: 10, z: 5)
    scene.rootNode.addChildNode(lightNode)

    sceneView.scene = scene


}

目前面临相同的问题,发射应该仅在夜间显示,即由SCNLight照亮的一侧。有人有任何想法吗? - Bersaelor
SceneKit有纹理的位图遮罩功能吗? - Confused
2个回答

10

SceneKit的着色器修改器非常适合这种任务。

您可以在此处查看最终结果的镜头。

片段着色器修改器

_lightingContribution.diffuse的视觉表示和着色器修改器的最终结果

我们可以使用_lightingContribution.diffuse(代表应用于漫反射的光照的RGB(vec3)颜色),来确定一个对象(在本例中为地球)的被照亮区域,并将其用于在片段着色器修改器中遮罩发射纹理。

您可以随意使用它,这是我想出的最简单的解决方案(使用GLSL语法,但如果您使用它,则会自动转换为Metal)。

uniform sampler2D emissionTexture;

vec3 light = _lightingContribution.diffuse;
float lum = max(0.0, 1 - (0.2126*light.r + 0.7152*light.g + 0.0722*light.b)); // 1
vec4 emission = texture2D(emissionTexture, _surface.diffuseTexcoord) * lum; // 2, 3
_output.color += emission; // 4
  1. 计算_lightingContribution.diffuse颜色的亮度(使用此处的公式)(如果光照不是纯白色)
  2. 从1中减去它,以获得“暗面”的亮度
  3. 使用漫反射UV坐标从自定义纹理获取发射,并通过乘法应用亮度
  4. 将其添加到最终输出颜色中(与常规发射应用方式相同)

着色器部分就这样,现在让我们看看Swift方面的事情。


Swift设置

首先,我们不会使用材质的emission.contents属性,而是需要创建一个自定义的SCNMaterialProperty

let emissionTexture = UIImage(named: "earthEmission.jpg")!
let emission = SCNMaterialProperty(contents: emissionTexture)

使用setValue(_:forKey:)将其设置为材料

earthMaterial.setValue(emission, forKey: "emissionTexture")

注意:关注关键点 - 它应该与着色器修饰符中的统一变量相同。此外,您不需要自己持久化材质属性,setValue 会创建一个强引用。

现在只需将片段着色器修改器设置为材质即可:

let shaderModifier =
"""
uniform sampler2D emissionTexture;

vec3 light = _lightingContribution.diffuse;
float lum = max(0.0, 1 - (0.2126*light.r + 0.7152*light.g + 0.0722*light.b));
vec4 emission = texture2D(emissionTexture, _surface.diffuseTexcoord) * lum;
_output.color += emission;
"""
earthMaterial.shaderModifiers = [.fragment: shaderModifier]

以下是这个着色器修改器的运动镜头视频

请注意,光源必须非常亮,否则“球体”周围会出现暗淡的灯光。在您的设置中,我不得不将lightNode.light?.intensity设置为至少2000才能按预期工作。您可能需要尝试计算发光度并将其应用于发射以获得更好的结果。


如果您需要,_lightingContribution是片段着色器修改器中可用的结构,还具有ambientspecular成员(下面是Metal语法):

struct SCNShaderLightingContribution {
    float3 ambient;
    float3 diffuse;
    float3 specular;
} _lightingContribution;

谢谢Lësha,这正是我所需要的。我也很高兴现在知道如何设置着色器修改器,在Unity中做过,但还没有在Swift/Scenekit中尝试过! - Bersaelor

1

我喜欢Lësha的回答,对着色器进行了小修改,以便它可以在较低的光照条件下工作。添加了一个阈值(t),低于该阈值的发射值将不会显示,在阈值和零之间,它会在漫反射和漫反射+发射之间插值。更改t值会调整表示夜间和白天过渡的带的宽度。由于我使用的发射纹理看起来过于明亮,因此还在发射公式上附加了一个0.5乘数。

let shaderModifier =
"""
uniform sampler2D emissionTexture;

vec3 light = _lightingContribution.diffuse;
float lum = max(0.0, 1 - (0.2126*light.r + 0.7152*light.g + 0.0722*light.b));
vec4 emission = texture2D(emissionTexture, _surface.diffuseTexcoord) * lum * 0.5;
float t = 0.11; // no emission will show above this threshold
_output.color = vec4(
    light.r > t ? _output.color.r : light.r/t * _output.color.r + (1-light.r/t) * (_output.color.r + emission.r),
    light.g > t ? _output.color.g : light.g/t * _output.color.g + (1-light.g/t) * (_output.color.g + emission.g),
    light.b > t ? _output.color.b : light.b/t * _output.color.b + (1-light.b/t) * (_output.color.b + emission.b),1);
"""

网页内容由stack overflow 提供, 点击上面的
可以查看英文原文,
原文链接